My mother loved Almond Roca. Or at least we all thought she did. The poor woman got a can of it every year on her birthday and Mother’s Day. It wasn’t until I was an adult that she confessed that she didn’t really like it. But then she had my homemade version … and changed her mind!
I have been making candy since before I can remember so I am one of the lucky ones that never feared it. I know to be careful of the boiling sugar (the worst burn you can get!), that sugar won’t caramelize well on humid or rainy days, to follow my instincts about how long to cook it, and how to pull taffy by hand.
Candy is fun to make, but I’m always prepared for it to fail and to start over if needed. Candy making is mercurial. One day it is comes out perfectly; the next it is a massive failure. And never turn your back on it – if you get distracted, the next thing you know it will get too hot and there is no way to get rid of that burned flavor. But there are a couple of things that will help your experiences be more consistent and pleasurable.
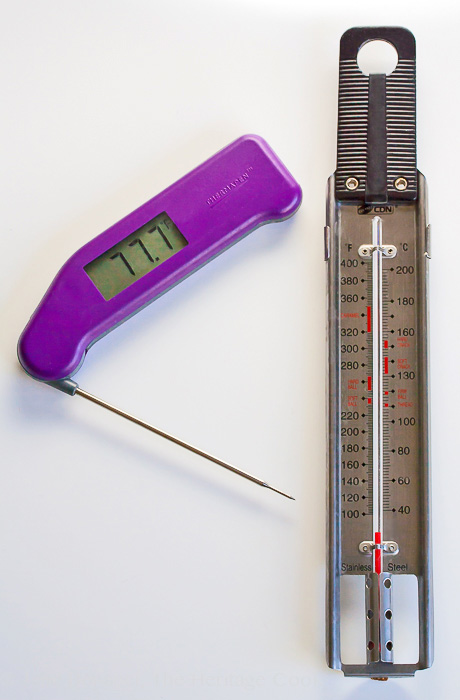
For consistent results and success every time, you need a thermometer. Either a candy thermometer that attaches to the pan (on the right above) or a good instant read that you can dip into the candy to judge temperature accurately. My favorite is the Thermapen, the Rolls Royce of thermometers. Even my grandmother, who rarely measured anything carefully, used a thermometer. They don’t have to be expensive and will save you hundreds of dollars in ruined ingredients if you undercook or overcook your candies.
Let’s talk about corn syrup for a minute, the second tip for success when caramelizing sugar. With all the negative press about High Fructose Corn Syrup these days, a lot of people confuse it with regular corn syrup and don’t want to use either one of them in their cooking. In general I agree and use alternatives most of the time, but there is one exception – candy.
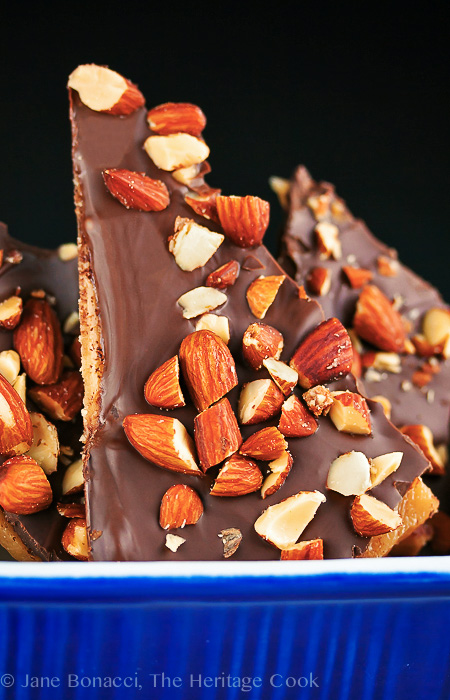
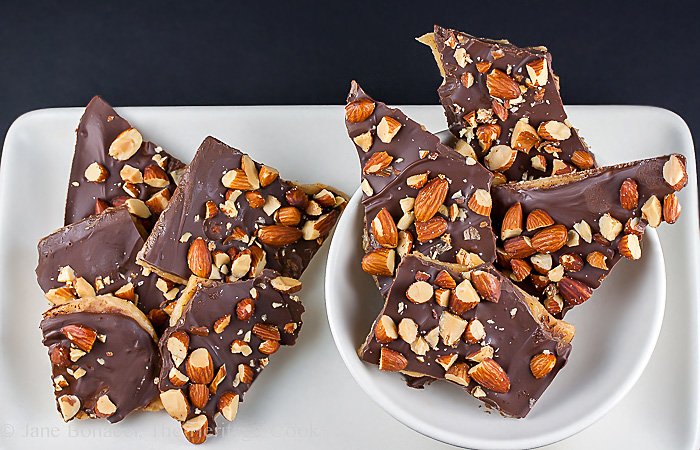
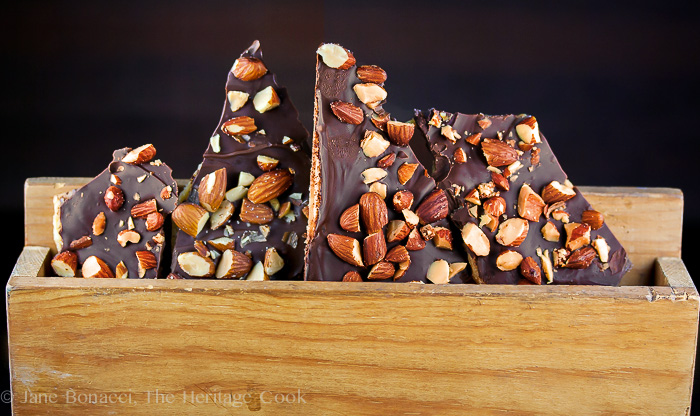
Whole slab of chocolate covered caramel with chopped almonds
When I am making candy, especially any kind of caramel, I always add a little corn syrup because it helps reduce the chances of crystallization. If there are any sugar crystals on the sides of the pan or on a spoon you’ve used for stirring, and they get reintroduced back into the cooked candy, it can cause a chemical reaction. Suddenly your lovely caramel becomes sandy and gritty again. When the challenges are already high enough, a little insurance doesn’t hurt. 😉
In any recipe where there are very few ingredients, each one takes on more importance. In this case, using 100% cane sugar, such as C&H brand, and grass-fed/pastured butter, such as #Kerrygold or #OrganicValley brands makes a HUGE difference in the quality of your finished candy. And an added benefit is that they are much healthier for us to consume.
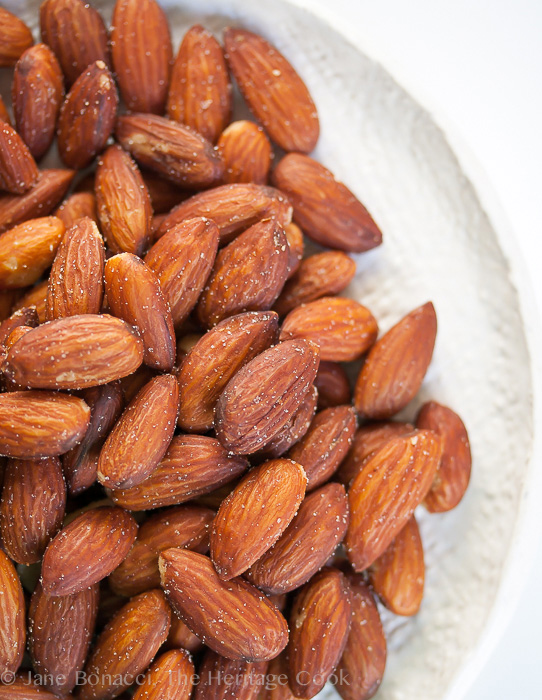
Salty roasted almonds are the perfect balance for the sweetness of the toffee and chocolate
Today’s recipe is similar to Almond Roca, but a lot easier to make at home. You can make this with any kind of nut you like, but the roasted, salted ones I used add a delightful crunch and salty balance to offset the sweetness. I chose to make mine in a half-sheet pan with sides and it worked fine, but it took nearly twice as much chocolate as I thought it would and the toffee part wound up being quite thin. Use the 9×13-inch pan as I suggest below and your toffee layer will be much thicker, just right to eat with the chocolate layer.
The Artist went on a bike ride today and his friend he was riding with was very upset when she found out what I was making for this week’s Chocolate Monday. She made him promise to set some of the candy aside for her and her family to share. Thank goodness because otherwise I would eat it all myself, LOL!
Happy Chocolate Monday everyone ~ have a fabulous week!
Gluten-Free Tips:
English toffee is easy to adjust for gluten-free. Make sure you are using gluten-free chocolate, almonds, and cocoa powder. If your ingredients aren’t labeled, consult with the manufacturer. See additional notes at the end of the recipe.
Kitchen Skill: Calibrating Your Thermometer
Fill a large, heavy bottomed saucepan, about halfway with water. Place over high heat and bring to a boil. Insert your candy thermometer in the water. It should register 212°F. If it shows anything else, adjust the final candy temperature accordingly. For example, if it registers 200°F, reduce the final cooking temperature by 2 degrees. If it registers 217°F, increase the final cooking temperature by 5 degrees.
- 2 to 3 cups chopped, salted almonds* (gluten-free if needed)
- Softened butter for the pan, about 1 tbsp
- 2 tbsp cocoa powder, in a small, fine wire sieve or sifter
- 2 cups (4 sticks/1 lb) butter, at cool room temperature, cut into pieces
- Pinch kosher or sea salt
- 2 cups granulated sugar
- 1 tbsp light corn syrup
- 1(12 oz bag) semisweet** chocolate chips (gluten-free if needed)
- Toast the Almonds: Pour the chopped almonds into a dry skillet and toast them over medium heat, stirring often, until fragrant, about 3 minutes. Remove from the heat and transfer to a plate.
- Butter a 13 x 9 x 1-inch baking pan. Set next to the stove. Pour about 3 tbsp of unsweetened cocoa powder into a small fine wire sieve. Set next to the pan.
- Attach the candy thermometer to the edge of a heavy 4-quart saucepan, preferably nonstick, without allowing it to touch the bottom of the pan. Alternately, you can use an instant read thermometer to measure the temperature as the candy cooks.
- Cook the Toffee: Place the butter and salt in the saucepan and melt over medium-high heat. Add the sugar and corn syrup. Bring to a boil, stirring gently with a heatproof spatula or wooden spoon***. You don’t want to splash any sugar crystals onto the sides of the pan if can avoid it.
- Reduce the heat to medium or medium-low, keep at a low boil**** and cook until the candy reaches 295°F. Periodically stir the candy, staying mostly in the center of the pan. I stir in a figure-8 motion to make sure nothing is sticking and keep the ingredients blended. Give the candy a quick final stir if the butter is separating at all to reincorporate it.
- Remove the pan from the heat and immediately pour into the prepared pan. Using hot pads, tip the pan if needed to get the candy into the corners.
- Let the candy sit at room temperature until cool, giving it time to set up. This can take an hour or more depending on the temperature in your kitchen. Feel the bottom of the pan with your hand to judge how cool it is.
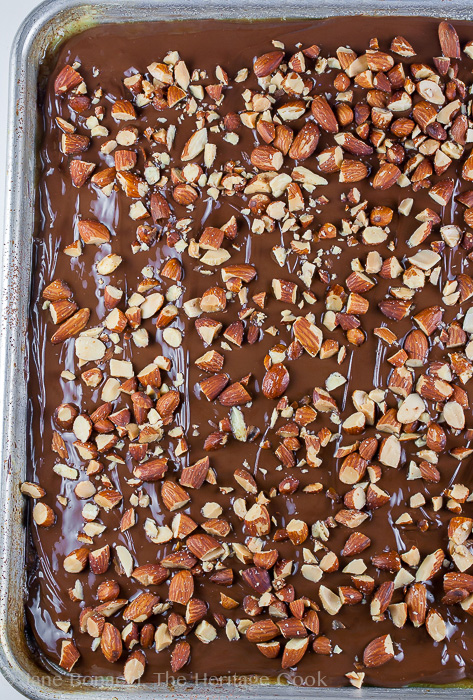
- When it is cool, very lightly sift the cocoa powder over the top of the caramel. You don’t need to use it all if your pan is smaller. This helps absorb any excess butter on the surface and help the chocolate adhere to the toffee more easily.
- Cover Toffee with Chocolate: Pour the chocolate chips into a microwave-safe bowl and heat in 10-second increments until melted. The chips may deceptively hold their shape even when the interior is melted, so stir occasionally until they are completely softened. Then stir until smooth. Using an offset spatula spread the chocolate evenly over the entire surface. Immediately sprinkle the top with the chopped almonds. Press gently into the melted chocolate, being careful not to burn your hands on the hot chocolate.
- Set the pan aside and cool at room temperature, about an hour. Then transfer to the refrigerator to chill for 30 minutes. This will help the caramel contract making it easier to remove from the pan. Use a flexible metal spatula (I used my offset) to release the candy from the pan (slip it under one side and lift up) and then use your hands to break it into pieces. If they are bite-sized they are easier to eat.
- To Store: Transfer to an airtight tin or resealable plastic bag and store in the refrigerator to keep the chocolate firm and the toffee brittle.
- Yield: about 2 pounds
- * As long as you are not using flavored or seasoned almonds, they should be gluten-free. Check the label to be sure. If someone has an allergy to almonds, use pecans or other nuts instead or leave them off completely.
- ** You can use milk, bittersweet, or a blend of any type of chocolate to coat the toffee.
- *** If you are cooking for someone who is celiac, do not use wooden utensils unless they are brand new and freshly washed. The grain of the wood can absorb gluten and make someone sick. The best choice these days is a silicon spatula or spoon (that can handle high heat). They do not trap anything and can be used safely.
- **** If your candy separates, you probably cooked it over too high heat. Try beating it in before you pour it into the pan to blend it back together. If that doesn’t work, start over and boil at medium-low. This gives the sugar time to caramelize before reaching the correct temperature for the soft/hard crack.
Create a New Tradition Today!
Let’s connect! If you ever need any entertaining or cooking advice, need to alter a recipe for gluten-free, or want recipe suggestions, don’t hesitate to email me. I can also be found at the social media site links on this page. This post may contain Amazon affiliate links. If you purchase a product via my link, it doesn’t cost you anything and I earn a tiny commission, which helps defray the costs of producing The Heritage Cook blog. Thank you for supporting me.
Welcome to The Heritage Cook Family!
Unauthorized use, distribution, and/or duplication of proprietary material from The Heritage Cook without prior approval is prohibited. This includes copying and reprinting content and photographs. If you have any questions or would like permission, I can be contacted here. Feel free to quote me, just give credit where credit is due, link to the recipe, and send people to my website. The suggestions here are not intended as dietary advice or as a substitute for consulting a dietician, physician, or other medical professional. It is the reader’s sole responsibility to determine which foods are appropriate and safe for their family to consume. The author makes no claims regarding the presence of food allergens and disclaims all liability in connection with the use of this site. Please see the Disclaimers page for additional details.
Thank You!