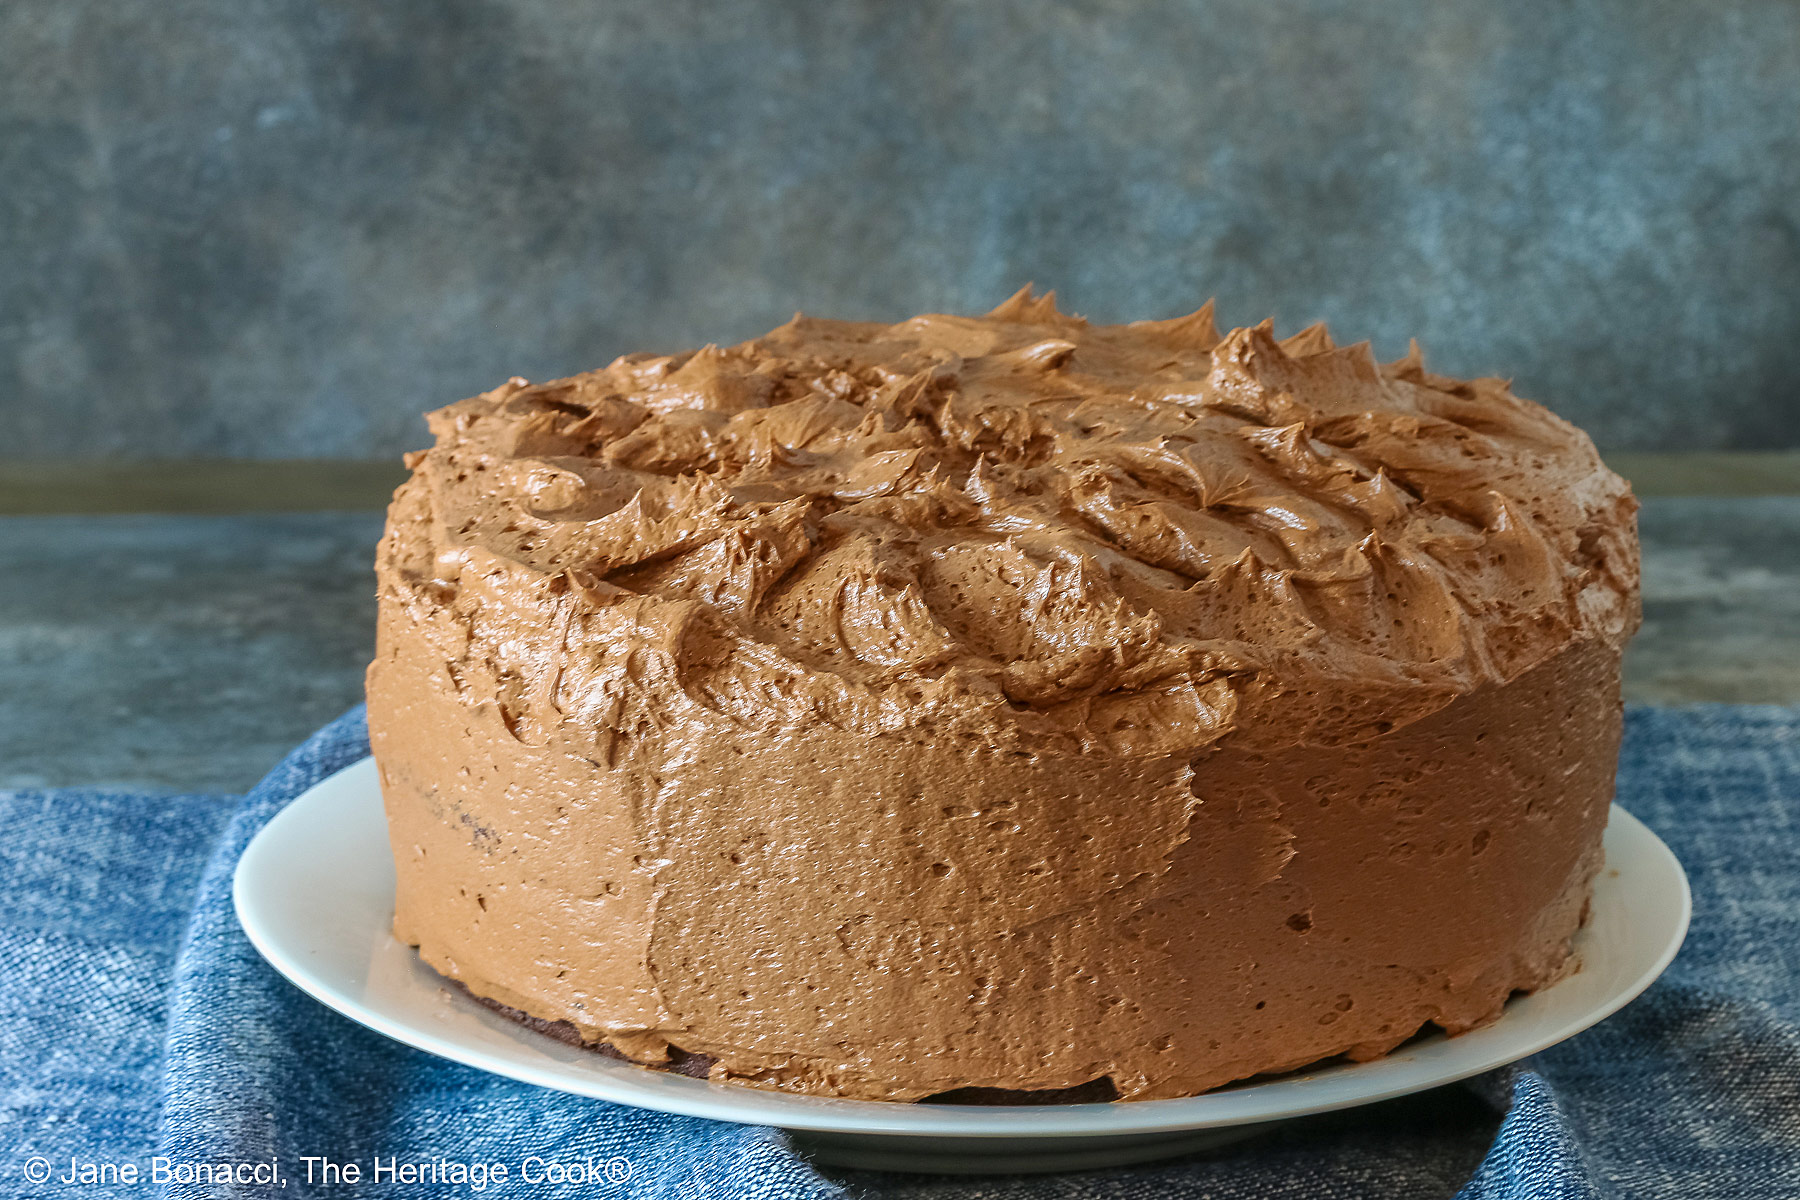
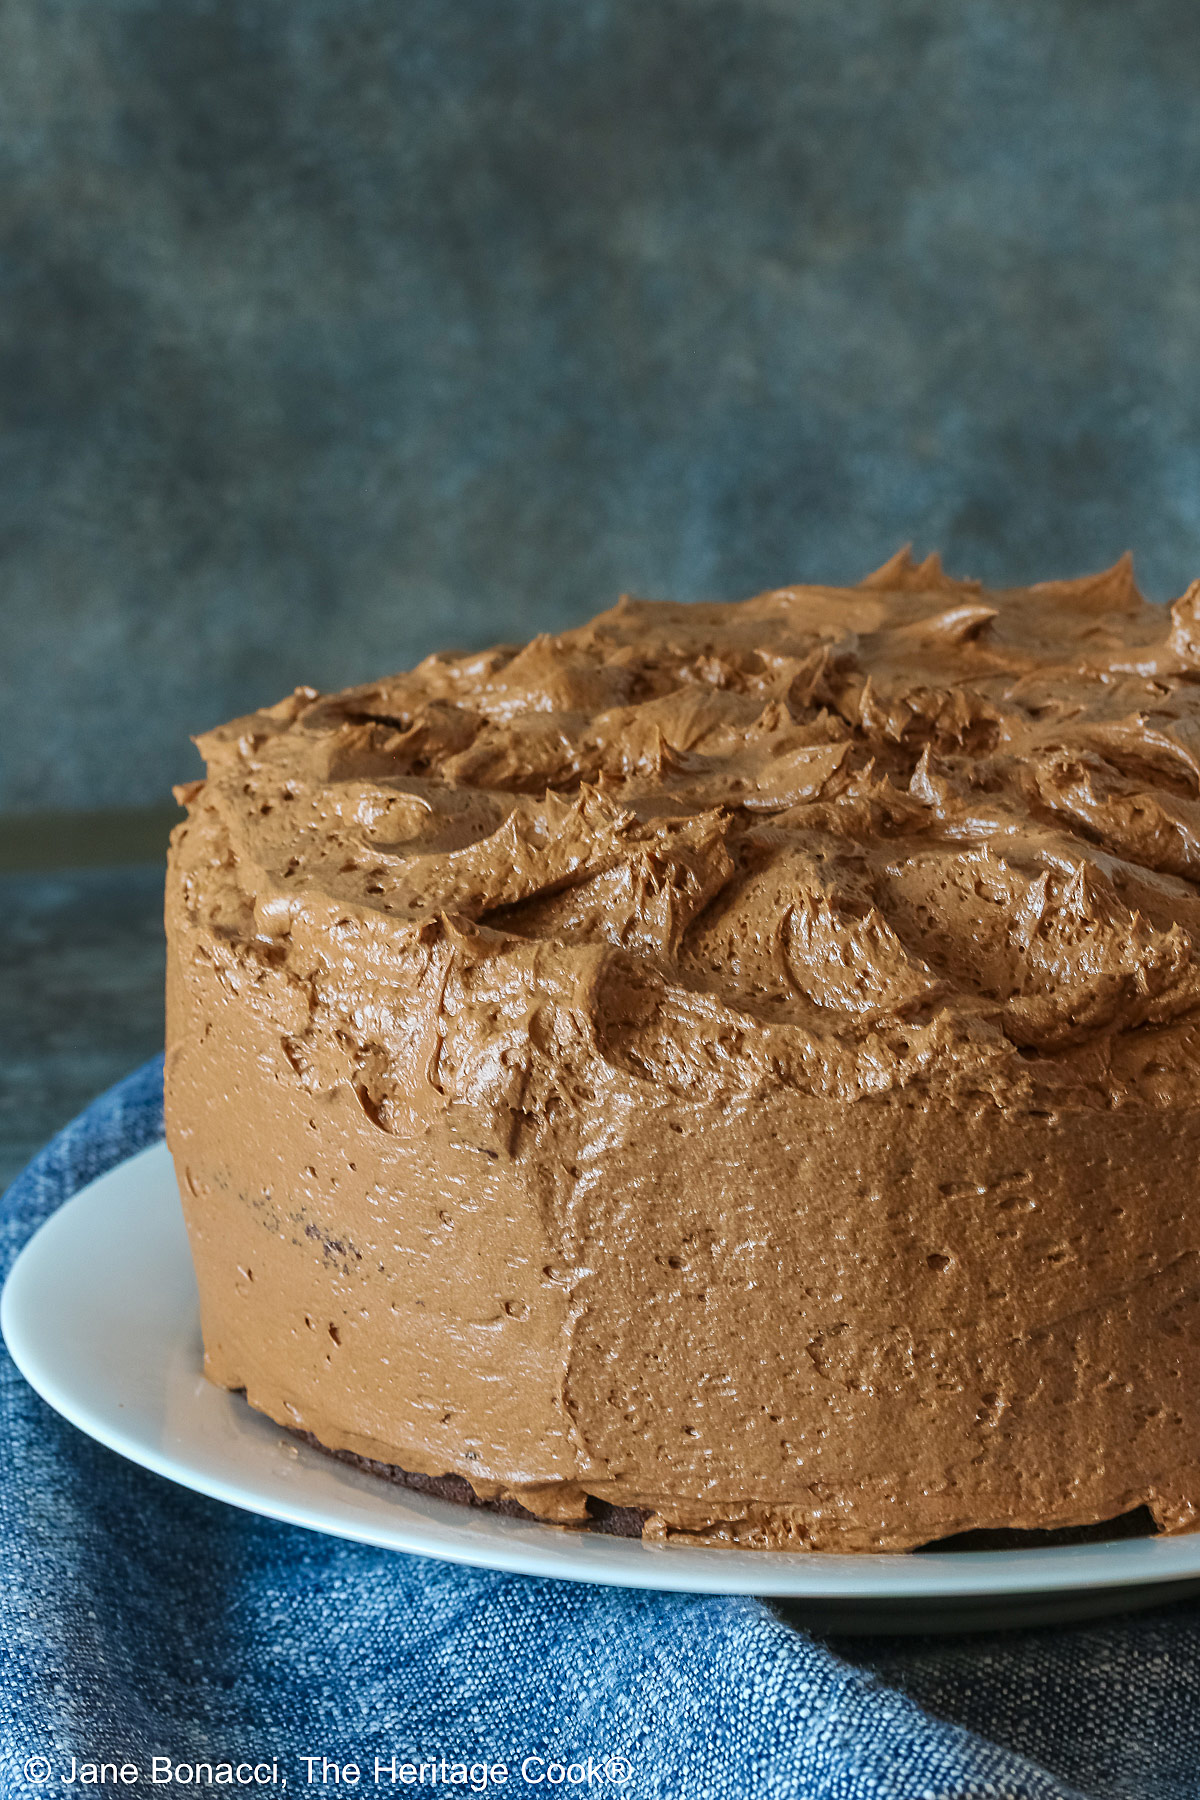
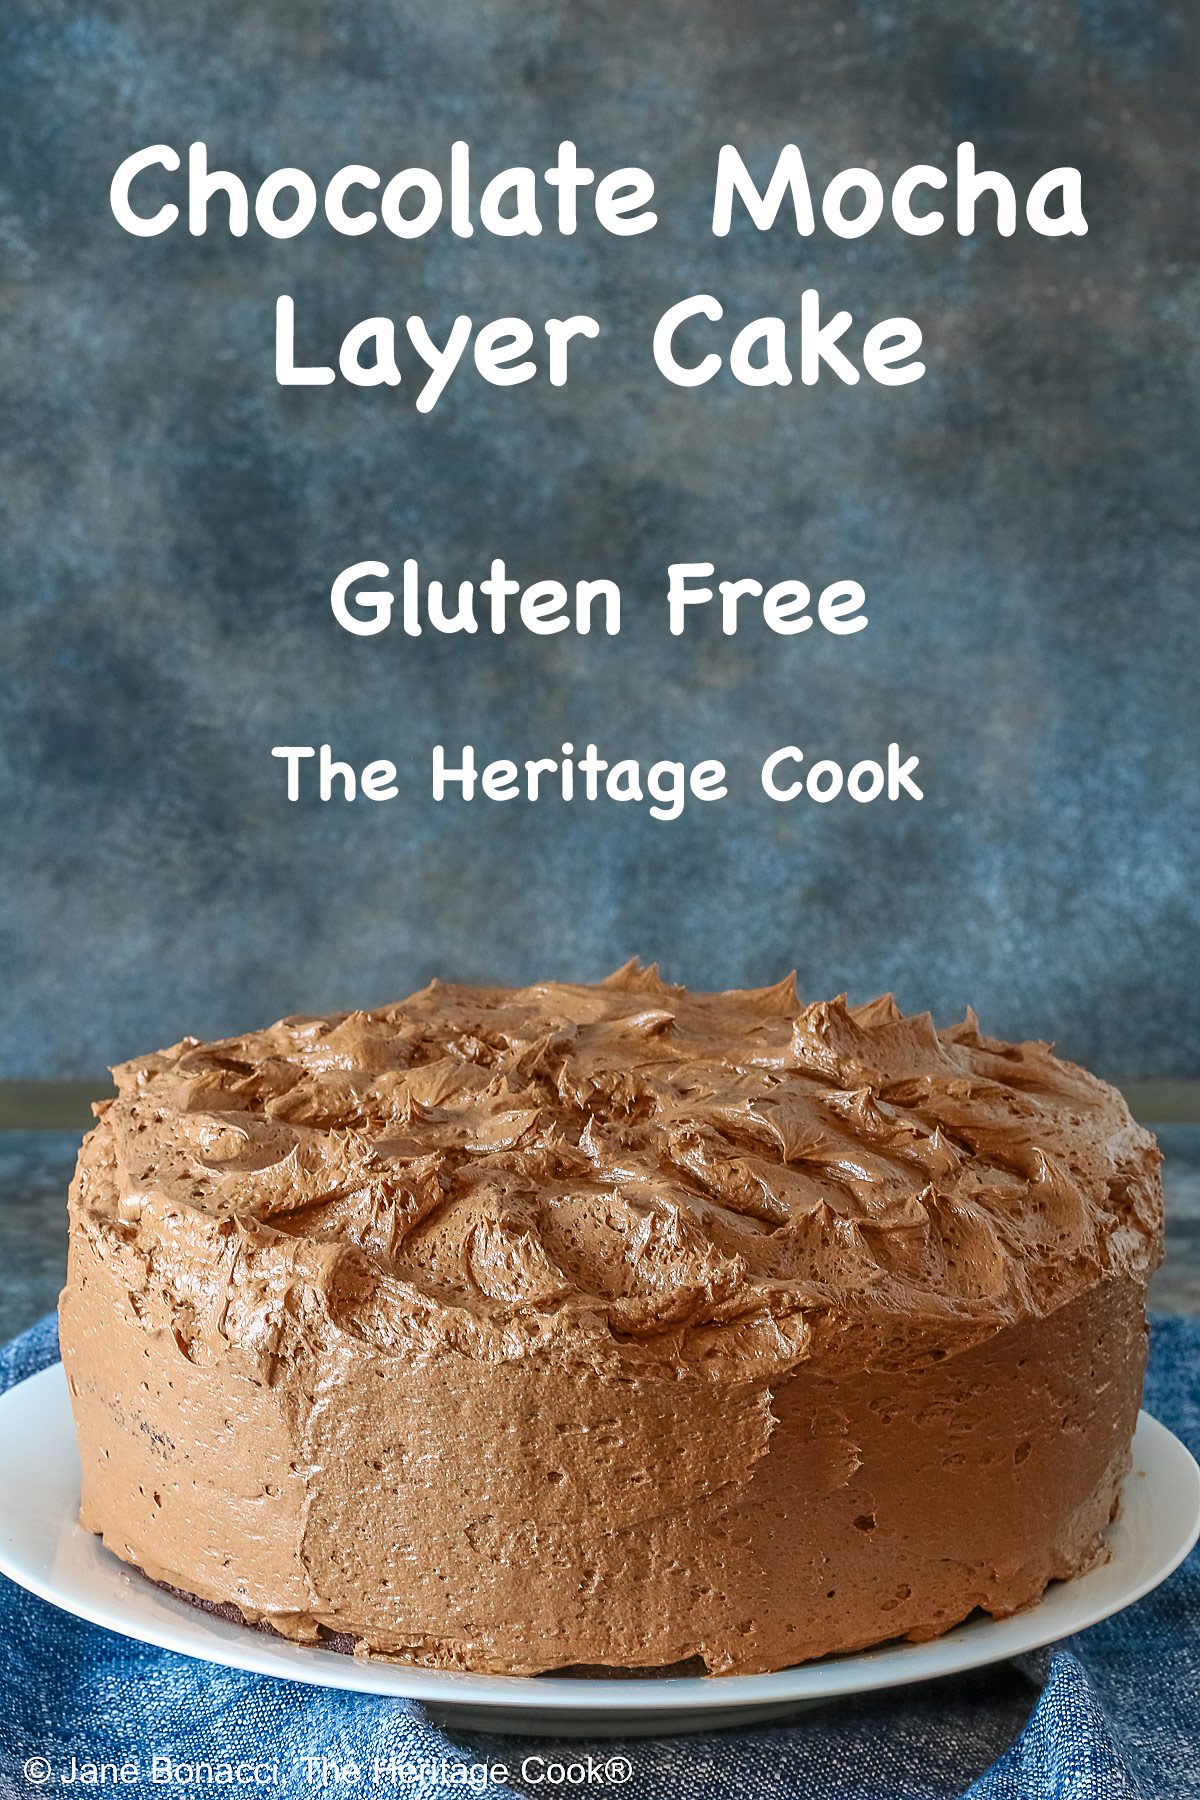
 Is there anything better than a towering, mouthwatering layer cake? Especially a chocolate cake with chocolate frosting! It is one of life’s greatest pleasures to have this beautiful chocolate mocha layer cake in front of you, waiting to slice and dive into it!
There is a secret ingredient in this cake that you would never guess was there if you didn’t already know! It is mayonnaise – and before you turn up your nose and say yuck, it is really just eggs and oil, ingredients regularly found in cake recipes. This is a short cut and utilizes a common pantry item. I love the moistness and tenderness I get when I use it.
And surprise, the cake itself is dairy-free! No butter needed, the mayonnaise takes its place in the batter and the eggs give you plenty of protein even if you are using gluten-free flour!
If you are going for dairy-free, you can sift powdered sugar on top of the cake or use a raspberry sauce on the plate under each serving in place of the frosting. Yum!
When you are adding the chocolate/coffee mixture, it will take several additions before it starts to look like a chocolate batter – it will be very pale in the beginning. But never fear, it will become a beautiful, deep chocolate color by the time you are done adding all the flour mix and chocolate/coffee liquid.
If you are concerned about using coffee and mayonnaise, you cannot taste either in the finished cake. They enhance the flavor of the chocolate and give you a beautiful cake to enjoy with family and friends.
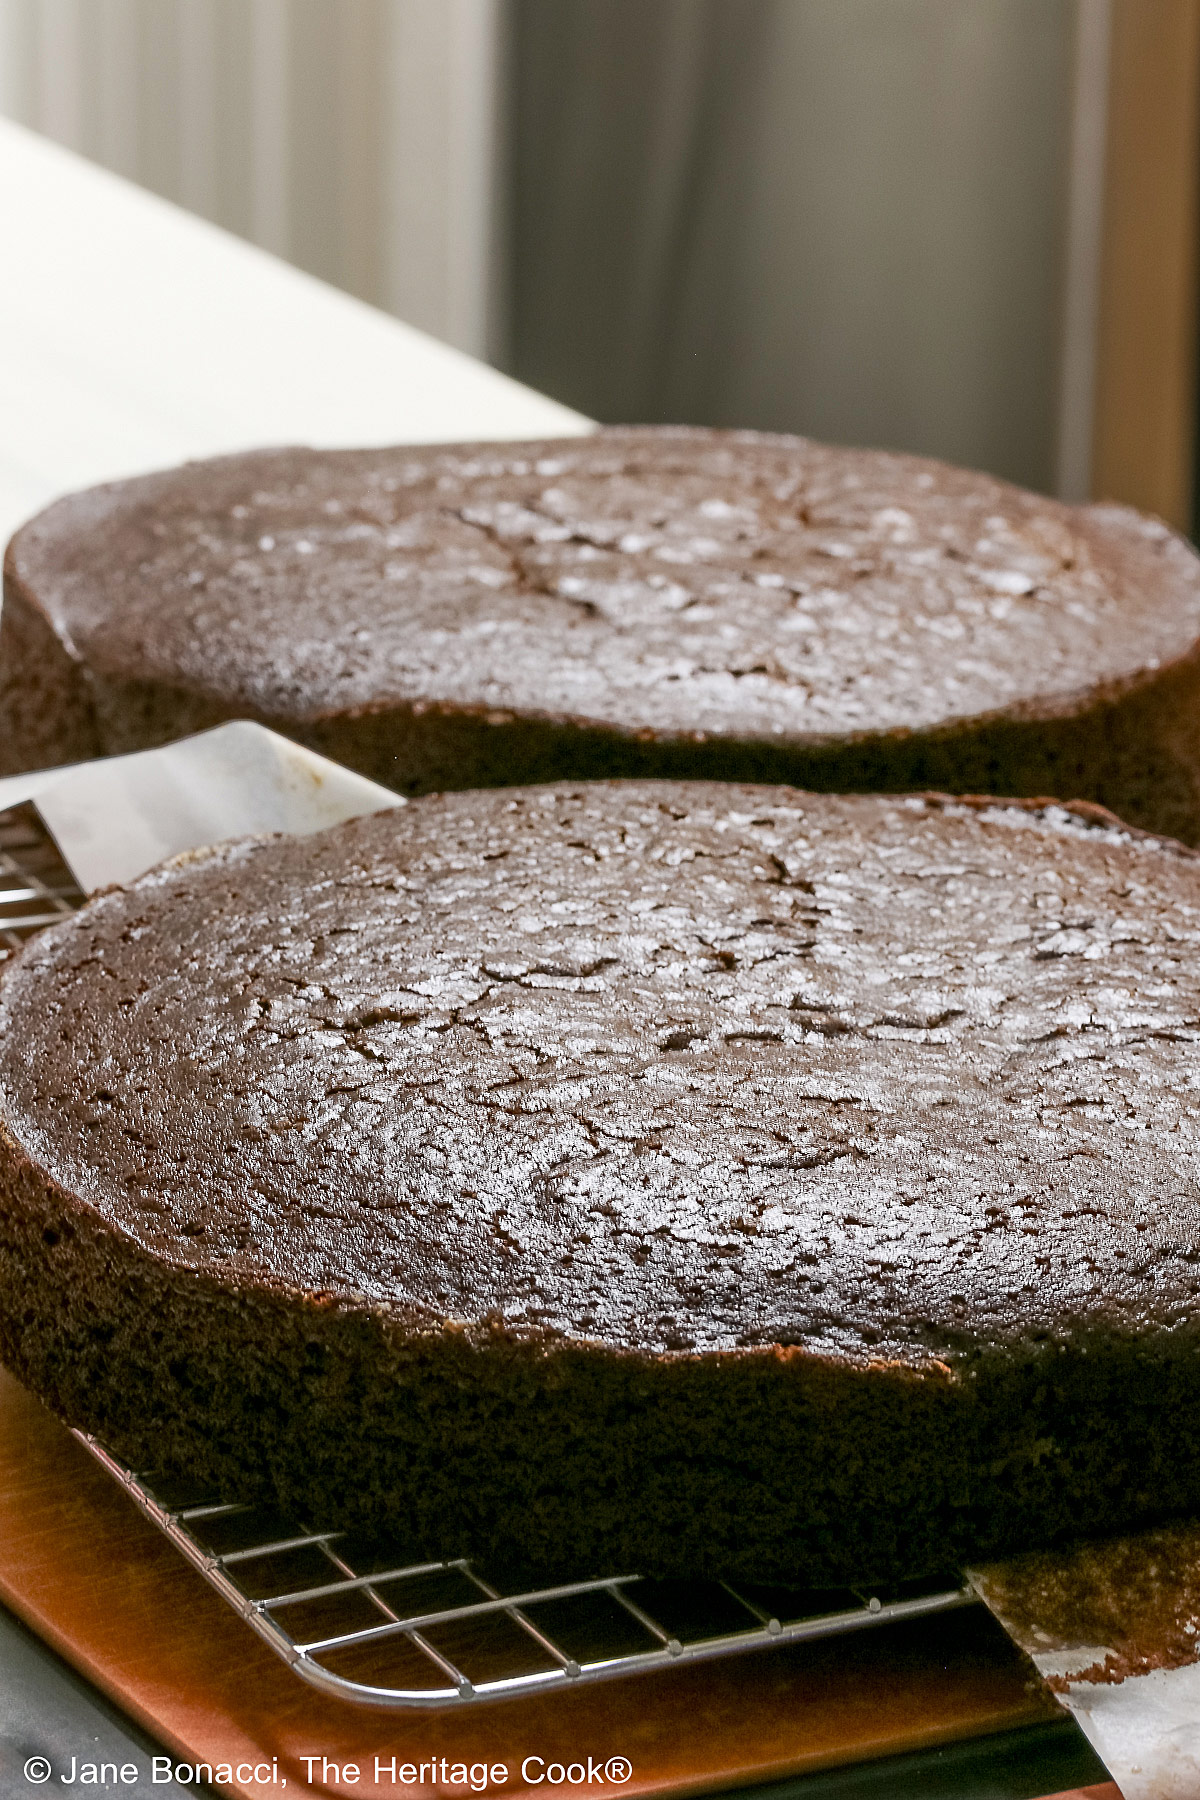
When you are dividing the batter in the baking pans, have them next to each other on the counter. That way you can better judge when they are even. Mine were not next to each other and I wound up with one deeper than the other. No problem except one needed more time in the oven.

I used two 9×3-inch (23x8cm) baking pans because that is what I have and it took quite a bit more than the stated time to bake fully. I pulled the first layer when the toothpick had a few moist crumbs on it. At that time the center of the second layer was nearly liquid so I kept going back to check and finally it was done and came out too.
If you use 9×2-inch (23x5cm) pans they will probably be done closer to the time given. But always use the toothpick test to be sure the layers are done baking all the way to the center. Remember that every oven is different!
If you have to bake the layers on separate racks in the oven, be sure you rotate them and swap top for bottom racks halfway through the baking time for the most even baking.
Be sure the cake layers are completely cooled before you begin to assemble the cake. If not, your buttercream frosting will melt and make a real mess. It is worth the wait to be sure there is no lingering heat in the center of your layers. And you can use whatever frosting you love. My dad always asked for caramel frosting which was absolutely delectable! Use your favorite.
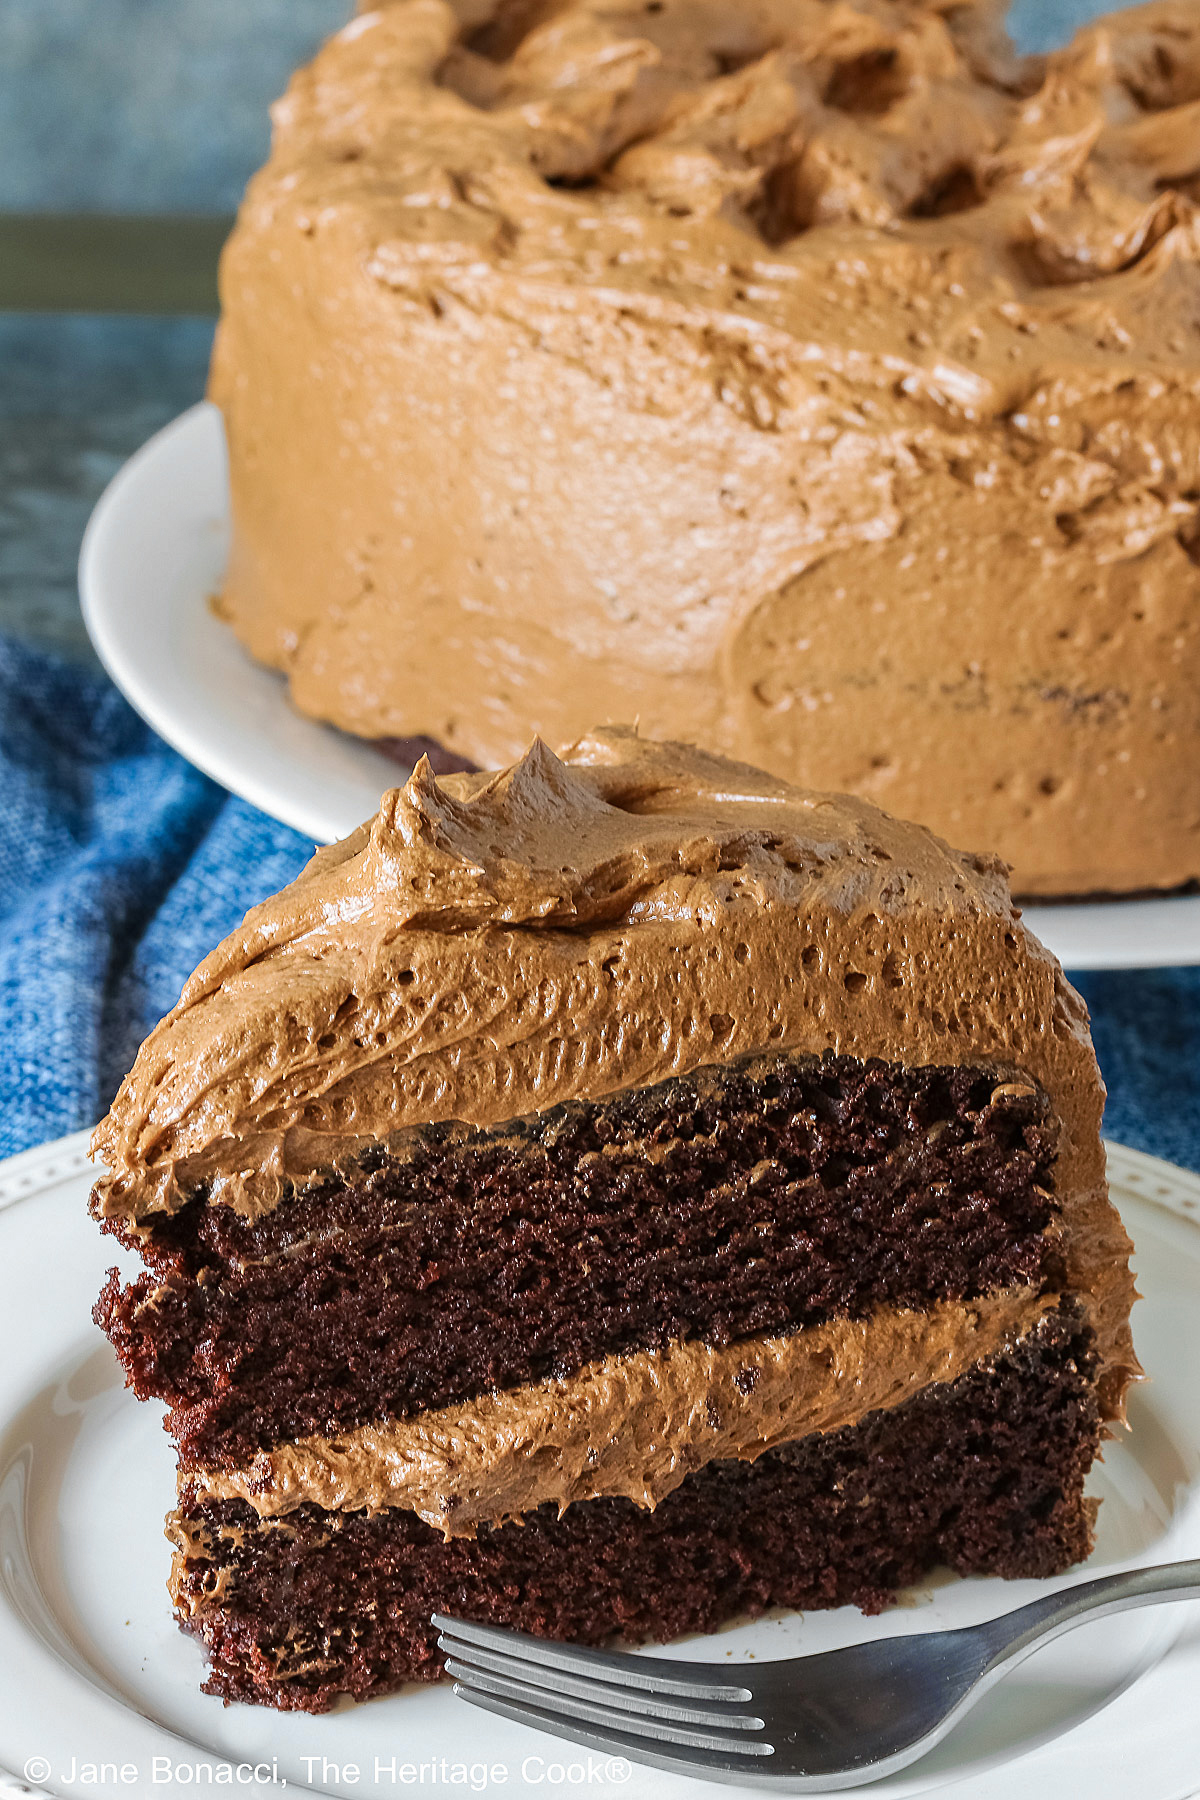
I left my layers whole and thicker but if you want more layers or thinner ones, you are welcome to cut them in half horizontally. It makes for a more impressive presentation when you cut the slices. You will probably need a bit more frosting, so you can increase it by another quarter.
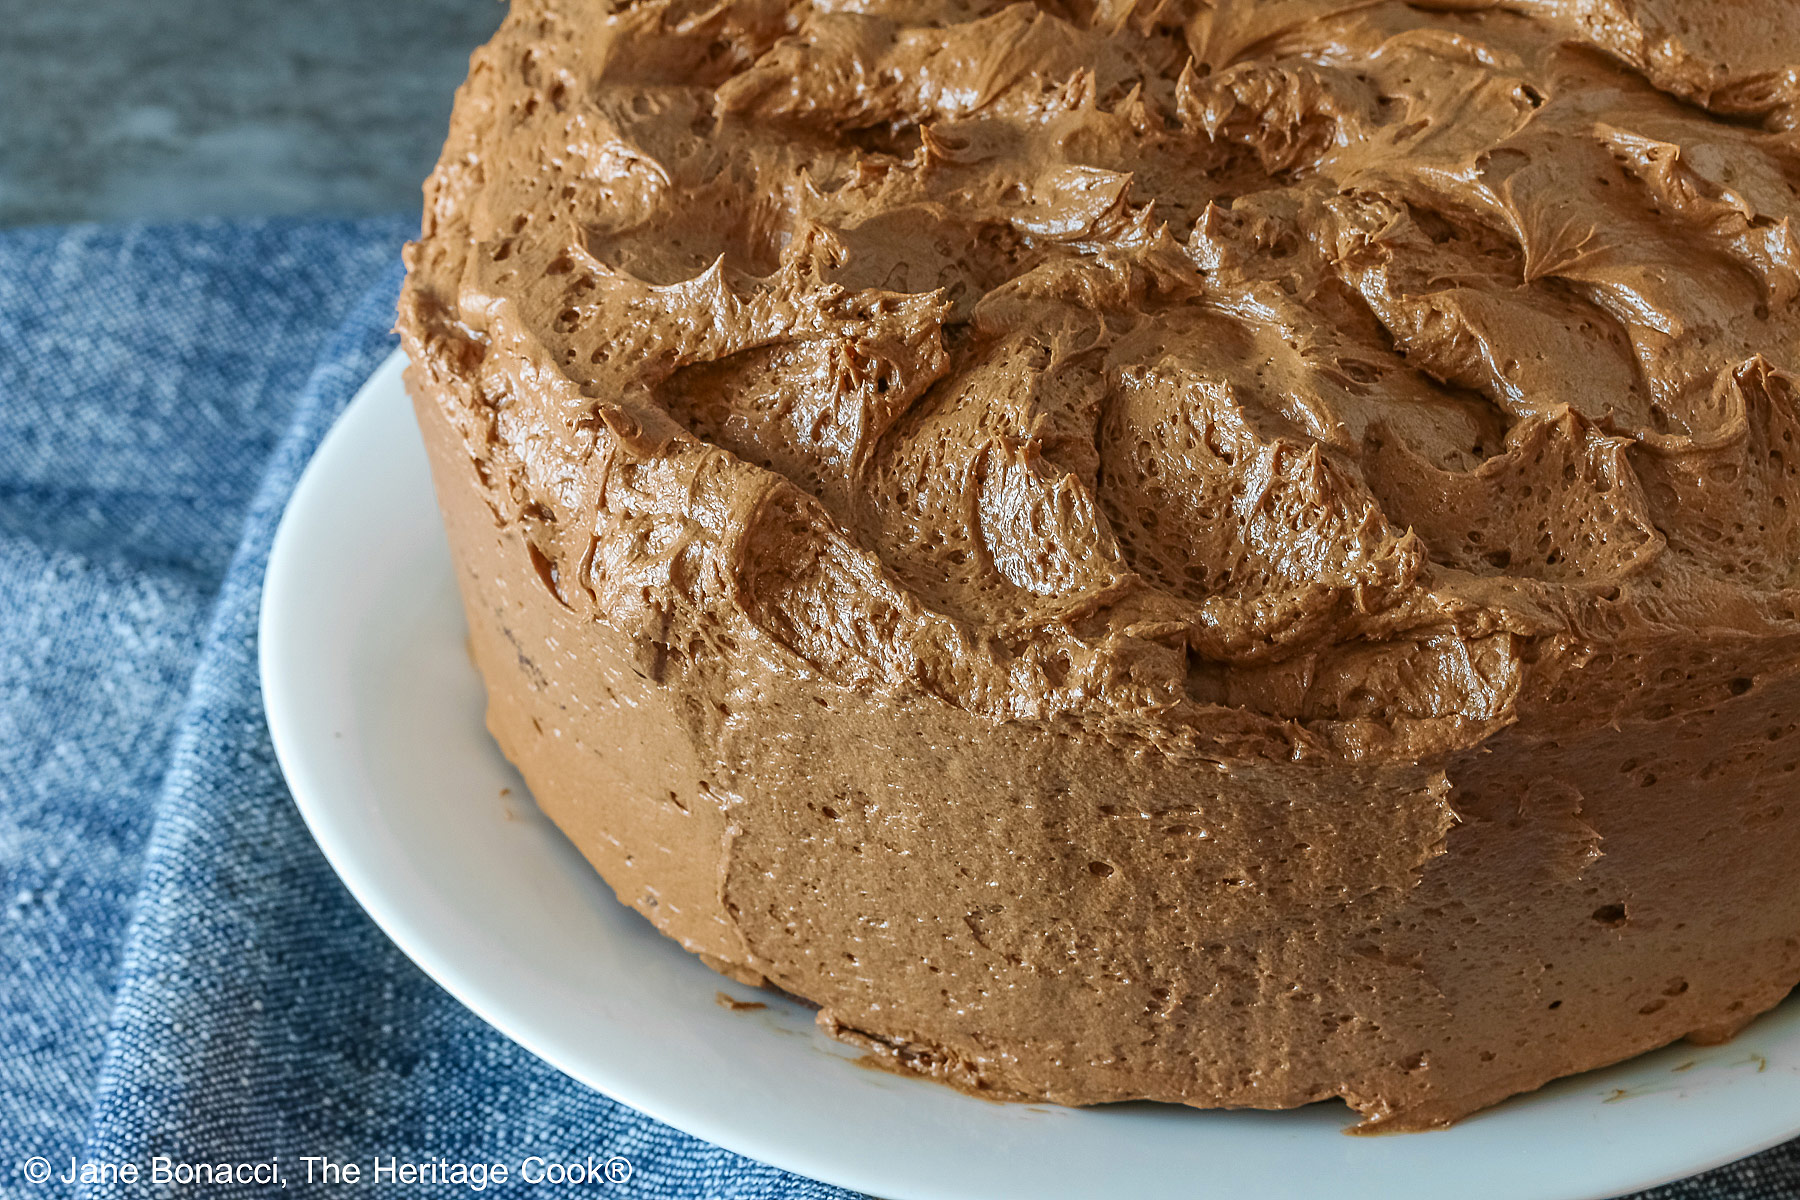
This is one gorgeous and impressive cake – layer cakes always are! The deep chocolate flavor of the cake is enhanced by the creamy buttercream frosting. This gives you amazing, luscious slices for each of your guests and everyone will be swooning with delight at every bite!

If you try this recipe, let me know! Please leave a star rating in the recipe card, comment below, and don’t forget to snap a pic and tag it @theheritagecook on Instagram! Seeing your creations makes my day and I love hearing from you!
Ingredients needed for Chocolate Mocha Layer Cake:
- Cake: brewed coffee, cocoa powder, flour, baking soda, salt, sugar, eggs, mayonnaise, vanilla
- Frosting: cocoa powder, salt, butter, confectioners’ sugar, heavy cream or half and half, vanilla, espresso powder
PRO Tip:
The cocoa won’t dissolve in the coffee easily. Take your time and whisk until all the lumps disappear, about 3 minutes. Be sure you work your way around the edges of the bowl because you won’t be able to see the solid chocolate easily. And be sure to whisk again before adding it to the batter.
PRO Tip:
Always read the recipe (and Pro Tips) completely through a couple of times before you begin so you are prepared for all the steps. I print out a copy of the recipe and tape it to the cupboard at eye level to make it easier to read, keep clean, and make notes on.
How to make Chocolate Mocha Layer Cake:
- Make the Cake: Whisk together the hot coffee with the cocoa powder in a bowl. Let stand until cooled to room temperature. In another bowl, whisk together the flour, baking soda, baking powder, and salt.
- Cream the sugar and eggs, beating until light and fluffy, about 4 minutes. Add the mayonnaise and vanilla, mixing to combine. Then alternating the dry ingredients with the coffee/cocoa add to the egg mixture, a little at a time, beginning and ending with the dry ingredients. Beat until smooth and creamy.
- Divide evenly between buttered and parchment-lined baking pans and bake at 350°F (180°C) until a toothpick inserted in the center comes out with a few moist crumbs, 22 to 25 minutes. Timing will be longer if you use two 9×3-inch (23x8cm) baking pans.
- Cool cake layers in their pans for 20 minutes on a wire rack, then turn them out and place back on the rack to cool completely, about 30 more minutes.
- Prepare the Frosting: Whisk the cocoa powder in the bowl of your stand mixer or a large bowl if using a hand mixer. Add the salt and butter, mixing until smooth. Add a cup of the confectioners’ sugar with a tablespoon of the milk, mix to blend then increase speed to medium speed and beat about a minute to lighten the mixture. Repeat until all the sugar and milk have been added.
- Add the vanilla and espresso powder, mixing to combine evenly. You want a spreadable frosting. If it appears too dry, add more milk a tablespoon at a time. If too wet, add more sugar, a tablespoon at a time until it reaches the right consistency.
- Assemble the Cake: Place a cake layer, round side down on a serving plate. Spread about 3/4 cup (177 ml) frosting over the top. Set the second layer, round side up, on top – if using 3 layers, use about 1/2 cup (118 ml) of frosting between the layers. Spread remaining frosting over the sides and top of the cake. Set aside to allow the frosting to firm up a bit before slicing and serving.
PRO Tip:
To keep the serving plate clean while frosting the cake, tuck strips of parchment paper under the cake until the plate is completely covered. Frost all the cake layers and when done, slip the strips of paper out from under the cake taking any extra frosting with them. And voila, you have a perfectly frosted layer cake with a clean plate!
PRO Tip:
Consider investing in newer 9-inch (23cm) round parchment circles with strips on either side. These tags stick up above the batter and baked cake layers, making it really easy to lift the layers out of the baking pans. They are a game changer. See the link below.
Recommended Tools (affiliate links; no extra cost to you):
- Kitchen scale
- Mixing bowls
- 9-inch (23cm) round cake pans
- Parchment circles with “handles”
- Stand mixer or hand mixer
- Wire cooling rack
Gluten-Free Tips:
* You can adjust any baking recipe to gluten-free by using 120 grams per cup of my favorite gluten-free flour blend. If you are using another brand of flour or regular flour, whisk it, spoon it lightly into a measuring cup until mounded, level off the top with a knife, and weigh the flour left in the cup. Use that weight as your standard per cup of that specific flour. Do this for each flour blend you use. Commercial gluten-free blends such as Pamela’s All-Purpose Artisan Blend, Bob’s Red Mill 1-to-1, or King Arthur Measure for Measure are all good gluten-free choices.
You will get the best and most consistent results by using a digital kitchen scale and weighing your ingredients, especially when you are baking. And use grams, they are much more accurate than pounds and ounces.
All recommended ingredients are gluten-free as of the writing of this article. Always check to be sure the products haven’t changed and are still safe to consume.
Chocolate Mocha Layer Cake (GF)

Is there anything better than a mouthwatering layer cake? Especially a chocolate cake with chocolate frosting! It is one of life’s greatest pleasures to have this beautiful Chocolate Mocha Layer Cake in front of you, waiting to slice and dive into it!
Ingredients
Cake
- 1-1/2 cups (340g; 355ml) hot brewed coffee
- 1 cup (84g) unsweetened cocoa powder
- 3 cups (360g*) all-purpose gluten-free flour* or regular all-purpose flour, like Gold Medal
- 2 tsp baking soda
- 1/2 tsp baking powder
- 1/2 tsp kosher salt
- 2-1/2 cups (495g) granulated sugar
- 4 large eggs
- 1 cup (227g) mayonnaise (you can’t taste it!)
- 2 tsp vanilla extract
Frosting
- 1 cup (84g) unsweetened cocoa powder (natural or Dutch; Dutch cocoa will give you darker frosting)
- 1/4 tsp kosher salt
- 1-1/2 cups (339g) butter, at room temperature
- 5 cups (568g) confectioner’s sugar
- 1/2 cup (114 g) heavy cream or half and half
- 2 tsp vanilla extract or vanilla paste
- 1/2 tsp espresso powder
Instructions
Whisk together the hot coffee and cocoa in a bowl until completely dissolved. Let stand until it cools to room temperature, about 20 minutes. Whisk again before using. (Coffee enhances the flavor of chocolate – you won’t be able to tell it is in the finished cake.)
Preheat the oven to 350°F (180°C). Grease three 9x2-inch (23x5cm) standard round cake pans or two 9x3-inch (23x8cm) round pans. Line pans with parchment circles and butter the parchment.
Make the Cake Batter: Whisk together the flour, baking soda, baking powder, and salt in a bowl. Set aside.
In the bowl of your stand mixer or a large bowl if using a hand mixer, combine the granulated sugar and eggs. Beat on medium speed until lighter and creamy, about 3 minutes. Scrape the bowl and beater(s).
Add the mayonnaise and the vanilla to the egg mixture, beating on low speed. Then in 5 additions, alternate a little of the flour mixture, blending, and then some of the coffee mixture and blending. Begin and end with flour mixture, mixing until everything is smooth and creamy. Scrape the bowl thoroughly and beat again to incorporate anything that was stuck to the bowl.
Divide the batter evenly among prepared pans. Bake in the preheated oven until a toothpick inserted in the center comes out with moist crumbs, 22 to 28 minutes. Timing will be longer if you are using two thicker 9x3-inch (23x8cm) baking pans.
Cool the cake layers in their pans on a wire rack 20 minutes. Then remove the cake layers from the pans, setting the cakes back on the wire rack and cool completely, about 30 minutes longer.
Make the Frosting: Place the cocoa powder in the bowl of your stand mixer or a large bowl if using a hand mixer. Whisk to remove any lumps. Add the salt and butter, mixing until well combined and smooth. Scrape the bowl well.
Place the confectioner's sugar in a large bowl. Whisk to remove any large lumps. Add about 1 cup (237 ml) of confectioner's sugar with about a tablespoon of cream to the cocoa mixture. Mix to blend then mix on medium-high for a minute. After each addition has been combined, increase the mixer to medium-high speed for about a minute. Repeat until all the sugar and milk have been added. Add the vanilla extract and espresso powder and combine well, mixing until light and airy. Scrape the bowl and beater completely and mix in any unincorporated ingredients.
You are looking for frosting that is easily spreadable. If the frosting appears too dry, add more milk, a tablespoon at a time, until it reaches the right consistency. If it appears too wet, add more confectioner’s sugar, a tablespoon at a time.
Assemble the Cake: Place a cake layer on a serving plate top side down. Spread about 3/4 cup (177 ml) frosting over the top. Set the second layer on top of the frosted bottom layer, top side up. If using three layers, use about 1/2 cup (118 ml) between each layer. Spread remaining frosting over the sides and top of cake. Set cake aside to allow the frosting to set up a bit before slicing and serving.
Store the cake in an airtight container in the refrigerator. Return to room temperature before slicing and serving.
Recipe found at www.theheritagecook.com
Notes
* You can adjust any recipe to gluten-free by using 120 grams per cup of my favorite gluten-free flour blend. If you are using another brand of gluten-free flour, whisk the mix, spoon it lightly into a measuring cup without a spout until mounded, level off the top with the back of a knife, and weigh the flour left in the cup. Use that weight as your standard per cup of that specific flour. Do this for each flour blend you use. Commercial blends such as Pamela's, Bob's Red Mill 1-to-1, or King Arthur Measure for Measure are all good gluten-free choices.
You will get the best results by using a digital kitchen scale and weighing your ingredients, especially when you are baking. And use grams, they are much more accurate than pounds and ounces.
All recommended ingredients are gluten-free as of the writing of this article. Always check to be sure the products haven’t changed and are still safe to consume.
Cake adapted from a recipe by Southern Living
Frosting adapted from a recipe by Add a Pinch
Nutrition Information:
Yield:
10Serving Size:
1Amount Per Serving: Calories: 149Total Fat: 3gSaturated Fat: 1gTrans Fat: 0gUnsaturated Fat: 1gCholesterol: 77mgSodium: 402mgCarbohydrates: 23gFiber: 1gSugar: 3gProtein: 5g
The nutritional information for recipes on this site is calculated by online tools and is merely an estimate. If you need nutritional calculations for medical reasons, please use a source that you trust.
If you enjoyed this recipe, be sure to follow me on social media so you never miss a post:
Create a New Tradition Today!
Welcome! The suggestions here are not intended as dietary advice or as a substitute for consulting a dietician, physician, or other medical professional. Please see the Disclaimers/Privacy Policy page for additional details. Unauthorized use, distribution, and/or duplication of proprietary material from The Heritage Cook without prior approval is prohibited. If you have any questions or would like permission, please contact me. We participate in the Amazon Services LLC Associates Program, an affiliate advertising program designed to provide a means for sites to earn advertising fees by advertising and linking to amazon.com. As an Amazon Associate, I earn a small amount from qualifying purchases without any additional cost to you. This page may contain affiliate links. The author makes no claims regarding the presence of food allergens and disclaims all liability in connection with the use of this site.