These Decadent Chocolate Cupcakes with Vanilla Buttercream are the perfect way to celebrate any occasion. St Patrick’s Day is coming up this week and The Artist and I are getting ready to celebrate our 30th anniversary of the day we met – on St. Pat’s!
Two friends introduced us and we are forever grateful they did. It was a crazy and fun afternoon and evening, celebrating St. Patrick’s Day. It makes every year’s anniversary even more special and fun!

The best way for us to celebrate our anniversary are these Decadent Chocolate Cupcakes with Vanilla Buttercream Frosting with their great balance of flavors. The cake has a bolder chocolate flavor from the espresso powder and the sweetness of the frosting is a lovely foil, creating the perfect bite.
The Artist loved these cupcakes. He wasn’t patient enough to wait for me to frost them, he swiped one and ate it plain! He was impressed with how tender it was … that’s thanks to the sour cream in the recipe.

The frosting is a simple vanilla buttercream with just five ingredients and you have the perfect accompaniment to the coffee-boosted chocolate cupcakes. It is wonderful for many other desserts too – keep the recipe handy!
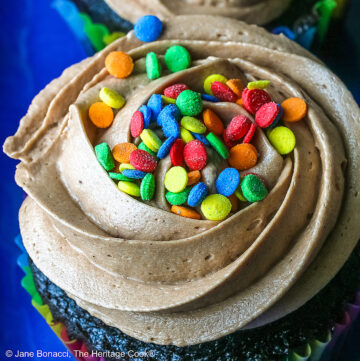
Instead of piping on the frosting, I decided to do a rustic coating like my grandmother and mom showed me as a child. Using an offset spatula gave me the perfect surface to showcase sparkly sugars I found at Sprinkle Pop. Isn’t it fun!

If you want to do fancy piping, I would double or triple the frosting recipe to make sure you have enough to do elaborate designs. This recipe made the perfect amount for regular frosting of the cupcakes.
My favorite piping tip is the “1-M”. You can find it at craft stores or online. It will give you beautiful ruffled roses with very little practice. You can practice on a piece of parchment paper or waxed paper, then scrape it off and reuse it until you are comfortable with piping!

I hope you enjoy these Decadent Chocolate Cupcakes with Vanilla Buttercream Frosting. You would never guess they are gluten-free and everyone at your St. Paddy’s Day party will love them!
If you try this recipe, let me know! Please leave a star rating in the recipe card, comment below, and don’t forget to snap a pic and tag it @theheritagecook on Instagram! Seeing your creations makes my day and I love hearing from you!

Ingredients needed for Decadent Chocolate Cupcakes:
- Cupcakes: GF flour*, cocoa powder, espresso powder, baking powder, baking soda, salt, butter, sugar, eggs, vanilla, sour cream
- Frosting: butter, confectioners’ sugar, vanilla, salt, cream
PRO Tip:
If you are looking for really great sprinkles and other decorations for your baked goods, you should check out the Sprinkle Pop website. Isn’t it a fun source for all things glittery! (This is not an affiliate link, I just love their products!)
How to make Decadent Chocolate Cupcakes:
- Make the Cupcakes: Whisk together the flour*, cocoa, espresso, baking powder, baking soda, and salt; set aside.
- Cream the butter and sugar, then add the eggs, one at a time, fully blending before adding the next one. Mix in the vanilla and beat until smooth. Add 1/3 of the dry ingredients and beat until incorporated, then add half the sour cream and beat it in; add another 1/3 of the dry ingredients and mix in, remaining sour cream and mix, then the final dry ingredients, beating well. Scrape the bowl and beater(s) then turn up the speed and beat another minute to lighten the batter.
- Use a scoop to fill paper-lined muffin tins, each about 1/2 to 2/3 full. Bake at 350°F (180°C) for about 15 minutes or until a toothpick comes out clean. Let the cupcakes sit in the muffin pan for a couple of minutes then transfer them to a wire rack to cool completely.
- Prepare the Frosting: Beat the butter until lightened and creamy, about 4 minutes. Scrape bowl and beater(s). Add the sugar, 1/3 at a time, mixing well after each addition. Add the vanilla and salt, mixing until incorporated and light and fluffy.
- Add the cream, a little at a time until it reaches the right consistency for spreading or piping. Whip on med-high until lightened in color, smooth, and creamy, about 1 minute.
- Frost the Cupcakes: Once fully cooled, spread some of the frosting over the top of each cupcake with an offset spatula, or you can pipe it on if you prefer. If you are piping, you want to double or triple the frosting recipe to have plenty to work with.
- To Pipe: Place a tip in the piping bag, cut off the tip of the bag so the piping tip sits snugly. Fill the bag about 2/3 full, twist the top closed and gently press the frosting down into the tip. Pipe into your favorite design. If you want more direction on piping, check out this video.
PRO Tip:
If you prefer to pipe the frosting on the cupcakes, you will need to double or maybe triple the frosting recipe to be sure you have enough for elaborate designs.
Recommended Tools (affiliate links; no extra cost to you):
Gluten-Free Tips:
Use a good quality gluten-free flour blend, preferably a homemade version made with Authentic Foods superfine rice flours. Using their flours guarantees there is no grittiness in any of your baked goods! No one can tell that what I make is gluten-free thanks to Authentic Foods!
* You can adjust any baking recipe to gluten-free by using 120 grams per cup of my favorite gluten-free flour blend. If you are using another brand of flour or regular flour, whisk it, spoon it lightly into a measuring cup until mounded, level off the top with a knife, and weigh the flour left in the cup. Use that weight as your standard per cup of that specific flour. Do this for each flour blend you use. Commercial gluten-free blends such as Pamela’s All-Purpose Artisan Blend, Bob’s Red Mill 1-to-1, or King Arthur Measure for Measure are all good choices.
You will get the best and most consistent results by using a digital kitchen scale and weighing your ingredients, especially when you are baking. And use grams, they are much more accurate than pounds and ounces.
All recommended ingredients are gluten-free as of the writing of this article. Always check to be sure the products haven’t changed and are still safe to consume.
Decadent Chocolate Cupcakes with Vanilla Buttercream Frosting (Gluten Free)

These Decadent Chocolate Cupcakes with Vanilla Buttercream are the perfect way to celebrate any occasion. These cupcakes have a great balance of flavors. The cake has a bolder chocolate flavor from the espresso powder and the sweetness of the frosting is a lovely foil, creating the perfect bite.
Ingredients
Cupcakes
- 3/4 cup (90g) gluten-free flour blend
- 1/2 cup unsweetened cocoa powder
- 1 tsp espresso powder, optional
- 1 tsp baking powder
- 1/2 tsp baking soda
- 1/2 tsp kosher salt
- 1/2 cup (1 stick; 113g) butter, at room temperature
- 3/4 cup granulated sugar
- 2 large eggs
- 1 tbsp pure vanilla extract or vanilla paste
- 1/2 cup sour cream
Frosting
- 1/2 cup (1 stick; 113g) butter, at room temperature
- 2 cups confectioners' sugar, sifted, or more as needed
- 1 tbsp pure vanilla or vanilla paste
- 1/4 tsp kosher salt
- 2 to 3 tbsp cream or half and half
Instructions
1. Preheat the oven to 350F (180°C). Line 12 to 15 muffin tins with paper cups; set aside.
2. Make the Cupcakes: In a mixing bowl, combine the flour blend, cocoa powder, espresso powder, baking powder, baking soda, and salt. Whisk together and set aside.
3. In the bowl of your stand mixer, using the paddle attachment, beat the butter and sugar together until creamy. Add the eggs, one at a time, completely incorporating one before adding the next. Mix in the vanilla and beat on medium-high until smooth.
4. Add 1/3 of the dry ingredients, beating until fully incorporated, then mix in half of the sour cream, another 1/3 of the dry ingredients, remaining sour cream, and remaining dry ingredients, beating well between each addition. Scrape the bowl and beater. When everything is incorporated, turn up the speed and beat for another minute, lightening the batter with more air.
5. Fill the lined muffin tins about 1/2 to 2/3 full. Using a spring-loaded scoop makes it really easy to portion the batter. Bake for about 15 minutes or until a toothpick inserted in the center comes out clean. Let the cupcakes sit in the tins for a couple of minutes and then transfer them to a wire rack to cool completely.
6. Prepare the Frosting: In the bowl of your stand mixer fitted with the paddle attachment or a large bowl if using a hand mixer, place the butter and beat on medium-low speed until lightened and creamy, about 4 minutes. Scrape the bowl and beater. Add the sugar, 1/3 at a time, mixing well after each addition. Once all the sugar is incorporated, turn the mixer up to medium-high for about 30 seconds to beat extra air into the frosting. Add the vanilla and salt, mixing until incorporated.
7. Add the cream, a little at a time, until it reaches the right consistency for spreading or piping. If it gets too thin, add a little more powdered sugar. Increase the speed to medium-high and whip until the frosting lightens in color and is smooth and creamy, about 1 minute.
8. Frost the Cupcakes: Once the cupcakes are completely cooled, you can spread the tops with the frosting using an offset spatula or you can pipe it on. If you are piping, you probably want to double or triple the recipe to have plenty for full coverage.
9. To pipe, place your favorite tip into a disposable piping bag. Cut off the bottom of the bag so the tip fits tightly in the bag. Fold a cuff at the top of the bag and place it into a large glass or jar to support it.
10. Fill the bag about 2/3 full, twist the top closed and gently press the frosting down into the tip. Pipe the frosting onto the cupcakes in your favorite design. For guidance on which tips to use and how to pipe frosting, check out this video.
Recipe found at www.theheritagecook.com
Notes
* You can adjust any recipe to gluten-free by using 120 grams per cup of my favorite gluten-free flour blend. If you are using another brand of gluten-free flour, whisk the mix, spoon it lightly into a measuring cup without a spout until mounded, level off the top with the back of a knife, and weigh the flour left in the cup. Use that weight as your standard per cup of that specific flour. Do this for each flour blend you use. Commercial blends such as Pamela's, Bob's Red Mill 1-to-1, or King Arthur Measure for Measure are all good choices.
You will get the best results by using a digital kitchen scale and weighing your ingredients, especially when you are baking.
All recommended ingredients are gluten-free as of the writing of this article. Always check to be sure the products haven’t changed and are still safe to consume.
Adapted from a recipe by I Am Baker
Note: If you want to pipe the frosting on the cupcakes, you will want to double or triple the frosting recipe to be sure you have enough for elaborate designs. For some guidance on which tips to use and how to pipe frosting, check out this video.
Nutrition Information:
Yield:
16Serving Size:
1Amount Per Serving: Calories: 171Total Fat: 4gSaturated Fat: 2gTrans Fat: 0gUnsaturated Fat: 1gCholesterol: 34mgSodium: 143mgCarbohydrates: 30gFiber: 1gSugar: 24gProtein: 2g
The nutritional information for recipes on this site is calculated by online tools and is merely an estimate. If you need nutritional calculations for medical reasons, please use a source that you trust.
If you enjoyed this recipe, be sure to follow me on social media so you never miss a post:

Create a New Tradition Today!
Welcome! The suggestions here are not intended as dietary advice or as a substitute for consulting a dietician, physician, or other medical professional. Please see the Disclaimers/Privacy Policy page for additional details. Unauthorized use, distribution, and/or duplication of proprietary material from The Heritage Cook without prior approval is prohibited. If you have any questions or would like permission, please contact me. We participate in the Amazon Services LLC Associates Program, an affiliate advertising program designed to provide a means for sites to earn advertising fees by advertising and linking to amazon.com. As an Amazon Associate, I earn a small amount from qualifying purchases without any additional cost to you. This page may contain affiliate links. The author makes no claims regarding the presence of food allergens and disclaims all liability in connection with the use of this site. This post was first shared in March 2019. The article was updated in 2025.