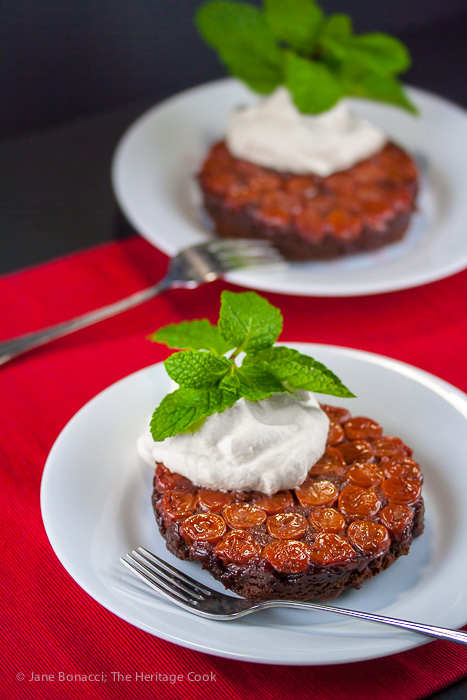
Today’s recipe for Individual Black Forest Upside Down Cakes is sure to please everyone and is perfect for the holidays and special occasions. Upside down cakes are always popular, and this one is reminiscent of a European classic, Black Forest cake with the sinfully good combination of chocolate and cherries. If you’ve never had one, you are in for a real treat!
The cake most likely originated in the Black Forest region of Germany in the late 1500s. The area is also known for Kirsch or Kirschwasser, a brandy made from sour Morello cherries so it isn’t surprising that chefs combined their passion for chocolate desserts with the local sour cherries. The modern version appears to have been created around 1920 and has become one of Germany’s most famous desserts.
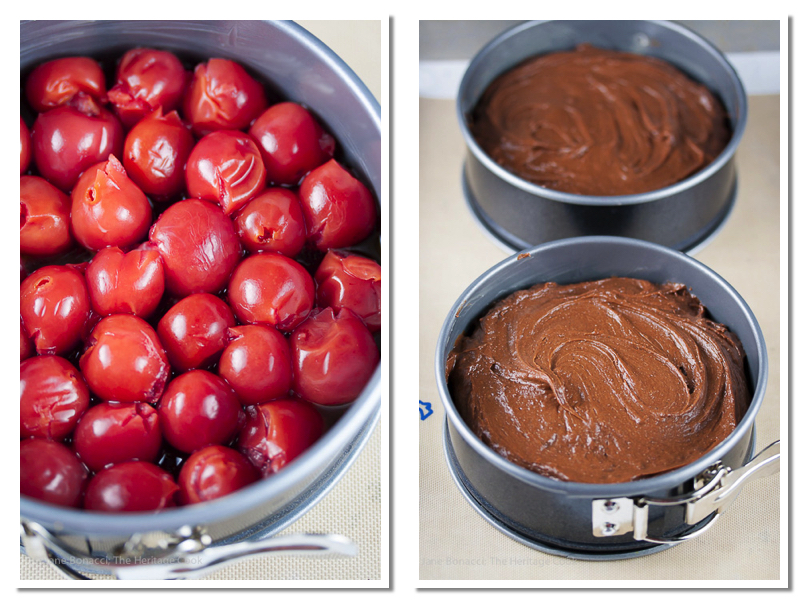
L: Fitting the cherries in the pans; R: topped with the cake batter
The classic version of a Black Forest dessert is usually a 4-layer cake that is quite time consuming and challenging for beginning cooks. But by using the same flavor profiles and simplifying the method, anyone can create these amazing desserts.
One of the tricks to this dessert is to use jarred sour cherries. They’ve got a little added sugar but still maintain the tartness that balances the sweetness. If you can find them (look at Trader Joe’s), jarred Morello cherries are perfect to make treats all year long. When they are in season, Montmorency is a common type of cherry grown in this country, and they make the best pies and desserts like these cakes.
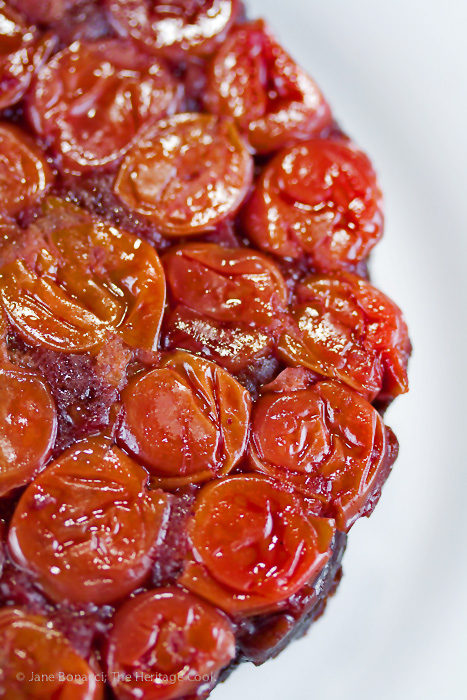
Hot from the baking pan
Once these cakes come out of the oven, let them cool for about 15 minutes. Then you can easily get the cakes out of the pans. If you let them cool too much you may have a struggle getting them out without ruining the top. Even if some of the cherries stick and don’t come out cleanly, just replace the stray pieces on the top and cover any obvious boo boos with whipped cream.
If you don’t already have Silpats (non-stick silicone baking sheets), you should put them on your holiday wish list. They come in handy for so many applications and today was no exception. I used one on my baking sheet to help keep the mini springform pans from sliding around as I moved them in and out of the oven. But I quickly learned why the original recipe called for ramekins. I didn’t think the springforms needed to be wrapped in foil, but I was wrong. The caramel leaked out and was all over the baking sheet. But because I had the Silpat on there, there was no hassle with clean up. I pulled it off the baking sheet, put it under running water in the sink and the caramel slipped right off! It would have taken an hour of soaking if the Silpat wasn’t there!
This recipe is designed for an intimate dinner for two, but you can easily double the recipe to feed four. If you have more people coming to dinner, I would recommend you make two doubled recipes. Doubling a second time rarely works with baked goods. Something always seems to go haywire. It’s better to be safe and make one batch, then whip up the second one while the first four cakes bake. Just about the time the second set are ready to come out of the oven, the first round will be ready to unmold. If you have a second pair of hands available, that would probably help a lot.
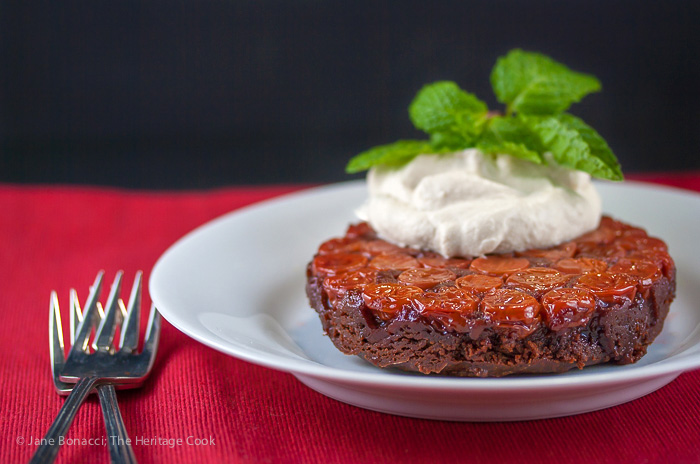
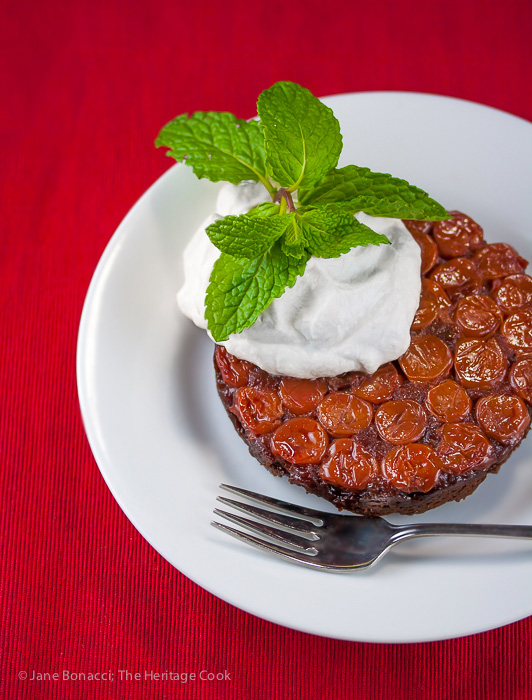
The sweet chocolate cake and whipped cream are offset by the tart cherries, a balance you will love! Whether you are having a romantic dinner for you and your love, you are looking for a beautiful dessert for the holidays, or if you want to make something special for your Valentine, these little cakes are the perfect choice!
It’s another great Chocolate Monday! 🙂
Jane’s Tips and Hints:
Because this is an upside down cake, remember that what faces the bottom of the pan will become the top of the cake. You want the roundest, prettiest cherries facing down. They will flatten out while baking due to the weight of the cake batter on top, but they will still be pretty.
Most cooked cherries are a pink color. If you want a more vibrant red, you can add some red food coloring to the cherries while they are in the juice and let them macerate for a while to pick up the color.
Gluten-Free Tips:
Use a gluten-free flour blend (preferably with xanthan or other gum in it) in place of the regular flour. As always, read the labels of all your ingredients and contact the manufacturer if you have any questions.
Kitchen Skill: Inverting Desserts
When a recipe calls for inverting onto a serving plate, it means that you are going to be serving the recipe with the bottom on top. The easiest way to do this is to hold the cake pan on one palm, set the serving plate on top and holding the two together, quickly flip it over. If you’re lucky you won’t get too much movement or liquid on the plate (depending on what you are making). If the baking pan is still hot, make sure you use hot pads, preferably that are no-slip and be very careful!

- Cherry Topping
- 1-1/2 cups (14.5 oz) sour cherries, drained over a bowl; reserving the juices (use either canned or jarred)
- 2 tbsp butter
- 2 tbsp firmly packed brown sugar
- 1 tsp reserved cherry juice
- Cake
- 1/3 cup all-purpose flour or Gluten-Free flour blend
- 1/4 cup unsweetened cocoa powder (gluten-free)
- 1/4 teaspoon baking powder (gluten-free)
- 1/4 teaspoon kosher or fine sea salt
- 2 tbsp butter, at room temperature
- 1/3 cup firmly packed brown sugar
- 1 large egg yolk
- 1 tsp pure vanilla extract or paste
- 3 tablespoons whole milk or half and half
- Whipped Cream
- 1/4 cup heavy cream
- 1 tbsp brown sugar or to taste
- 2 teaspoons kirsch, cassis, red wine, or reserved cherry juice, optional
- Preheat oven to 350°F. Lightly butter two 8-oz (4-inch diameter, 2-inches tall) ramekins or mini springform baking pans (wrap the springforms with heavy duty foil to prevent leaks). Set a rimmed baking sheet next to the stove and line it with a Silpat or sheet of parchment (for traction).
- Prepare the Cherry Topping: In a microwave-safe bowl, combine 2 tbsp butter, 2 tbsp brown sugar, and 1 tsp of the reserved cherry juice. Microwave until butter and brown sugar are melted and bubbling, about 30 seconds. Stir well to fully dissolve the sugar. Divide the mixture evenly between the two prepared baking dishes. Arrange cherries in a tightly packed single layer in the bottom of each dish.
- Make Cakes: In a small bowl, whisk together flour, cocoa, baking powder, and salt. In the bowl of your standing mixer, beat together 2 tbsp butter and 1/3 cup of the brown sugar until lightened in color, about 3 minutes. The friction of the mixer will soften the butter helping it whip. Mix in egg yolk, then flour mixture, vanilla, and milk. Beat until smooth, stopping the mixer and scraping the bowl often.
- Divide batter equally between baking dishes, smoothing the batter to cover the cherries. If you are making these with gluten-free flours, they are heavier and stickier than regular flour. They will need more help - an offset spatula dipped in water will help a lot. And don’t worry if it looks like there isn’t enough batter - there is and the cakes will puff up in the oven, filling in and covering all of the topping.
- Place the baking dishes on the baking sheet. Bake until a toothpick inserted in center of a cake comes out with only a few crumbs attached, about 30 minutes. Let cool on a wire rack, 20 minutes. This gives the topping time to solidify slightly before you turn out the cakes.
- Whip the Cream: Meanwhile, in a small bowl, using a hand-held electric mixer or whisk, beat the cream, brown sugar, and kirsch or other liquid (if using) to firm peaks.
- To Serve: Run a thin knife around the edge of each cake and invert them onto serving plates. Add a dollop of the whipped cream and garnish with a sprig of mint. Serve immediately.
- Yield: 2 servings
Create a New Tradition Today!
Let’s connect! If you ever need any entertaining or cooking advice, need to alter a recipe for gluten-free, or want recipe suggestions, don’t hesitate to ask. Feel free to quote me, just give credit where credit is due, link to the recipe, and send people to my website. Unauthorized use, distribution, and/or duplication of proprietary material from The Heritage Cook without prior approval is prohibited. If you have any questions or would like permission, please contact me. The suggestions here are not intended as dietary advice or as a substitute for consulting a dietician, physician, or other medical professional. Please see the Disclaimers page for additional details. Thanks for joining the Heritage Cook Family!