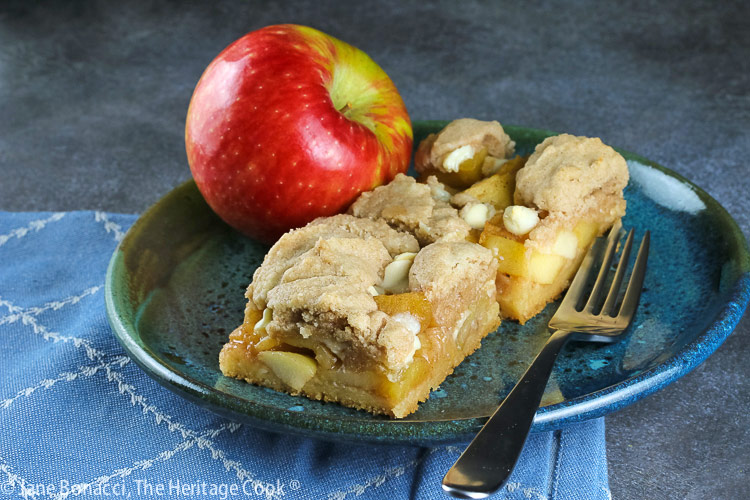
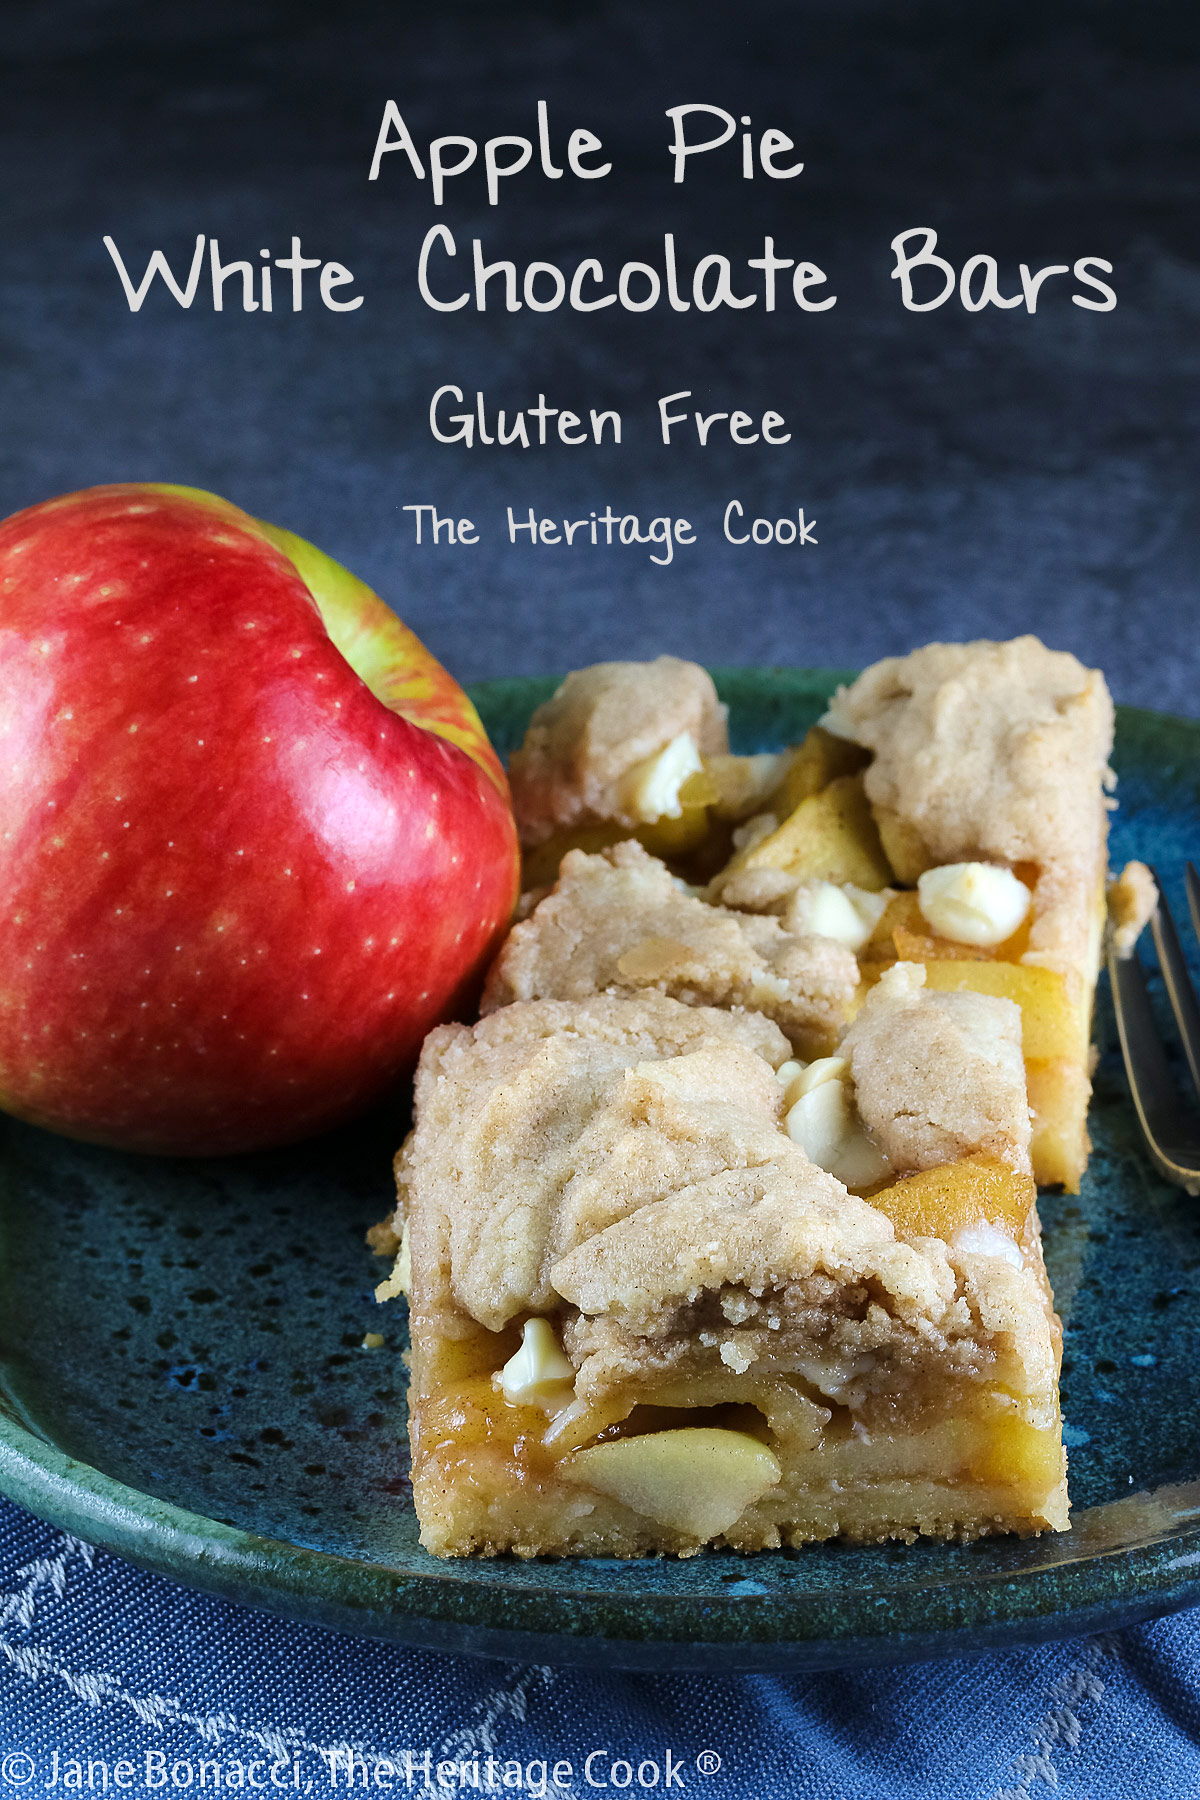
 Fall is my favorite time of the year and I love sweater weather. Today’s Apple Pie White Chocolate Bars are the perfect way to usher in the cooler days and celebrate the fall harvest.
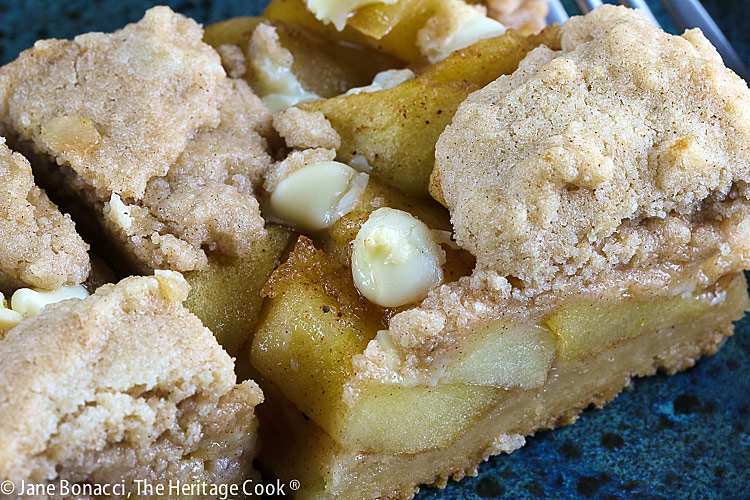
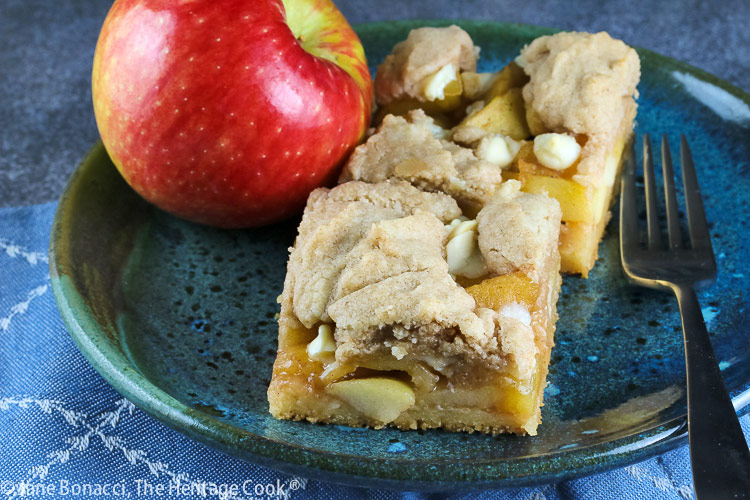
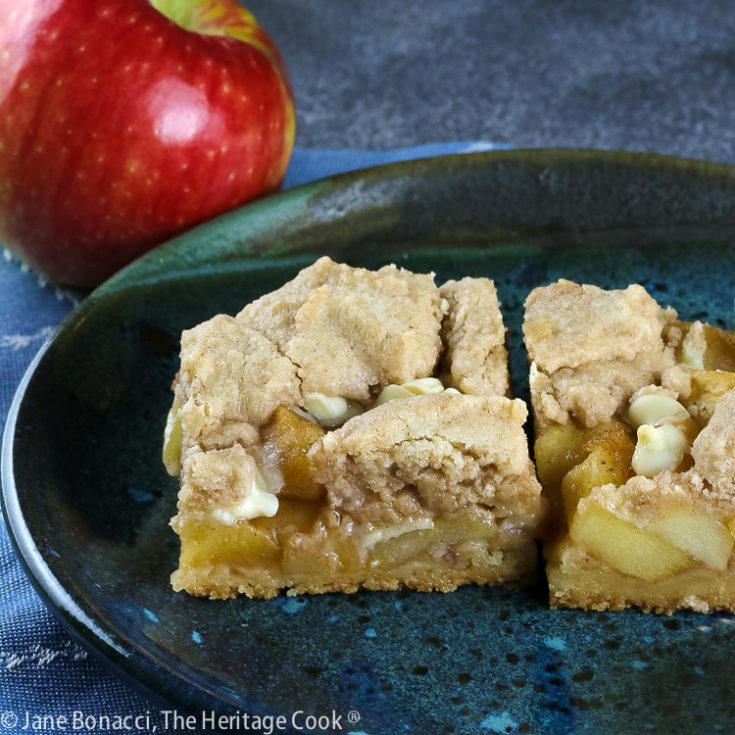
Loaded with fresh apples and spices with a super easy crust and studded with white chocolate chips, this might just take the place of a traditional apple pie in your house. I love how easily transportable it is, making it perfect if someone else is hosting your holiday celebrations.

Like a regular apple pie, these bars use a combination of tart and sweet apples. This gives you different flavors and textures in every bite. I like using Granny Smith or Pippin apples for the tart ones and Gala or Honey Crisp or something similar for the sweet ones. Use whatever you can find in your area.
I like adding a touch of cardamom to my baked goods. If you haven’t tried it, it is a wonderful unique spice. But if you don’t have it, you don’t need to make a special trip to the store, you can increase the cinnamon or add a little allspice or mace to the blend.
If your family has to avoid eggs, this is the perfect recipe! No eggs in either the crust or the filling and it is a delicious dessert. I hope you love it!
It is essential that you let these bars cool completely before lifting them out of the pan and cutting. If you don’t, the filling will be too soft and they will likely fall apart. If you use gluten-free flour the bars will be more delicate than those with regular flour so be gentle when moving them and use a spatula to support them.
The crust is a cross between pie crust and a cookie, shatteringly delicate and absolutely addicting. The Artist nearly swooned when he took the first bite – he loves crusts and this is his new favorite.
Put these Apple Pie White Chocolate Bars on your to-make list and once you taste them, they’ll be on regular rotation by popular demand! I promise you will want to grab a sweater and sit in front of a fire with a cup of tea or coffee while noshing on these bars. Enjoy!

If you try this recipe, let me know! Please leave a star rating in the recipe card, comment below, and don’t forget to snap a pic and tag it @theheritagecook on Instagram! Seeing your creations makes my day and I love hearing from you!
Key Ingredients for Apple Pie White Chocolate Bars:
- Unsalted butter, sugar, brown sugar, vanilla, flour, salt, nuts, cinnamon, cardamom, tart and sweet apples, freshly squeezed lemon juice, nutmeg, white chocolate chips
PRO Tip: What is the easiest way to core an apple?
After peeling, I like to cut the apples into quarters, then lay each quarter on one flat side. Take your knife and slice out the core from the center of each piece. You’ll be ready to slice and bake the apples in no time.
PRO Tip:
While I prefer to have you weigh ingredients when measuring flour (regular or gluten-free) and other dry ingredients, you can also use cups to measure by volume. Always whisk the flour to loosen and blend it, use a spoon to lightly scoop the flour into a measuring cup without a spout, mounding it. Use a knife or other straight edge to scrape off the excess. Note the weight of what is left in the cup. Repeat for each type of flour you are using.
How to make Apple Pie White Chocolate Bars:
- Line a 9×13-inch (23x33cm) pan with parchment to create a sling.
- Make the Crust: Cream the butter, both sugars, vanilla, and salt in a stand mixer until light and creamy; meanwhile whisk the flour, then gradually beat it into the butter mixture.
- Take 2/3 of the dough and scatter it across the bottom of the prepared pan, pressing lightly onto the bottom and 1/2-inch (1 cm) up the sides; refrigerate 20 minutes.
- Bake at 375°F (191°C) for 18 to 20 minutes until golden brown; cool on a wire rack.
- Reduce oven to 350°F (180°C). While the crust is cooling, take the bowl with the remaining dough and add the nuts, cinnamon, and cardamom, mixing on low speed to combine. This will become the crumbly top of the bars. Set aside.
- Make the Apple Filling: In a large bowl, combine all the apples with the sugar and spices, tossing until well coated; melt the butter in a large saucepan, add the apple mixture and cook, stirring often, until apples are tender and most of the liquid has evaporated.
- Spread the apples over the crust leaving a 1/2-inch (1cm) border, sprinkle with the white chocolate then scatter clumps of the remaining dough across the top covering most of the surface.
- Bake at 350°F (180°C) for 25 to 30 minutes until the top crust pieces are browned; cool completely on a wire rack.
- To Serve: Use the parchment sling to carefully lift the whole bar and place on a cutting board. Using a long, sharp knife, slice into 16 pieces, store leftovers, covered, in the refrigerator.
PRO Tip:
Be sure you use a metal 9×13-inch (23x33cm) baking pan because the crust needs to be chilled before baking. Putting a glass or ceramic pan straight from the refrigerator into the oven may cause it to crack or break. Metal is much safer.
PRO Tip:
Reading a recipe through two or three times will help keep you from missing any key steps or ingredients. I almost forgot to chill the crust before baking because I was reading quickly and jumped over the line about refrigerating it … and that was after reading it a couple of times! I reworded the method to help make that clearer for you.
Recommended Tools (affiliate links; no extra cost to you):
- Kitchen scale
- Chef’s knife
- Citrus reamer
- Parchment paper sheets
- Stand mixer or hand mixer
- Large mixing bowl
Gluten-Free Tips:
* You can adjust any baking recipe to gluten-free by using 120 grams per cup of my favorite gluten-free flour blend. If you are using another brand of flour or regular flour, whisk it, spoon it lightly into a measuring cup until mounded, level off the top with a knife, and weigh the flour left in the cup. Use that weight as your standard per cup of that specific flour. Do this for each flour blend you use. Commercial gluten-free blends such as Pamela’s All-Purpose Artisan Blend, Bob’s Red Mill 1-to-1, or King Arthur Measure for Measure are all good gluten-free choices.
You will get the best and most consistent results by using a digital kitchen scale and weighing your ingredients, especially when you are baking. And use grams, they are much more accurate than lb and ounces.
All recommended ingredients are gluten-free as of the writing of this article. Always check to be sure the products haven’t changed and are still safe to consume.
Apple Pie White Chocolate Bars (GF)
Loaded with fresh apples and spices with a super easy press-in crust, this might just take the place of a traditional apple pie in your house. I love how easily transportable it is, making it perfect if someone else is hosting your celebrations.
Ingredients
Crust
- 1 lb (4 sticks; 452g) unsalted butter, at room temperature
- 3/4 cup (149g) granulated sugar
- 1/2 cup (107g) brown sugar, lightly packed
- 2 tsp pure vanilla extract
- 4 cups (480g*) gluten-free flour blend* or all-purpose flour like Gold Medal (see Note) plus more flour for pressing out the dough
- 1-1/2 tsp kosher salt
- 1/2 cup (57g) finely chopped walnuts or pecans
- 1 tsp ground cinnamon
- 1/4 tsp ground cardamom, optional
Apple White Chocolate Filling
- 1-1/2 lb (680g) about 3 tart apples, peeled, cored, and sliced thinly
- 1-1/2 lb (680g) about 3 sweet/crisp apples, peeled, cored, and sliced thinly
- 3 tbsp freshly squeezed lemon juice
- 1/4 cup (50g) granulated sugar
- 1 tsp ground cinnamon
- 1/2 tsp ground cardamom, optional
- 1/8 tsp ground nutmeg
- 4 tbsp (1/2 stick; 1/4 cup; 28g) unsalted butter, cubed
- 1/2 cup (85g) white chocolate chips or chopped white chocolate
Instructions
1. Set out a metal 9x13-inch (23x33cm) baking pan and line with parchment paper, leaving the ends extended over the edges of the pan. This will create a sling to help you lift the bars out of the pan once cooled.
2. Make the Crust: Cream the butter, both sugars, vanilla and salt in the bowl of a stand mixer or a large bowl if using a hand mixer, and beat on medium speed for 2 minutes, until light and smooth.
3. In another bowl, whisk the flour and salt together. Gradually add the dry ingredients to the butter-sugar mixture, about 1/3 at a time, beating after each addition until combined.
4. Scatter 2/3 of the dough in lumps on the parchment in the bottom of the 9×13-inch (23x33cm) pan and sprinkle lightly with a little extra flour. (Reserve the remaining 1/3 of dough in the bowl.) Press the dough gently onto the bottom and 1/2-inch (1cm) up the sides. Add more flour if needed to keep it from sticking to your hands. Refrigerate the crust for 20 minutes.
5. Preheat the oven to 375°F (191°C).
6. Bake for 18 to 20 minutes, until the crust is golden brown. Remove from the oven and set aside to cool on a wire rack.
7. Reduce the oven to 350°F (180°C).
8. While the crust is cooling, take the bowl with the remaining dough and add the nuts, cinnamon, and cardamom, mixing on low speed to combine. This will become the crumbly top of the bars. Set aside.
9. Prepare the Apple Filling: Combine all of the sliced apples and lemon juice in a very large bowl. In a small bowl whisk together the sugar, cinnamon, cardamom, and nutmeg. Sprinkle the sugar mixture over the apples and mix well until everything is evenly coated.
10. Melt the butter in a large saucepan. Add the apple mixture, and simmer over medium to medium-low heat, stirring often, for about 15 minutes, until the apples are tender and the liquid has mostly evaporated.
11. Using a slotted spoon, spread the apple mixture evenly over the crust. Sprinkle the white chocolate chips over the top.
12. Scatter small clumps of the reserved dough across the top of the apples covering most of the surface (you will see apples between the clumps). Bake for 25 to 30 minutes, or until the topping is browned. Transfer the pan to a wire rack and cool completely.
13. Use the parchment sling to carefully lift the whole cooled bar out of the pan and place on a cutting board. Peel back the parchment, and then using a long, sharp knife, cut them into 16 pieces. Store, covered, in the refrigerator.
Recipe found at www.theheritagecook.com
Notes
* You can adjust any recipe to gluten-free by using 120 grams per cup of my favorite gluten-free flour blend. If you are using another brand of gluten-free flour, whisk the mix, spoon it lightly into a measuring cup without a spout until mounded, level off the top with the back of a knife, and weigh the flour left in the cup. Use that weight as your standard per cup of that specific flour. Do this for each flour blend you use. Commercial blends such as Pamela's, Bob's Red Mill 1-to-1, or King Arthur Measure for Measure are all good gluten-free choices.
You will get the best results by using a digital kitchen scale and weighing your ingredients, especially when you are baking. And use grams, they are much more accurate than lb and ounces.
All recommended ingredients are gluten-free as of the writing of this article. Always check to be sure the products haven’t changed and are still safe to consume.
Adapted from an Ina Garten recipe
Nutrition Information:
Yield:
16Serving Size:
1Amount Per Serving: Calories: 664Total Fat: 38gSaturated Fat: 20gUnsaturated Fat: 15gCholesterol: 71mgSodium: 260mgCarbohydrates: 76gFiber: 3gSugar: 28gProtein: 7g
The nutritional information for recipes on this site is calculated by online tools and is merely an estimate. If you need nutritional calculations for medical reasons, please use a source that you trust.
If you enjoyed this recipe, be sure to follow me on social media so you never miss a post:
Create a New Tradition Today!
Welcome! The suggestions here are not intended as dietary advice or as a substitute for consulting a dietician, physician, or other medical professional. Please see the Disclaimers/Privacy Policy page for additional details. Unauthorized use, distribution, and/or duplication of proprietary material from The Heritage Cook without prior approval is prohibited. If you have any questions or would like permission, please contact me. We participate in the Amazon Services LLC Associates Program, an affiliate advertising program designed to provide a means for sites to earn advertising fees by advertising and linking to amazon.com. As an Amazon Associate, I earn a small amount from qualifying purchases without any additional cost to you. This page may contain affiliate links. The author makes no claims regarding the presence of food allergens and disclaims all liability in connection with the use of this site. This post was first shared in Sept 2021. The article was updated in 2025.