The holidays are my favorite time of year. I love the crisp days and cold nights, the scent of wood fires, the holiday music and the excitement in the air. I become a child again, and of course I believe in Santa Claus! That jolly old elf always brings the magical spirit of Christmas to our household. And his little assistant, Elfie sits in our tree, keeping an eye on all of us to make sure we are behaving. So far I’ve been good – I’ve haven’t gotten a stocking of coal yet!
When I was a little girl, my mother and I would bake cookies together. She would roll out the dough and let me cut out the cookies. I could barely stand to wait the 10 minutes it took for them to bake. For special occasions she would make colorful frostings and we would cover them with all kinds of decorations. When we were done my hands, arms, and face were all stained with food coloring from eating the frosting, and my mom would put me in the tub and scrub me clean. Whenever I see brightly colored sugar cookies, I smile with the wonderful memories of my childhood.
Today I’ve assembled a selection of cookies to cover a wide variety of tastes. There are cinnamon, Italian, fudgy, and gingerbread cookies, shortbreads, spice cookies, and wonderful old-fashioned sugar cookies to tantalize you. If you make all of these, you will have a beautiful display that will dazzle everyone lucky enough to join you this season.
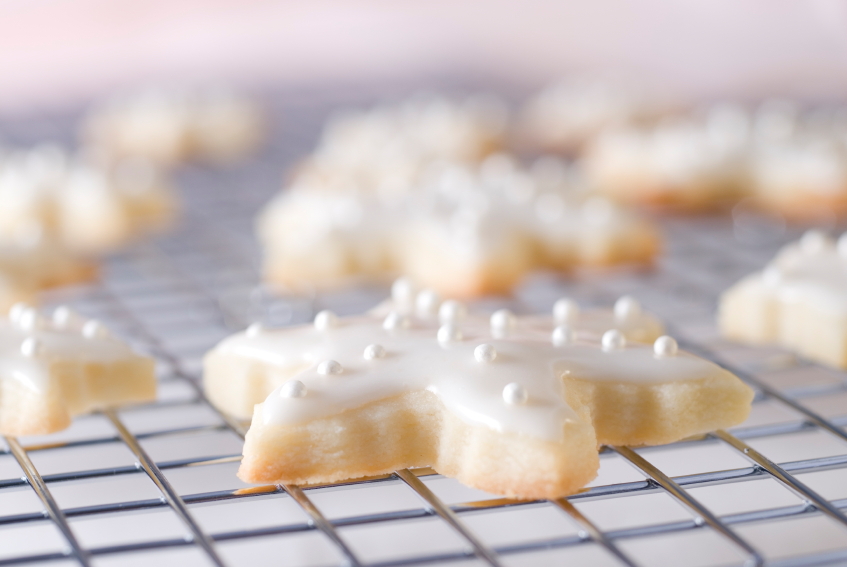
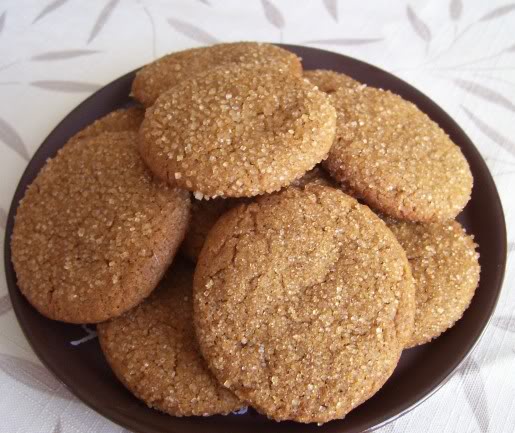
I think every child in America has visions of sugar cookies and gingerbread people instead of sugarplums dancing in their heads at this time of the year. Cut into fun shapes, baked until golden, and decorated with beautiful frostings and shiny sugars, there is nothing that lights up a child’s face more than these traditional cookies.

The dipped Black and White cookies are dramatic and yummy. Perfect little bites of pure joy, these are sure to become a favorite – especially at the holidays. They add a wonderful visual contrast to a platter of assorted cookies.
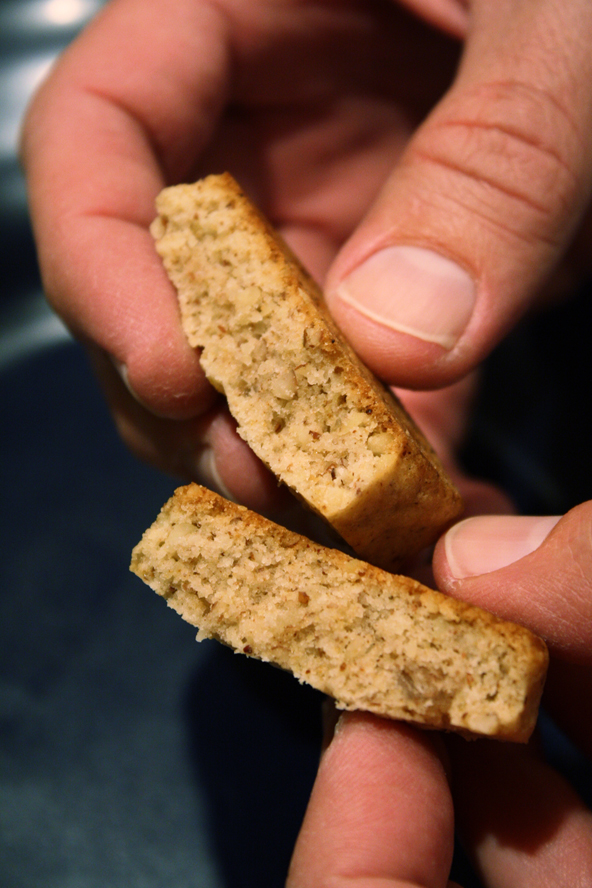
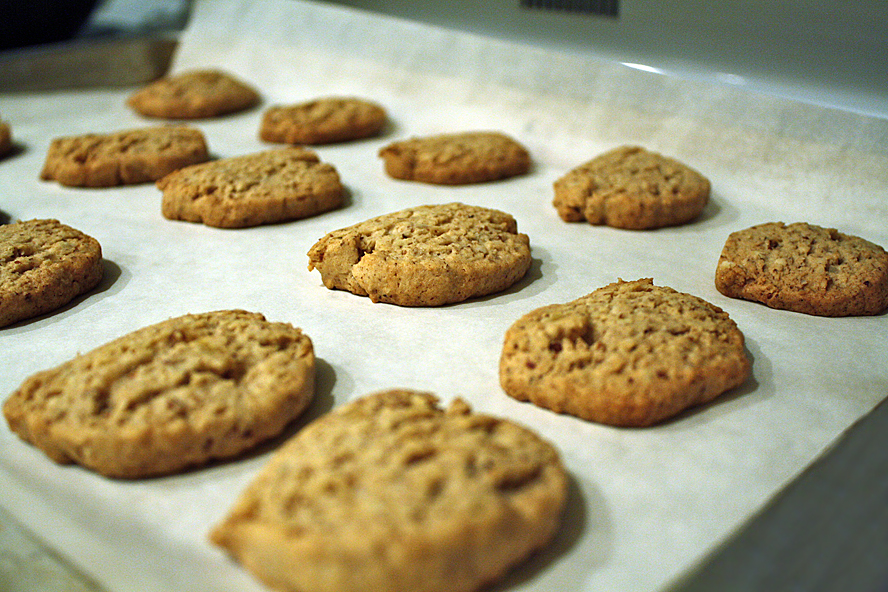
The Panettone Biscotti are a variation of a traditional Italian cookie made with olive oil that The Artist remembers from his childhood. The other Italian treat that he loves is Panettone (a type of fruit bread) and he waits impatiently all year long for them to arrive in the local bakeries. King Arthur Flour has a product called Fiori di Sicilia, a flavoring that is a cross between vanilla and citrus. It is the secret behind the flavor of Panettone. I put two and two together and decided to make a Panettone-flavored olive-oil cookie. They made their debut at a dinner party we threw recently and The Artist received a standing ovation for baking them (I had made the dough; he sliced and baked. J
The Cinnamon Stars are a classic German Christmas cookie called Zimtsterne. They are like a cross between a macaroon and a meringue, with a hint of nutty spiciness. I am addicted to them. While they can keep for a long time, their texture changes and they’ll get chewier as time passes. Traditionally made with cinnamon, you could change the spices if you like – all ginger, a mix of cardamom and nutmeg, or maybe a spice blend of cinnamon, ginger, cloves, nutmeg, and mace. Just keep the total amount the same and have fun experimenting with new flavors!
You know I cannot put together a batch of my favorite cookies without including chocolate! These cookies are a little fudgy in the middle and a little crispy at the edges. Kind of the best of all worlds! A mouthful of chocolate that will appease even the most fanatical chocoholic. If you want to take them to the next level, you can press a chocolate “kiss” in the center of the dough before baking!
Both regular sugar cookies and gingerbread cookies use the same Royal icing for decorating. Leave it white for the gingerbread, and tint with bright colors for the sugar cookies. It is very easy to make from scratch but if you are concerned about raw eggs, there is a great product called Meringue Powder that you can use safely. It takes all the guesswork out of it and comes out perfectly every time! Made of dehydrated pasteurized egg whites, just mix it with water and sifted powdered sugar.
Make a large batch of white icing then divide into a separate bowl for each color. While you can use grocery store food color liquids, gel food colors give you a much richer color without diluting the icing and changing its consistency. You can find them at kitchen supply shops and gourmet food stores or you can buy them online.
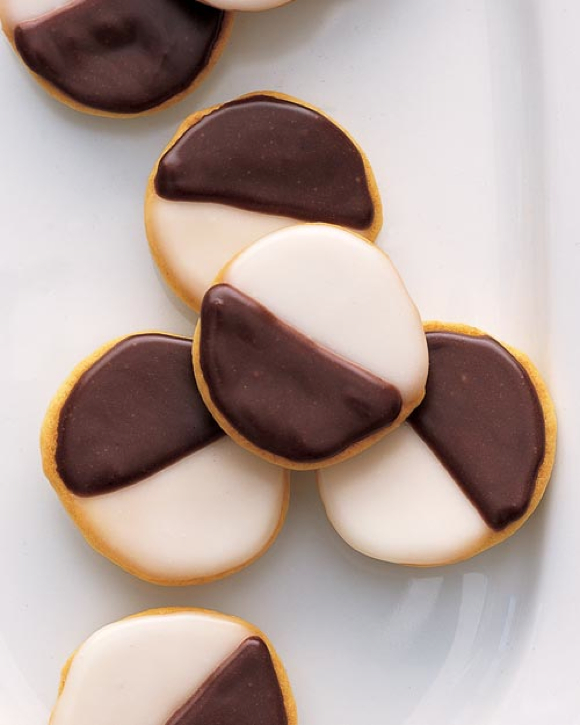
Photo Credit: Dana Gallagher
Having a piping kit is very helpful. You are going to need plain round tips, using a small one for the detail work (like outlining the cookies) and a larger tip for flooding. You can use zip-top plastic bags or pastry bags to hold the icing while you’re working.
You may not have heard, but King Arthur Flour has a Live Chat feature on their website. Like the Butterball Turkey line at Thanksgiving, you can talk to an expert who can help you with your baking challenges.
For those who learn better by watching, Howcast.com has created a series of videos to show you techniques and give you ideas of ways to decorate your cookies. Here are two that you will like:
1. How to Decorate Christmas Sugar Cookies
2. How to Make Gingerbread Men
When children are helping you bake, one way to cut down on the clean up is to use a plastic covered tablecloth. Secure it to the table so it won’t slip – I use tape – and you won’t care when little fingers get messy and flour, sugar, and icing get all over the table. Just rinse off the cloth and you’re ready to go!
Did you know that different brands of butter have varying percentages of water and fat in them? If you use different brands each time, your baked goods will never come out the same way twice. You can use any that you like, but the most important thing is to always use the same brand. My favorite is Land O’ Lakes. It is easy to find and reasonably priced. I love their consistently high quality and the fact that I know my baked goods will come out exactly the same way every time I make them. And unlike most bakers, I don’t buy unsalted butter just for baking. I use regular salted butter and cut back a bit on the amount of salt called for in recipes. I store my butter in the freezer where it stays fresh for months.
The type of sugar you use has the potential to cause you extreme frustration. At a Baker’s Dozen meeting years ago, the issue of inconsistency in baking came up. No one could figure out why one time their cookies were perfect and the next time they failed. They used exactly the same ingredients each time. This is a group of professional bakers so you know the conversation was intense. It turns out that the inconsistencies they were experiencing was because they were using beet sugar. Beets grow beneath the ground and minute particles remain in the finished product no matter how hard the manufacturers try to filter it all out. These particles of dirt can cause havoc with baking.
Cane sugar on the other hand grows above ground and does not contain any contaminates. Due to a variety of reasons we are losing our sugar cane fields. By purchasing cane sugar you can help support the sugar cane farmers and make sure cane sugar remains available for all of us. The only sugar I buy and use is C & H brand. Look for the pink and white packages!
If you bake a lot of cookies, do yourself a favor and buy extra baking sheets and silpats. I have 5 sheets so that I can bake continuously without having to wait for the sheets to cool down between batches. Using silpats or parchment sheets cuts way down on clean up as well.
Cookies are the perfect end to a meal. They offer automatic portion control if you want it, the ability to easily offer multiple flavors and textures, and they can be served stand-alone or as part of a larger dessert. Not to mention they are The Artist’s absolute favorite.
Whenever you bake, especially with children, expect to make a mess. Don’t sweat the small stuff and have fun, you can always clean up later. Put on fun holiday music, think of the delight on the faces of everyone who is getting your cookies, and your day of baking will be full of happiness. Remember, you are creating memories that last a lifetime. So put on your baking cap and let’s get into the kitchen!
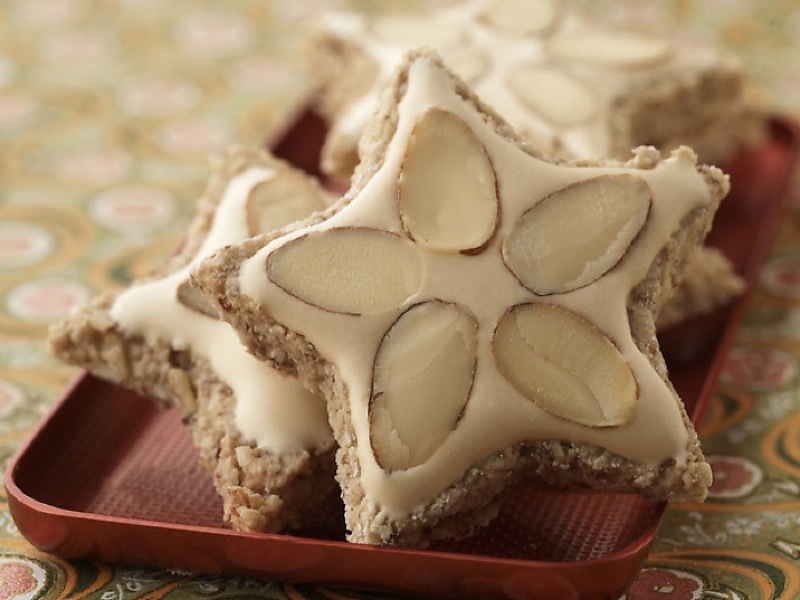
Photo Credit: The Food Network
Jane’s Tips and Hints:
If the recipe calls for a flat cookie sheet with no sides and you don’t own one, just flip your regular baking sheet over and cook on the inverted bottom!!
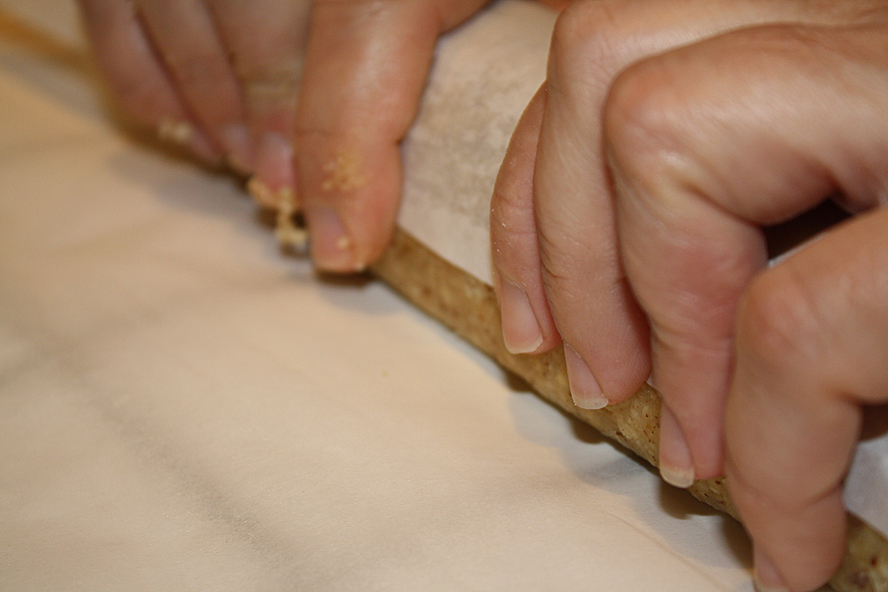
Kitchen Skill: Rolling Cookie Dough
When preparing for rolling cookie dough, clear off a large surface and set up your tools. You’ll need a large rolling pin, extra flour or powdered sugar to help with sticking, decorator sugars or icing (if using) and cookie cutters.
With a soft dough like the Cinnamon Stars, rolling it out between sheets of parchment will save you a lot of frustration and clean up. Make sure both sides of the dough are dusted with powdered sugar before rolling.
All doughs made with butter need to be kept cool to make them easier to work with. If the dough starts to get sticky and fight back, pop it back in the refrigerator for a few minutes to firm up again. If the dough is too hard to roll out, let it sit at room temperature for a few minutes to soften.
- 1 cup “European Candied Mixed Peel” from King Arthur Flour or mixed candied lemon, orange, and citron fruit peels
- 3 cups pecans
- 2-1/4 cups all-purpose flour
- 1 tsp baking powder
- 1/4 tsp salt
- 1 cup granulated sugar
- 1/2 cup light olive oil or vegetable oil
- 2 large eggs (or you can use egg substitute for a vegan cookie)
- 1/2 tsp Fiori di Sicilia or pure vanilla extract
- Turbinado or raw sugar crystals (use colored sugar or edible glitter for holiday sparkle!)
- In a food processor, finely chop the candied peels and/or fruits. Set aside. If you do not have food processor, chop very finely with a sharp knife.
- Do not clean processor bowl – add pecans and pulse a few times. Add the flour, baking powder, and salt. Process until nuts are finely chopped.
- In the bowl of a heavy-duty stand mixer combine sugar, oil, eggs, and flavoring. Mix on low speed until eggs are broken up and then increase to medium for about 30 seconds until smooth. Blend in the chopped fruit. Add the dry ingredients to the bowl and carefully mix on low until it just holds together, about 30 to 45 seconds. Do not overbeat.
- Transfer half of dough to a sheet of parchment paper. Using the paper to help you, form into a log about 12-inches long. Wrap with the parchment and twist the ends closed. Repeat with remaining dough. Place both logs in the freezer to firm up, for about 30 minutes to 1 hour. I like to flatten out the edges of the logs to make rectangular-shaped cookies. It adds a nice variety to the shapes on your holiday platter.
- Dough can be frozen for up to 1 month. Write baking directions on outside of parchment and wrap tightly with plastic wrap. These make wonderful hostess gifts!!
- When ready to bake, preheat oven to 350°F, with the racks set in the upper and lower thirds of oven.
- Roll the logs in the coarse or colored sugar, slice into 1/4-inch thick slices, and place on parchment or Silpat-lined baking sheets. Bake for 10 to 15 minutes, switching oven racks (top to bottom/bottom to top) and spinning back to front halfway through baking. Bake until bottoms are golden brown and the tops feel fairly firm to the touch. They will get very little color on the top so watch carefully. You can also tell they are done when you can smell them baking – your nose can often tell before your eyes when baked goods are ready!
- Transfer to wire racks to cool. Store in an airtight container for up to a week … as if they’ll last that long!
- Yield: about 4 dozen cookies

- 2-1/4 cups confectioner’s sugar, divided, plus more for rolling
- 15 oz sliced (not slivered) almonds (about 4-1/2 cups), divided
- 1-1/4 tsp ground cinnamon
- 3 large egg whites, at room temperature
- 2 tsp finely grated lemon zest (the yellow part only, no white!)
- Sift the confectioner’s sugar. Put 1/2 cup of the sifted sugar, 10 oz of the almonds (about 3 heaping cups) and the cinnamon in a food processor. Process until the nuts are finely ground, with just a few larger pieces.
- In a large, sparkling clean bowl with an electric mixer, whip the egg whites on high speed until they hold soft peaks, about 1 minute. With the motor running, gradually add the remaining 1-3/4 cups confectioner’s sugar, until the whites are thick, creamy and somewhat stiff, about 2 minutes more. Set aside 2/3 cup of this meringue for topping the cookies.
- Fold the ground almond mixture and the lemon zest into the remaining meringue to make a stiff dough.
- Preheat the oven to 250°F. Line 2 baking sheets with parchment paper or silicone baking mats.
- Lay a sheet of parchment or waxed paper on a work surface and lightly dust with confectioner’s sugar. Turn the dough out onto the dusted paper, flatten, dusting with more sugar as needed, and then lay another sheet of parchment or waxed paper on top. Roll the dough between the sheets of paper until it is about 1/4-inch thick. Flip the dough over and gently peel off the sheet of paper. Flip it back over and gently pull off the other side of the paper so that the dough is fully released from it. (This makes it much easier to get the cookies off the paper and onto the baking sheets.)
- Cut cookies with a 3-inch star cookie cutter and place about 2 inches apart on prepared baking sheets. If you like, you can use different sizes of stars for more variety. Re-roll extra dough and finish cutting out cookies. Use a small pastry brush to brush off any excess sugar.
- Use a small offset spatula or the back of a spoon to spread the reserved meringue over the top of each cookie, being careful not to let the meringue drip over the sides. Press sliced almonds into the meringue on the arms of the star (see photo above) or chop coarsely, sprinkle them loosely over the top, and gently press into the meringue. If you don’t have long fingernails, using a clean pair of tweezers can help you set the almond slices on the cookies cleanly and easily.
- Bake cookies until bottoms are light golden brown and meringue is set and crisp, about 30 minutes. Turn off the oven and open the oven door to release the heat and leave the cookies in the oven for 10 more minutes.
- Carefully transfer to a wire rack to fully cool. Store in an airtight container, layers separated by pieces of waxed or parchment paper.
- Make Ahead Tips: Rolled out dough can be frozen between the sheets of paper for up to 2 weeks wrapped tightly in plastic wrap. Store baked cookies in an airtight container for up to 10 days.
- 2-1/4 cups bleached all-purpose flour
- 1/4 tsp salt
- 3/4 cup sugar
- 1-1/2 sticks (6 oz) unsalted butter, cut into pieces
- 1 large egg
- 2 tsp finely grated lemon zest (optional)
- 1 tsp pure vanilla extract or vanilla paste
- Colored sugars and silver dragées
- In a small bowl, whisk the flour with the salt. Put the sugar in a food processor and process until very fine. Add the pieces of butter and process until the mixture is smooth and creamy. Add the egg, lemon zest and vanilla and process until smooth. Add the flour mixture and pulse just until a dough forms.
- Transfer the dough to a sheet of plastic wrap and pat it into a disk 1 inch thick. Chill until firm, about 1-1/2 hours.
- Preheat the oven to 350°F.
- On a lightly floured surface, roll out the dough 1/8 inch thick. Brush off excess flour with a dry pastry brush. Stamp out shapes, cutting the cookies as close together as possible. Sprinkle the cookies with colored sugars or dragées. Transfer the cookies to nonstick or greased baking sheets, leaving 1 inch between them (to allow for air movement).
- Bake for 10 to 12 minutes, or until lightly browned around the edges. Transfer the cookies to racks and let cool.
- Yield: About 4 dozen (2-1/2 inch) cookies
- MAKE AHEAD: The cookies can be stored in an airtight container between sheets of wax paper for 1 month.
- 2 cups all-purpose flour (spooned and leveled), plus more for rolling
- 2 tsp ground ginger
- 1 tsp ground cinnamon
- 1/2 tsp ground nutmeg
- 1/4 tsp ground cloves
- 1/4 tsp baking soda
- 1/4 tsp salt
- 1/2 cup (1 stick) unsalted butter, at room temperature
- 1/3 cup packed dark-brown sugar
- 1/3 cup unsulfured molasses
- 1 large egg
- Decorating sugar or sprinkles (optional)
- In a medium bowl, whisk together flour, spices, baking soda, and salt; set aside. With an electric mixer, beat butter and brown sugar until smooth. Beat in molasses and egg. With mixer on low, add dry ingredients; mix just until a dough forms. Place dough on floured plastic wrap; pat into an 8-inch square. Wrap well; chill until firm, 1 to 2 hours.
- Preheat oven to 350°F.
- Divide dough in half. Working with one half at a time (rewrap and refrigerate second half), place dough on floured surface and roll out 1/8 to 1/4 inch thick, turning, lifting, and flouring dough (and rolling pin) as needed. Freeze dough (on paper) until firm, about 20 minutes. (Slightly thicker cookies are easier to transfer and won’t break as easily when little children are handling them.)
- Loosen dough from paper. Cut out shapes, and transfer to baking sheets. Decorate with sugar or sprinkles, if desired.
- Bake until firm and edges just begin to darken, 10 to 18 minutes, baking times will vary depending on the size of the cookies. Cool completely on baking sheets.
- Makes 36 medium-sized cookies
- 2 cups all-purpose flour
- 1/2 tsp baking soda
- 2 tsp Homemade Baking Spice Blend (see recipe below)
- 1/8 tsp salt
- 1/2 cup granulated sugar
- 1/2 cup light brown sugar
- 5 oz (1-1/4 sticks) unsalted butter, softened
- 3 tbsp cold water
- 1-1/2 oz (1/2 cup) sliced almonds
- Sift the flour, baking soda, spice blend, and salt into a large mixing bowl. Using an electric mixer at low speed, combine the flour mixture with the sugars. Increase mixer speed to medium-low, add butter and blend until mixture is crumbly and resembles a streusel. Maintaining the same speed, blend in water 1 tbsp at a time. Mix just until ingredients come together in a cohesive ball.
- Divide in half, and roll each portion between two sheets of waxed paper to form circles 12 inches in diameter and 1/8-inch thick. Leaving the dough between the waxed paper, transfer to a baking sheet and refrigerate until firm, from 2 hours to 3 days; or freeze, well wrapped, up to 1 month.
- Center a rack in the oven and preheat to 300°F. Line two large cool baking sheets with parchment paper; sprinkle on each sheet just enough sliced almonds to cover.
- Remove one sheet of dough at a time from the refrigerator. Remove the top waxed paper sheet and then lay it loosely back on the dough (loosening it for easier later removal of baked cookies). Turn the dough over, peel off top waxed paper sheet and discard it.
- Using a 1-1/2 inch round cutter, cut out shapes in the dough. Place cutouts on nut-covered baking sheets about 1/2-inches apart, lightly pressing cookies into nuts. Bake, one sheet at a time, for about 20 minutes or until light brown on the bottom and golden on top. With a metal spatula, remove cookies to a wire rack to firm as they cool. Serve the cookies, nutty side up.
- To store these cookies, stack the cookies in an airtight metal container at room temperature up to 10 days.
- Yield: 3 to 4 dozen
- If you’re using traditional wooden molds, dust them well with flour, and then tap out excess before making an imprint. Press pieces of dough into molds; roll a rolling pin over dough to ensure filling the crevices. With the tip of a small knife, trim excess dough to shape it neatly. Tap the mold on work surface to release the forms. Put each cookie, imprinted side up, on nut-covered cool baking sheets. With a clean dry pastry brush, brush off excess flour and lightly press cookies into almonds without disturbing the imprint. Bake as directed above.
- 3 tbsp ground cinnamon
- 3/4 tsp ground coriander
- 3/4 tsp ground cloves
- 3/4 tsp ground powdered ginger
- 3/4 tsp freshly ground black pepper
- 3/4 tsp nutmeg, preferably freshly ground
- Scant 1/8 tsp cayenne
- In a small bowl, blend all ingredients together. Store spice blend in tightly covered small glass jar in a cool place.
- You can double or triple the recipe and give as gifts to family and friends!
- Yield: generous 1/4 cup
- 1 lb box confectioner’s sugar
- 2 egg whites from size large eggs
- In the bowl of your electric mixer, combine the sugar and egg whites. Mix until it becomes a fluffy paste, similar in texture to marshmallow creme. You can refrigerate this icing up to 2 days; return to room temperature before using.
- Alternately, you can use Meringue Powder, which is made with powdered pasteurized egg whites. This is a better choice if you are baking for those with compromised immune systems or very young children.

- 1-1/4 cups all-purpose flour
- 1/2 tsp baking soda
- 1/2 tsp salt
- 6 tbsp unsalted butter, softened
- 1/2 cup granulated sugar
- 1 large egg
- 3/4 tsp pure vanilla extract, divided
- 1/3 cup low-fat buttermilk
- 2 cups confectioners’ sugar
- 1 tbsp plus 1 tsp light corn syrup
- 2-1/2 tsp freshly squeezed lemon juice
- 1 tbsp unsweetened cocoa powder
- Preheat oven to 350°F. Line two baking sheets with parchment paper. Sift flour, baking soda, and salt into a bowl; set aside.
- Make Cookies: In the bowl of an electric mixer fitted with the paddle attachment, mix butter until creamy, about 2 minutes. Add granulated sugar; mix until fluffy, about 3 minutes. Mix in egg and 1/2 tsp vanilla. Mix in flour mixture in 3 batches, alternating with the buttermilk. Begin and end with the flour mixture.
- Roll tablespoons of dough into balls (or use a 1/2-oz ice-cream scoop). Place them 2 inches apart on lined sheets. Bake until bottoms turn golden, about 10 minutes. Transfer to wire racks; let cool completely.
- Make Icing: Whisk confectioners’ sugar, corn syrup, lemon juice, remaining 1/4 tsp vanilla, and 1 tbsp water in a small bowl until smooth. If necessary, add more water (icing should be a bit thicker than honey).
- Make the Cocoa Icing: Transfer half to a small bowl. Stir in cocoa. If necessary, thin with a little water.
- Working on the flat side of cooled cookies, spread white icing on half of each cookie and cocoa icing on other half; let set 30 minutes.
- Yield: about 4 dozen
- Cookies
- 2 cups all-purpose flour
- 1/3 cup plus 1 tbsp granulated sugar
- 1/3 cup confectioner’s sugar
- 2 tsp grated lemon zest
- 1/4 tsp salt
- 16 tbsp (2 sticks) unsalted butter, cut into pieces, at room temperature
- Lemon Glaze
- 2 cups confectioners’ sugar
- 2 tbsp finely grated lemon zest
- 1/3 cup fresh lemon juice
- Preheat an oven to 325°F.
- In a food processor, combine the flour, the 1/3 cup granulated sugar, the confectioner’s sugar, lemon zest and salt and process briefly to blend. Add the butter and process just until the mixture resembles coarse meal. Turn the dough out onto a floured work surface and gather it into a rough ball.
- For Shaped Cookies: Roll dough out to 1/4-inch thick. Cut out cookies with shaped cutters. Carefully transfer to baking sheets and bake until lightly golden at the edges and firm to the touch, about 15 to 20 minutes.
- Transfer to a wire rack and cool thoroughly.
- For Slice and Bake Cookies: Roll dough into a log and refrigerate until very firm. With a very sharp knife and using a sawing motion, sliced into 1/4-inch thick rounds. Place on an ungreased baking sheet about 1 inch apart and bake until lightly golden at the edges and firm to the touch, about 15 to 20 minutes.
- Transfer to a wire rack and cool thoroughly.
- For Traditional Wedges: Pat the dough evenly over the bottom of an ungreased 10-inch springform pan or tart pan with a removable bottom. Press the tines of a fork around the edge to form a decorative border, and then pierce the surface every 2 inches with the fork. Sprinkle the surface with the 1 tbsp granulated sugar.
- Bake the shortbread until lightly golden at the edges and the center is firm to the touch, 45 to 50 minutes. Transfer to a wire rack and let cool in the pan for 10 minutes.
- Carefully remove the sides of the pan. Using a long, sharp knife, score the shortbread into thin wedges. Let cool completely before cutting and serving.
- To Glaze Cookies: Combine glaze ingredients in a medium bowl, and whisk until smooth. Use an offset spatula to spread glaze over cookies. Set glazed cookies back on wire racks and let set, about 1 hour. Once completely dry, you can stack to store.
- To Store Cookies: Stack in layers, separated by waxed paper, in an airtight container at room temperature for up to 5 days.
- Yield: 1 dozen cookies
- 1 cup all-purpose flour (bleached flour makes more tender cookies)
- 1/4 tsp baking soda
- 1/8 tsp salt
- 1/8 tsp cayenne pepper
- 5 tbsp unsalted butter
- 1/2 cup plus 1 tbsp unsweetened cocoa powder
- 2/3 cup granulated sugar
- 1/3 cup packed light brown sugar
- 1/3 cup low-fat yogurt or buttermilk
- 1 tsp pure vanilla extract
- Powdered sugar
- Arrange the racks in the upper and lower thirds of the oven and preheat the oven to 350°F. Line two cookie sheets with parchment or Silpats.
- In a large mixing bowl, whisk the flour, baking soda, salt, and cayenne together thoroughly. Set aside.
- In a medium saucepan, heat the butter until it is melted and sizzling. Take it off the heat, transfer to the bowl of a stand mixer, and stir in the cocoa until blended and smooth. Stir in both sugars; the mixture will be sandy. Mix in the yogurt and vanilla. Add the flour mixture all at once and fold and stir just until it is entirely moistened and incorporated. Be careful not to over-mix dough.
- Scoop level tablespoons of the dough 1-1/2 inches apart onto the lined baking sheets or use an ice cream scoop for easy uniformity. Use a fine strainer to sift powdered sugar over the tops. Or you can place powdered sugar in a pie plate and drop the balls of dough into it, roll them around to coat, and then place on lined baking sheets.
- Bake until the cookies look dry and cracked on top but still feel a little soft when pressed, 9 to 11 minutes. Rotate the sheets from top to bottom and spin them halfway through the baking. Slide the cookies, still on the parchment paper, off the sheets and onto wire racks to cool; or set the pans on the racks and let cool.
- The cookies will keep for 2 to 3 days in an airtight container, although they soften and lose their crunchy exterior.
- Yield: about 3 dozen cookies
Thank You!