
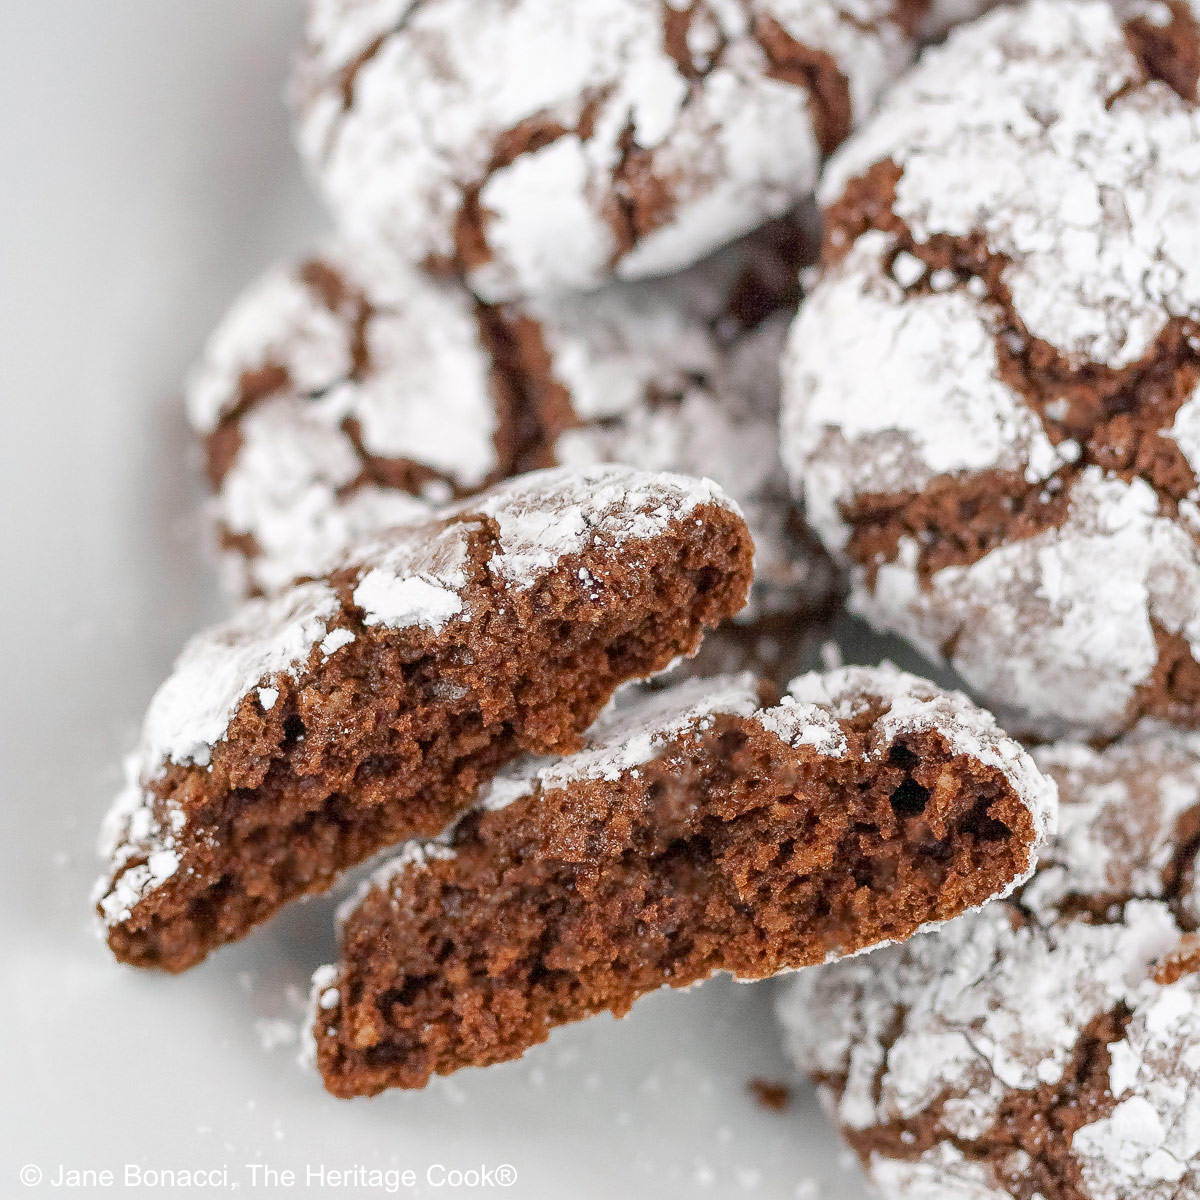
A slightly crunchy sweet crust breaks open and the intense flavor of chocolate is exposed as you eat one after another of these amazing Chocolate Crinkle Cookies. The dough is rolled into balls and then heavily coated with powdered sugar. As they bake, the surface cracks open, exposing the dark brown interior, contrasting beautifully with the white sugar coating.
Do you love chocolate? Do you want the easiest cookies to make that everyone will enjoy? I have the perfect recipe for you – these chocolatey, rich, decadent and gluten-free chocolate crinkle cookies are some of the best ones I make. I have been making a regular version of them for years, but hadn’t adapted them to gluten-free until a few years ago and they are just as delicious!

When people talk about chocolate percentages, it can be a bit confusing. Simply put, the higher the percentage, the darker the color, more intense the flavor, and less sugar it contains. So 55% chocolate chips (semisweet) are lighter in flavor than 80% (usually called bittersweet).
Gluten-free cookies are not difficult to make, and if you use a super fine ground flour, they will not have the common sandy texture of most gluten-free baked goods. I usually use my standard GF flour blend but these cookies use ground nuts in the dough adding texture and flavor that you will love.

If you have had trouble with powdered sugar melting and disappearing when used on hot cookies or cakes, there is an amazing product sold by King Arthur Baking that will solve all your problems. It is called Snow White Topping Sugar and it is perfect for these cookies, lemon bars, gingerbread, or any other moist items that usually absorb the sugar.
I used to get so frustrated when I wanted a beautiful powdered sugar coating, and would coat, dust, and dip my poor unsuspecting cookies, but it never held up. The snow white sugar from King Arthur is amazing. It lasts for days, looking just as fresh as right after it was first applied. A little goes a long way, because you don’t need to use as much. Give it a try and I know you will love the results.

For the best texture, eat these cookies the day you bake them. While good the next day, the cookies get denser. They’re still delicious, just not quite as perfect as the first day. I like to bake off only what we want for a single day and save the rest of the dough for later. Make sure to stir the batter well after it has been sitting to incorporate any accumulated liquid in the bottom of the bowl. It keeps in the refrigerator, covered, for two to three days, or in the freezer for up to one month. Thaw it in the refrigerator overnight before using. And be sure to stir it well to incorporate any moisture in the bottom of the bowl.
Unless I am baking for a large crowd, I usually portion out the dough and roll it into logs. Wrap the logs first in parchment. Using a Sharpie, I write the kind of cookie, the oven temperature, and how long to bake them on the parchment (so I don’t have to find the recipe when I want to bake some) and then wrap the parchment-wrapped logs in plastic for airtight storage. That way I can slice and bake fresh-from-the-oven cookies anytime.

The Artist gets into the act when he rummages through the freezer and finds cookie dough. He is like a child on Christmas day – thrilled to have fresh cookies just a few minutes away! You do not have to let the dough thaw before using. Use a very sharp knife and cut into 1/4-inch thick slices. You can dip both sides of the slices in powdered sugar, or leave it off. The cookies will not crack on top as much if the dough is sliced versus being rolled into balls but they will be just as delicious. If you want round cracked cookies, thaw them completely, portion, and roll.

I have made these chocolate crinkle cookies for years and they have never failed to be the hit of every party. When I enter them in the local county fair, they always win a blue ribbon and if someone you know is having a down day, these are guaranteed to lift their spirits. You will probably find that they become one of your most requested baked items.
My motto is “There are four basic food groups: milk chocolate, dark chocolate, white chocolate and chocolate truffles.” – Author Unknown
It wouldn’t be Chocolate Monday without something to tempt you to throw all cautions away and dive right in. Be careful, these cookies are addicting! Have a wonderful week and Happy Chocolate Monday!
If you try this recipe, let me know! Please leave a star rating in the recipe card, comment below, and don’t forget to snap a pic and tag it @theheritagecook on Instagram! Seeing your creations makes my day and I love hearing from you!
Ingredients needed for Chocolate Crinkle Cookies:
Butter, unsweetened chocolate, almond meal, GF all-purpose flour or regular all-purpose flour, baking powder, salt, sugar, eggs, vanilla, powdered sugar or King Arthur’s Snow White Topping Sugar
PRO Tip:
If you have had trouble with powdered sugar melting and disappearing when used on hot cookiesor cakes, there is an amazing product sold by King Arthur Baking that will solve all your problems. It is called Snow White Topping Sugar and it is perfect for these cookies, lemon bars, gingerbread, or any other moist items that usually absorb the sugar. It doesn’t melt into your baked goods making them look freshly baked for several days!
How to make Chocolate Crinkle Cookies:
- Melt the butter and chocolate together and set aside to cool slightly. Mix together the dry ingredients and set aside.
- Beat together the sugar, eggs, and vanilla until creamy. Blend in the melted chocolate mixture, then add the dry ingredients mixing just until there are no white streaks. Refrigerate the dough for an hour until firm to the touch.
- Make balls of 2 tbsp each and roll them heavily in powdered sugar. Place on parchment-lined pans about 2-inches apart. Bake at 325°F (163°C) for about 12 minutes.
- Remove from the oven and leave on the baking pan for a couple of minutes to finish baking then transfer to a wire rack to finish cooling.
PRO Tip:
Unless I am baking for a large crowd, I usually portion out the dough and roll it into logs. Wrap the logs first in parchment. Using a Sharpie, I write the kind of cookie, the oven temperature, and how long to bake them on the parchment and then wrap the parchment-wrapped logs in plastic for airtight storage. That way I can slice and bake fresh-from-the-oven cookies anytime.
Recommended Tools (affiliate links; no extra cost to you):
- Kitchen scale
- Chef’s knife
- Medium saucepan
- Heatproof bowls
- Stand mixer or hand mixer
- Baking sheet pans
- Parchment paper
Gluten-Free Tips:
* You can adjust any baking recipe to gluten-free by using 120 grams per cup of my favorite gluten-free flour blend. If you are using another brand of flour or regular flour, whisk it, spoon it lightly into a measuring cup until mounded, level off the top with a knife, and weigh the flour left in the cup. Use that weight as your standard per cup of that specific flour. Do this for each flour you use – all flours weigh differently. Commercial gluten-free blends such as Pamela’s All-Purpose Artisan Blend, Bob’s Red Mill 1-to-1, or King Arthur Measure for Measure are all good gluten-free choices.
You will get the best and most consistent results by using a digital kitchen scale and weighing your ingredients, especially when you are baking. And use grams, they are much more accurate than pounds and ounces.
All recommended ingredients are gluten-free as of the writing of this article. Always check to be sure the products haven’t changed and are still safe to consume.
Chocolate Crinkle Cookies (GF)

The dough for these Chocolate Crinkle Cookies is rolled into balls and then heavily coated with powdered sugar. As they bake, the surface cracks open, exposing the dark brown interior, contrasting beautifully with the white sugar coating. This blue ribbon winning recipe will be the hit of any party!
Ingredients
- 1/2 cup (1 stick; 113g) butter, cut into cubes
- 8 oz (227g) unsweetened chocolate, coarsely chopped
- 1 cup (84g) almond meal
- 2 cups (240g*) gluten-free all-purpose flour* or regular all-purpose flour (like Gold Medal)
- 2 tsp baking powder (gluten-free)
- 1/2 tsp kosher or sea salt
- 2 cups (396g) granulated sugar
- 4 large eggs
- 2 tsp vanilla extract
- About 2 cups (227g) powdered sugar, sifted, for coating
Instructions
1. In a heatproof bowl set over a medium saucepan with about 1 inch (3cm) of simmering water. Melt the butter and chocolate together, stirring occasionally. When the chocolate is nearly all melted, remove from heat and stir until smooth. Set aside to cool.
2. In a mixing bowl, combine the almond meal, flour blend*, baking powder and salt. Whisk together to thoroughly blend, Set aside.
3. In the bowl of your standing mixer or a large bowl if using a hand mixer, combine the sugar, eggs and vanilla. Beat on medium speed until smooth and creamy. With the mixer on low speed, blend in the butter/chocolate mixture. Beat until completely incorporated. Add half the flour mixture and beat on low until combined. Add remaining dry ingredients and mix until no white streaks remain.
4. The dough will be quite soft at this point. Cover the bowl with plastic wrap pressed on top of the dough and refrigerate until the dough is firm to the touch, about 1 hour.
5. Set racks in the center of the oven and preheat to 325°F (163°C). Line two baking sheets with parchment paper or Silpats. Sift the powdered sugar into a shallow pie plate and set it next to the baking sheets.
6. Scoop balls of about 2 tablespoons each. Put the balls into the plate of sugar and roll each ball until heavily coated. Place them at least 2 inches (5cm) apart.
7. Bake the cookies for about 12 minutes, spinning the baking sheet and alternating from the top to bottom halfway through baking. The cookies will crack as they bake creating deep crevices in the white sugar. They are done when they have a slight crust on top with a little resistance when you gently press them.
8. Remove the baking sheets from the oven and leave the cookies on the sheets for a couple of minutes. The carry-over heat will finish baking them. Transfer them to a wire rack to completely cool. Store in an airtight container. You can roll them a second time in the powdered sugar if needed just before serving.
Recipe found at www.theheritagecook.com
Notes
* You can adjust any recipe to gluten-free by using 120 grams per cup of my favorite gluten-free flour blend. If you are using another brand of gluten-free flour, whisk the mix, spoon it lightly into a measuring cup without a spout until mounded, level off the top with the back of a knife, and weigh the flour left in the cup. Use that weight as your standard per cup of that specific flour. Do this for each flour blend you use. Commercial blends such as Pamela's, Bob's Red Mill 1-to-1, or King Arthur Measure for Measure are all good gluten-free choices.
You will get the best results by using a digital kitchen scale and weighing your ingredients, especially when you are baking. And use grams, they are much more accurate than pounds and ounces.
All recommended ingredients are gluten-free as of the writing of this article. Always check to be sure the products haven’t changed and are still safe to consume.
Nutrition Information:
Yield:
60Serving Size:
1Amount Per Serving: Calories: 34Total Fat: 1gSaturated Fat: 0gTrans Fat: 0gUnsaturated Fat: 0gCholesterol: 13mgSodium: 41mgCarbohydrates: 6gFiber: 0gSugar: 1gProtein: 1g
The nutritional information for recipes on this site is calculated by online tools and is merely an estimate. If you need nutritional calculations for medical reasons, please use a source that you trust.
If you enjoyed this recipe, be sure to follow me on social media so you never miss a post:

Create a New Tradition Today!
Welcome! The suggestions here are not intended as dietary advice or as a substitute for consulting a dietician, physician, or other medical professional. Please see the Disclaimers/Privacy Policy page for additional details. Unauthorized use, distribution, and/or duplication of proprietary material from The Heritage Cook without prior approval is prohibited. If you have any questions or would like permission, please contact me. We participate in the Amazon Services LLC Associates Program, an affiliate advertising program designed to provide a means for sites to earn advertising fees by advertising and linking to amazon.com. As an Amazon Associate, I earn a small amount from qualifying purchases without any additional cost to you. This page may contain affiliate links. The author makes no claims regarding the presence of food allergens and disclaims all liability in connection with the use of this site. This post was first shared in March 2014. The article was updated in 2025.


Jane Bonacci, The Heritage Cook
These are perfect for any party. When combined with other types, they stand out on the platter!!
Shelby
I can see why they would be a hit at any party! They look delicious!
Feast on the Cheap
So pretty!