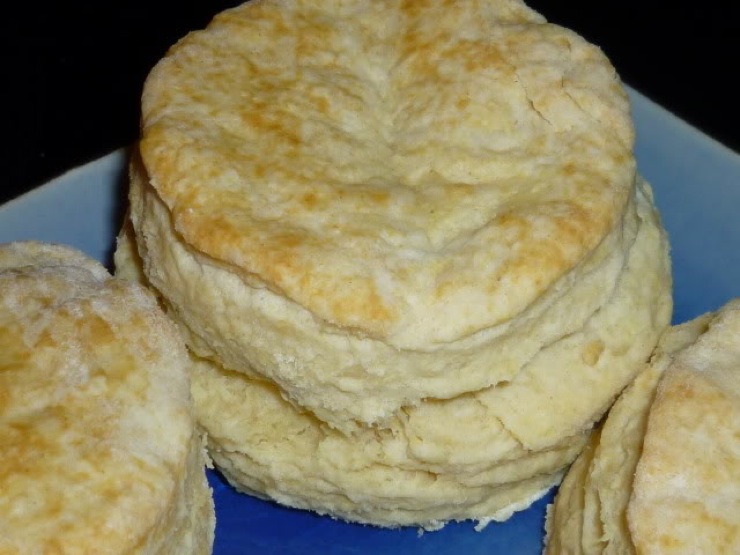
When it comes to comfort foods, I am not sure there is anything more soothing than homemade biscuits. Whether you slather them with butter, homemade jam or honey, biting into a piping hot biscuit is one of life’s greatest gifts. I could write volumes on biscuits, which the myriad of cookbooks on biscuits will attest to, but I will try to consolidate it for you today.
A true representation of Southern hospitality, biscuits beg to be delivered with a sweet southern accent – and I mean that with the utmost respect. There is something about biscuits that make me yearn to be sitting on a big covered porch, rocking in a chair that has cradled many generations, sipping sweet tea and munching on hot-from-the-oven biscuits smothered with butter. Whether it is early in the morning covered with sausage gravy, at supper served with honey butter and fried chicken, or in the evening after a long day when all you want is something that puts a smile on your face, biscuits are what I turn to.
Biscuits can contain a variety of ingredients, but are basically made with flour, salt, fat, a leavener and liquid. The real mystery lies in the technique and there are as many ways to make them as there are bakers in the South. I have read hundreds of articles, books, recipes, and interviews on biscuits and I think when you are talking about tenderness, it really boils down to gluten. If you overwork the dough, the gluten makes the dough tough and chewy – perfect for pizza dough or bread, but deadly for biscuits.
There are many ways to avoid developing the gluten but the “softer” the flour (low gluten content) the easier it is to make tender biscuits. You can make good biscuits with regular all-purpose flour but you have to be extremely careful not to overwork the dough. In the South the two favorite flours to use are White Lily and Southern Biscuit brands. These are made with softer winter wheat which contains less gluten. They are also bleached which helps produce a lighter biscuit. If you are a Yankee and live in an area where these are hard to find, you can order them from an online source or use locally available cake flour or pastry flour. Most good southern bakers also swear by self-rising flour and I have to agree that when you use it you certainly get a higher rise than with ordinary all-purpose flour.
The other big debate is the type of fat you use. Traditionally lard was used but this has given way to butter in most recipes today. The type of lard that is readily available in grocery stores is not the same as the lard our grandmothers used. The type they used was rendered by local butchers and full of flavor. Today’s versions are mostly flavorless fat, virtually the same as solid vegetable shortening. I try to avoid using solid vegetable shortening whenever I can because I don’t want to include any more trans-fats than necessary. If you can find leaf lard it is as close as we can get to the traditional flavors and well worth the hunt. My favorite local butcher, The Fatted Calf, sells it and I keep it in my freezer for those days when The Artist and I need a biscuit “fix.”
There are two distinct types of biscuits, cream biscuits and buttermilk biscuits. Cream biscuits typically have just baking powder in the recipe, use heavy cream instead of butter for the fat and are less fussy because you don’t have to worry about cutting the butter into the flour. Buttermilk biscuits always have baking soda and sometimes baking powder as well. Remember when you see a recipe with baking soda in it you must have an acid present to activate it. Buttermilk, sour cream, cream of tartar and even chocolate all contain the required acid.
If your recipe calls for butter, freeze it until fairly hard then, using the largest holes on a grater or the grating blade in a food processor, grate the butter into the dry ingredients. This is the fastest and easiest way to get the butter to the right size and easily incorporated into the flour. This technique also works beautifully for pie crusts!
Some recipes tell you to pat out the dough, others recommend using a rolling pin. I’m not sure that either way makes that much difference in the end product as long as you are gentle with the dough once the liquid has been added. If you are using all-purpose flour, let it rest about 30 minutes to give the gluten a chance to relax before forming the biscuits.
There is one trick that you seldom see in biscuit recipes but that can be extremely effective in creating the flaky layers we all love. It is the technique used when making croissants or other laminated doughs. You roll the dough out to about 1/2-inch thick and then using a bench scraper, fold it in thirds just like you would a letter. Turn the dough 90 degrees, roll it out again, and fold into thirds again. Turn the dough another quarter turn and repeat the rolling and folding. Then repeat the process one last time for a total of four “turns.” Use enough flour between each turn as needed to keep the dough from sticking.

I like to use a greased cake pan to bake my biscuits in. The sides of the pan help keep the biscuits from spreading out too much and help them rise taller. Use a light colored pan for the most even browning. A dark pan collects the heat, creating hot spots and baked goods tend to burn more in them.
I am including a number of different recipes for Cream Biscuits so you can see how similar they all are to one another. Small adjustments, understanding that flour absorbs moisture from the air and that some days you will need more or less depending on the weather, special tips or tricks, and a lot of practice are the real secrets to perfect biscuits. The more you make them, the more comfortable you become and the better they will turn out.
As always, I think the biggest trick to successful baking and cooking is to have fun. When you are having a good time and loving what you are doing, that love is transferred to the food and magic happens!
Jane’s Tips and Hints:
Another old trick to tender, flaky biscuits is to have your butter and liquid extremely cold. If you want you can also chill your flour but that isn’t as important. You want the butter to remain in pieces that are coated with flour. These bits of butter create little pockets when they melt allowing for taller rising. A good practice is to place the biscuits in the refrigerator for about 10 to 15 minutes before baking to firm up the butter again and reduce the amount of butter that may run out as they bake.
Equally important as cold ingredients is a really hot oven. If the recipe calls for the oven to be at 400°F, preheat it to 450°F and lower it to 400°F as soon as you put the biscuits in the oven. When you open the oven door you lose heat and preheating it at a higher temperature will make up for this drop in temperature. Remember that it takes an oven about 20 minutes to fully preheat.
Kitchen Skill: Cutting Biscuits
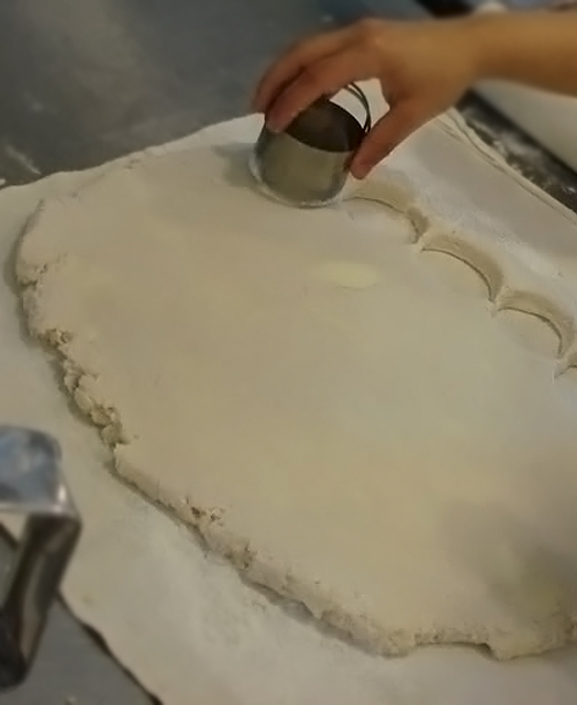
One trick that a lot of cooks won’t share with you is that there is an art to how you cut the biscuits. If you care using a round biscuit cutter, press it straight down and lift it straight back up – do not twist it! Twisting the cutter effectively seals the edges of the biscuits limiting the rising ability.

- 4 cups unbleached all-purpose flour
- 2 tbsp baking powder
- 1 tsp table salt
- 2 to 3 cups heavy cream
- Preheat the oven to 425°F. Lightly grease a cookie sheet.
- Stir together the flour, baking powder, and salt in a large bowl. Pour in enough of the cream to just form a dough. On a lightly floured surface, knead the dough gently several times and divide into 4 equal balls. Pat out each ball to make a flat 3-inch round on the cookie sheet.
- Bake for about 20 minutes or until pale golden. Transfer to a rack and let cool slightly.
- Yield: 8 biscuits
- 4-1/2 cups (or more) bleached all-purpose flour
- 2 tbsp baking powder
- 1 tbsp coarse kosher salt
- 3/4 cup (1-1/2 sticks) chilled unsalted butter, cut into 1/2-inch cubes
- 1-1/2 cups heavy whipping cream
- 3/4 cup half and half
- Position 1 rack in top third and 1 rack in bottom third of oven and preheat to 450°F.
- Combine 4-1/2 cups flour, baking powder, and salt in large bowl; whisk to blend. Add butter cubes and rub in with fingertips until mixture resembles coarse meal. Add cream and half and half and stir just until mixture is moistened and begins to clump together.
- Turn out dough on floured work surface. Knead gently just until dough holds together, adding more flour by tablespoonfuls if dough is very sticky, about 6 turns. Roll out dough to 1/2-inch thickness. Using tines of fork dipped into flour, pierce dough all the way through at 1/2-inch intervals. Using 2-3/4 to 3-inch-diameter biscuit cutter or cookie cutter dipped in flour, cut out dough rounds. DO NOT TWIST THE CUTTER! Transfer dough rounds to 2 ungreased rimmed baking sheets, spacing 1 inch apart.
- Bake biscuits until light golden brown and tester inserted into centers comes out clean, rotating baking sheets halfway through baking, about 14 minutes Total. Transfer biscuits to cooling racks and cool slightly.
- Yield: about 20 servings
- Biscuits can be baked 4 hours ahead. Let stand uncovered at room temperature. Place biscuits on ungreased rimmed baking sheets and re-warm in a 375°F oven for 5 minutes before serving.
- 1-1/2 cups all-purpose flour
- 1-1/2 tsp single-acting or double-acting baking powder (see Note)
- 1/4 tsp baking soda
- 1/2 tsp salt
- 1/4 cup cold lard or vegetable shortening, cut into pieces
- 1/2 cup buttermilk
- 1 tbsp unsalted butter, melted
- Preheat the oven to 450°F.
- In a bowl, sift the flour with the baking powder, baking soda, and salt. Using your fingers, work in the lard just until the mixture resembles coarse meal. Stir in the buttermilk just until moistened.
- Turn the dough out onto a lightly floured work surface and knead 2 or 3 times. Roll out or pat the dough 1/2-inch thick. Using a 2-inch round cutter, stamp out biscuits as close together as possible being careful not to twist the cutter. Transfer the biscuits to a baking sheet. Pat the dough scraps together, re-roll and cut out the remaining biscuits; do not overwork the dough.
- Pierce the top of each biscuit 3 times with a fork and brush with the butter. Bake the biscuits for 12 to 14 minutes, or until risen and golden. Serve at once.
- Yield: 1 dozen biscuits
- The unbaked biscuits can be frozen in a single layer, and then kept frozen in an airtight container for up to 1 month. Thaw before baking.
- To make your own single-acting baking powder, combine: 2 tbsp of cream of tartar, 1-1/2 tbsp of cornstarch, and 1 tbsp of baking soda. The mix will keep in a tightly sealed jar for up to 1 month.
Thank You!


megan @ whatmegansmaking
I love homemade biscuits! These look so good 🙂