
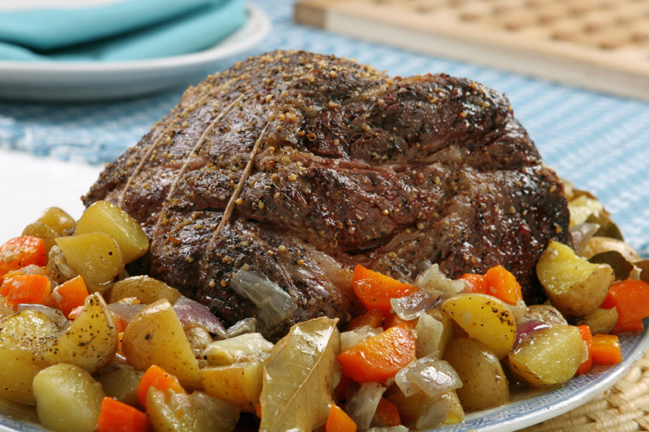
When I think about foods that take me back to my childhood, pot roast is right at the top of my list. It is warm and comforting with meat that is fall-apart tender, the way it gets with long, slow cooking. Today’s recipe is not your mother’s pot roast – it has an old-fashioned flavor that is boosted by the smokiness of the grill.
I like combining multiple cooking methods to take advantage of the best of each and create something better than you can believe. When you start your pot roast on the grill and then finish it in the oven you get the best tasting pot roast you have ever had, smoky and succulent.
The real trick to perfect pot roast is a combination of long cooking at a low temperature and moist heat or in other words, braising. Pot roast is typically made with chuck, a very tough cut of meat unless cooked slowly on low, which breaks down the connective tissue and makes it meltingly tender. If you have ever had tough pot roast, chances are it wasn’t cooked long enough. I have brought home leftovers from restaurants, nearly inedible when ordered, reheated them in the oven for an hour or longer and they turn into perfect pot roast.
Don’t be put off by the long ingredient list. Remember that this is a one-pot meal. You do not have to make anything else and will still have a healthy and nutritious dinner. Of course you can add other side dishes if you want, but if it is one of those days when you just don’t have the time or energy to do one more thing, this will give you all the nutrients, protein and flavor you desire and deserve!
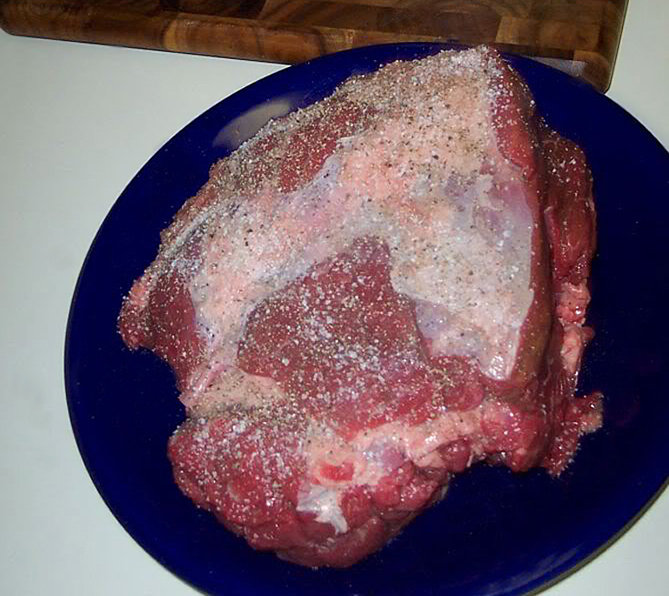
There are two main styles of chuck roasts available at most markets. The 7-bone flat version (about 2-inches thick) and the rounded version. Both will work in this recipe. My personal favorite is the 7-bone. I think the meat gets more tender and moist because there is more surface are in the cooking liquid. But if you are used a traditional Yankee Pot Roast, the rounded version will be what you remember from your childhood.

Can you see the bone in the center of the roast that is shaped like the number 7 … this is a 7-bone roast more commonly used in the Midwest.
An important thing to remember is to always start with your protein at room temperature, especially with large cuts of meat. That way a roast will cook more evenly and the outside won’t be overcooked while the center is still nearly raw. You can cut down on the overall cooking time by as much as an hour if the meat is at room temperature before you start cooking.
In traditional recipes you start by dredging the meat in flour and browning it in a pan. Because we are starting this on the grill, I have added the thickener to the vegetables, which then combines with the liquids and meat juices to create a delectable pan sauce. For those of you who are scared of making gravy, this method is foolproof and you don’t have to fuss with it. As a matter of fact, both grilling and braising are fuss-free methods. A few minutes of prep, a little time on the grill and the throw everything in the oven and forget it for hours. Dinner doesn’t get much simpler than that!
If your family prefers mashed potatoes, you can still cook them in the broth and transfer to a bowl before mashing or feel free to cook and mash them in the traditional method. Either way, you definitely want something to help sop up the gravy – you won’t want to miss a drop!
I created this recipe as a member of the Char-Broil All Stars. Make sure you go over to http://live.charbroil.com/ and check out all the recipes posted by other All Star members!
When you want all the flavor of the grill but don’t want to spend hours tending the fire, try this dual-cooking method. I know you will love the smoky goodness it adds to traditional pot roast.
Have a wonderful weekend and Happy Festive Friday!!
The “Yankee Pot Roast” style of chuck roast
Jane’s Tips and Hints:
Starting this roast on the grill and finishing it in the oven is the best of both worlds. You get all the smoky goodness of barbecuing and the moist heat of oven braising. The pot roast comes out incredibly tender and flavorful.
Kitchen Skill: Braising
Braising means to cook foods slowly in a steamy enclosed environment, retaining their moisture and tenderness. Start by browning your protein in a little oil and then add liquids to the pan. Scrape up all the browned bits off the bottom of the pan because they are full of flavor. Too many people skip this step and that is a shame. Cover with a tight lid and finish cooking in a slow oven, on top of the stove, or in a slow cooker until meat is fork tender.
Browning your meats prior to cooking gives you a much deeper color and flavor in the final product. If you don’t have the time or don’t want to dirty another pan, you can skip this step but your stew won’t be as delectable.
- 4 carrots, coarsely chopped, divided
- 4 stalks celery, coarsely chopped, divided
- 2 tbsp flour (or 2 tsp cornstarch or arrowroot for gluten-free)
- 2-1/2 to 3 lb boneless chuck shoulder pot roast, at room temperature (either a flat 7-bone or rounded style chuck roast will work)
- 1 tsp kosher salt
- 1/2 tsp freshly ground black pepper
- 1/2 tsp garlic powder
- 1 tsp onion powder
- 1/2 cup low-sodium beef broth
- 1/4 cup dry red wine, optional
- 2 tsp Worcestershire sauce
- 1 tbsp English Prime Rib Rub spice blend (from Penzey’s Spices or your favorite local brand), optional
- 1 tbsp dried finely chopped rosemary leaves
- 1 tbsp dried thyme leaves
- 4 large shallots, peeled and quartered
- 2 medium onions, peeled and sliced thickly lengthwise (from root to tip)
- 1 medium red bell pepper, coarsely chopped
- 4 to 6 medium Yukon Gold or red-skinned potatoes, halved
- 1 bay leaf
- Kosher salt and freshly ground black pepper, to taste
- Preheat grill to medium-high heat.
- Place half the chopped carrots and celery in the center of a roasting pan (with a lid) large enough to hold the roast and vegetables, creating a base for the roast to sit on. Using a wire sieve, sprinkle vegetables with the flour (or other thickener), toss vegetables, and set pan aside. (The flour will help thicken the broth slightly, making a sauce to serve with the meat.) Using a sieve or strainer makes sure there are no lumps when you add it to the pan.
- Season both sides of the beef roast with salt, pepper, garlic, and onion powder. Place over direct heat on the grill and cook until well browned (without burning) on first side, about 10 minutes. Using tongs, flip over and cook second side until well browned, about 10 minutes more.
- Transfer to prepared roasting pan, setting on top of the carrots and celery.
- Preheat oven to 300°F.
- In a measuring cup, blend the beef broth, wine and Worcestershire sauce. Pour over roast in pan. Combine English Rub and thyme leaves; sprinkle half over roast. Sprinkle with salt to taste. Cover with lid and cook for 15 minutes. Reduce heat to 275°F and cook for 2-1/2 hours.
- Remove roast from the oven; carefully lift off the lid and place the remaining carrots and celery, the shallots, onions, bell peppers and potatoes around the roast. Tuck bay leaf between the veggies and roast. Sprinkle vegetables with remaining herb mixture and season to taste with kosher salt and pepper. Add 1 cup water if needed to keep the roast and vegetables moist and make a pan sauce. Cover pan and return to the oven.
- Continue cooking for another 1 to 1-1/2 hours or until the vegetables are soft and the meat is fork tender. If it isn’t done, put it back in the oven and go read a book for awhile 😉
- Transfer vegetables to a medium bowl. Move pot roast to cutting board, tent with foil and let rest for 15 minutes. Carve into slices. Serve with roasted vegetables and pan juices.
- Note: If you do not want to grill the meat before braising, you don’t have to. Just increase roasting time by 20 to 30 minutes.
The intention of the content on this site is for your inspiration and enjoyment. It is not a substitute for advice given by a licensed health-care professional. You are responsible for medically confirming any dietary restrictions and ingredient safety with product manufacturers before consuming or using any product. If you have dietary restrictions, always read the labels before including any ingredient in your cooking.
As an affiliate member, if you click on links in my posts and purchase a product, I may receive a small percentage of the sale. Any commissions received will be used to offset a portion of the costs of running The Heritage Cook. If I have received products for review or had travel expenses covered, I will disclose that in the content of each article where applicable.
Thank You!


