Last week my sister-in-law Christine called to tell us she was going to a Halloween party in our area and she wanted to use our kitchen to make her cupcakes. Great! She had them designed in her mind and knew exactly what she wanted to do. She is extremely creative and we had a blast. So, just in time for your own Halloween celebration, I thought I would share our fun with you. Come along and bake with us!!
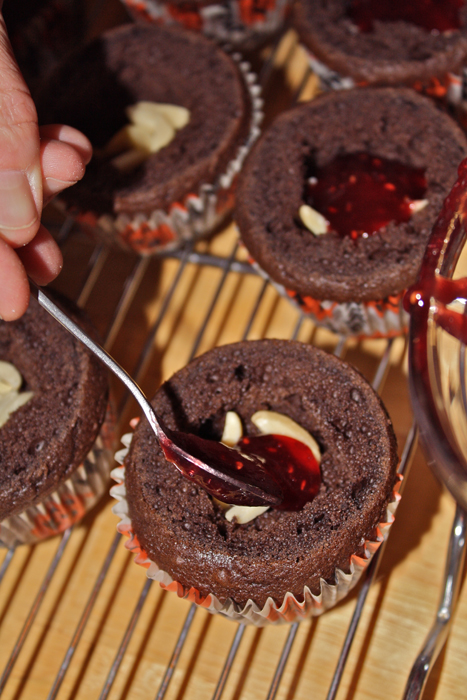
Her idea was to create individual graveyards complete with tombstones, flowers, grass, and freshly dug dirt. Plus a surprise when you bit into the center! A tad complicated but worth every step – they were a big hit at her party last night. We found really cute Halloween-themed cupcake liners and baked chocolate cupcakes in them. When they were cool, we sliced the tops off leaving a flat surface just above the top of the liners. The tops are great to nibble on while you’re decorating! Here comes the hidden surprise part. We took the center out of the cupcake, dropped in a few slivered almonds (not sliced!), topped them with some raspberry jam, and then we replaced the center piece, pressing it down. When you bite into the cupcake you get the delightful blending of chocolate and raspberry with the crunch of almonds. A wonderful surprise!
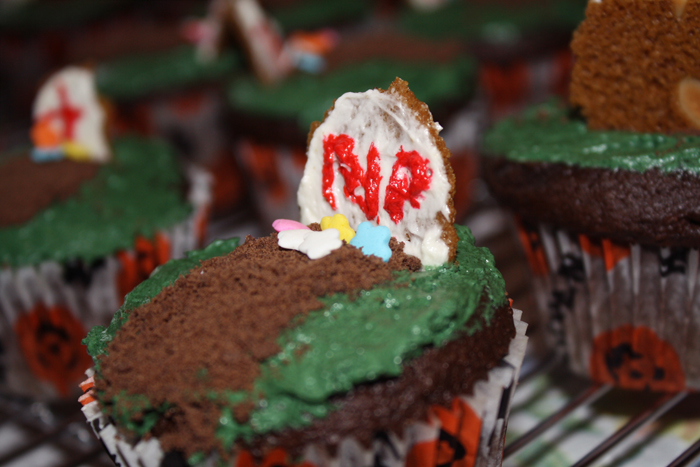
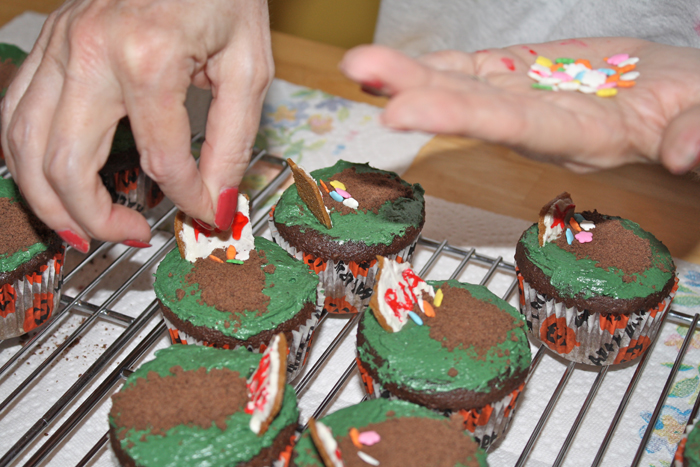
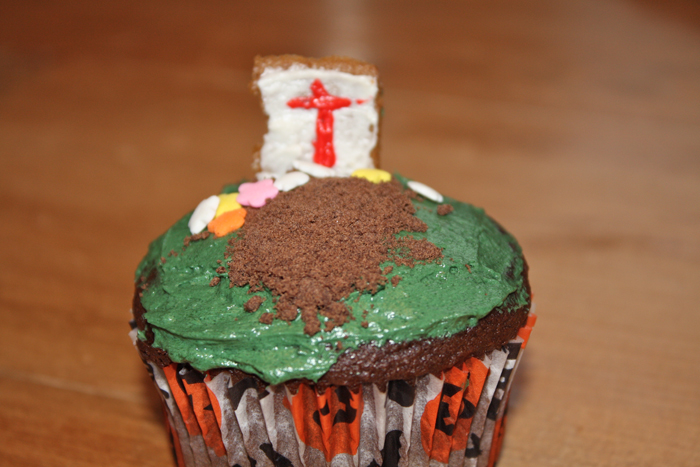
Meanwhile I made buttercream frosting (more on that in a second), putting aside some of the white for the tombstones, and tinted the remaining in green (for the grass) and red (for writing on the tombstones). Christine found wonderful butter almond cookies at Whole Foods for the tombstones – Almond Thins from Jules Destrooper. Slender, thin rectangles, broken in half made the perfect shape! When covered with white frosting they looked like marble headstones. We used the red frosting to draw crosses and write RIP on the tombstones.
We frosted the cupcakes with the green frosting, mounding them slightly in the center. Chocolate cookies crumbs made the dirt of freshly dug “graves” and candy sprinkles were flowers left by loving family members. Then voila! Individual graveyards for everyone.
Now, for the buttercream frosting … I found the most amazing recipe on chow.com, a great community of food loving people who share all kinds of information, such as where to eat when you’re visiting a new city, which restaurant serves the best burritos, and their favorite recipes. I wish I could give full credit, but the poster didn’t leave their name or contact info. This recipe came from a woman’s grandmother who got it from a cake decorating class, probably in the 1950s or 60s. It is truly remarkable – you go from coarse and grainy to silky smooth in just a couple of minutes of beating.
This is unlike any frosting you have ever made in the past. It tastes like a pure butter buttercream, but acts like it was made with vegetable shortening. It is smooth and creamy and not nearly as sweet as most frostings. The flavor of the butter and vanilla really stand out. A true winner! I hope this becomes your go-to Vanilla Frosting like it has for me!
I hope you and your families have a wonderful and safe Halloween. BOO!
Jane’s Tips and Hints:
To remove most of the seeds from any jam, heat it over low heat until melted and smooth. Press it through a wire sieve over a bowl and discard the seeds. If you want to get rid of all the seeds, you will need to press it through a few times.
Kitchen Skill: Smoothly Frosting a Cake/Cupcake
Why: To create a smooth surface to decorate on
How: The key to successful and easy cake frosting is using a frosting spatula. Sometimes called an icing spatula or icing knife, its long narrow shape and flexible blade is designed just for this purpose. You can get them as small as 6-inches long, and they go up to 15-inches and longer. Use a small one for cupcakes, a longer one for cakes. An offset spatula gives you a lot of flexibility, keeping your knuckles above the counter level. I have both types in multiple sizes. They are great spreaders for mustard and mayonnaise too!
Spread a fairly large amount of frosting on the top, taking off the excess you don’t need. With you spatula slightly angled, drag it around the outside of the cupcakes, smoothing the top. Having a flexible blade to work with (as opposed to a stiff kitchen knife) makes it possible to move it around evenly and smoothly.
Ingredients for “Graveyards”
Chocolate Cupcakes (recipe follows)
Vanilla Buttercream Frosting (recipe follows)
Almond Butter Cookies
Raspberry Jam
Slivered Almonds
Multi-colored Sugar “Snowflakes” decoration
Crushed Chocolate Cookies


- 3/4 cup unsweetened cocoa powder
- 1-1/2 cups all-purpose flour
- 1-1/2 cups sugar
- 1-1/2 tsp baking soda
- 3/4 tsp baking powder
- 3/4 tsp salt
- 2 large eggs, lightly beaten
- 3/4 cup warm water
- 3/4 cup buttermilk
- 3 tbsp safflower or canola oil (do not use olive oil)
- 1 tsp pure vanilla extract
- Preheat oven to 350°F. Line standard muffin tins with paper liners; set aside.
- Sift together cocoa powder, flour, sugar, baking soda, baking powder, and salt into a large bowl. Make a well in the center and add eggs, warm water, buttermilk, oil, and vanilla. Whisk until smooth, about 3 minutes. Scrape down the sides and bottom of bowl to assure batter is well mixed.
- Divide batter evenly among muffin cups, filling each 2/3 full. Bake until tops spring back when touched, about 20 minutes, rotating pans halfway through.
- Transfer to a wire rack; let cool completely.
- Yield: 18 to 24 cupcakes


- 5 tbsp flour
- 1 cup milk plus 1 to 2 tbsp or as needed
- 1 cup unsalted butter
- 1 cup granulated sugar
- 1 to 2 tsp vanilla extract, or other flavoring of your choice
- In a heavy-bottomed saucepan, whisk flour and milk together. Cook over medium to medium-high heat for a few minutes, stirring constantly, until it starts to thicken. Pull off the heat and make sure there are no lumps. Return to heat and cook for another minute or two until thick and creamy. You need to cook it long enough to get rid of any raw flour flavor without getting any color in it. Remove from heat and stir in 1 to 2 tbsp milk to thin slightly and whisk until creamy. Pour into a flat dish like a pie plate or cake pan (I used an 8x11-inch Pyrex baking dish) and let cool, stirring occasionally. If you still have a few lumps, you can press it through a fine sieve before continuing.
- In the bowl of an electric mixer combine the butter and sugar. Beat on medium until it has lightened in color and is fluffy, about 3 minutes. Add the cooled roux, about 2 tbsp at a time, while beating the sugar/butter mixture. The frosting will get creamier as you beat it. Test it occasionally and beat until there is no more grittiness from the sugar, about 2 to 3 more minutes, depending on the strength of your mixer.
- Beat in flavoring and any food coloring if using. Beat until light and creamy. This is a very stable frosting that holds up well to most conditions but will melt under extreme heat. Refrigerate as needed.
- Yield: enough to generously frost 24 cupcakes
Thank You!


Dinetonite
I love chocolates, these chocolate cake cups are very nice and looks delicious
Jane Bonacci, The Heritage Cook
If you love chocolate, you’ve come to the right place! We have Chocolate Mondays, so you have something fun to look forward to all week!