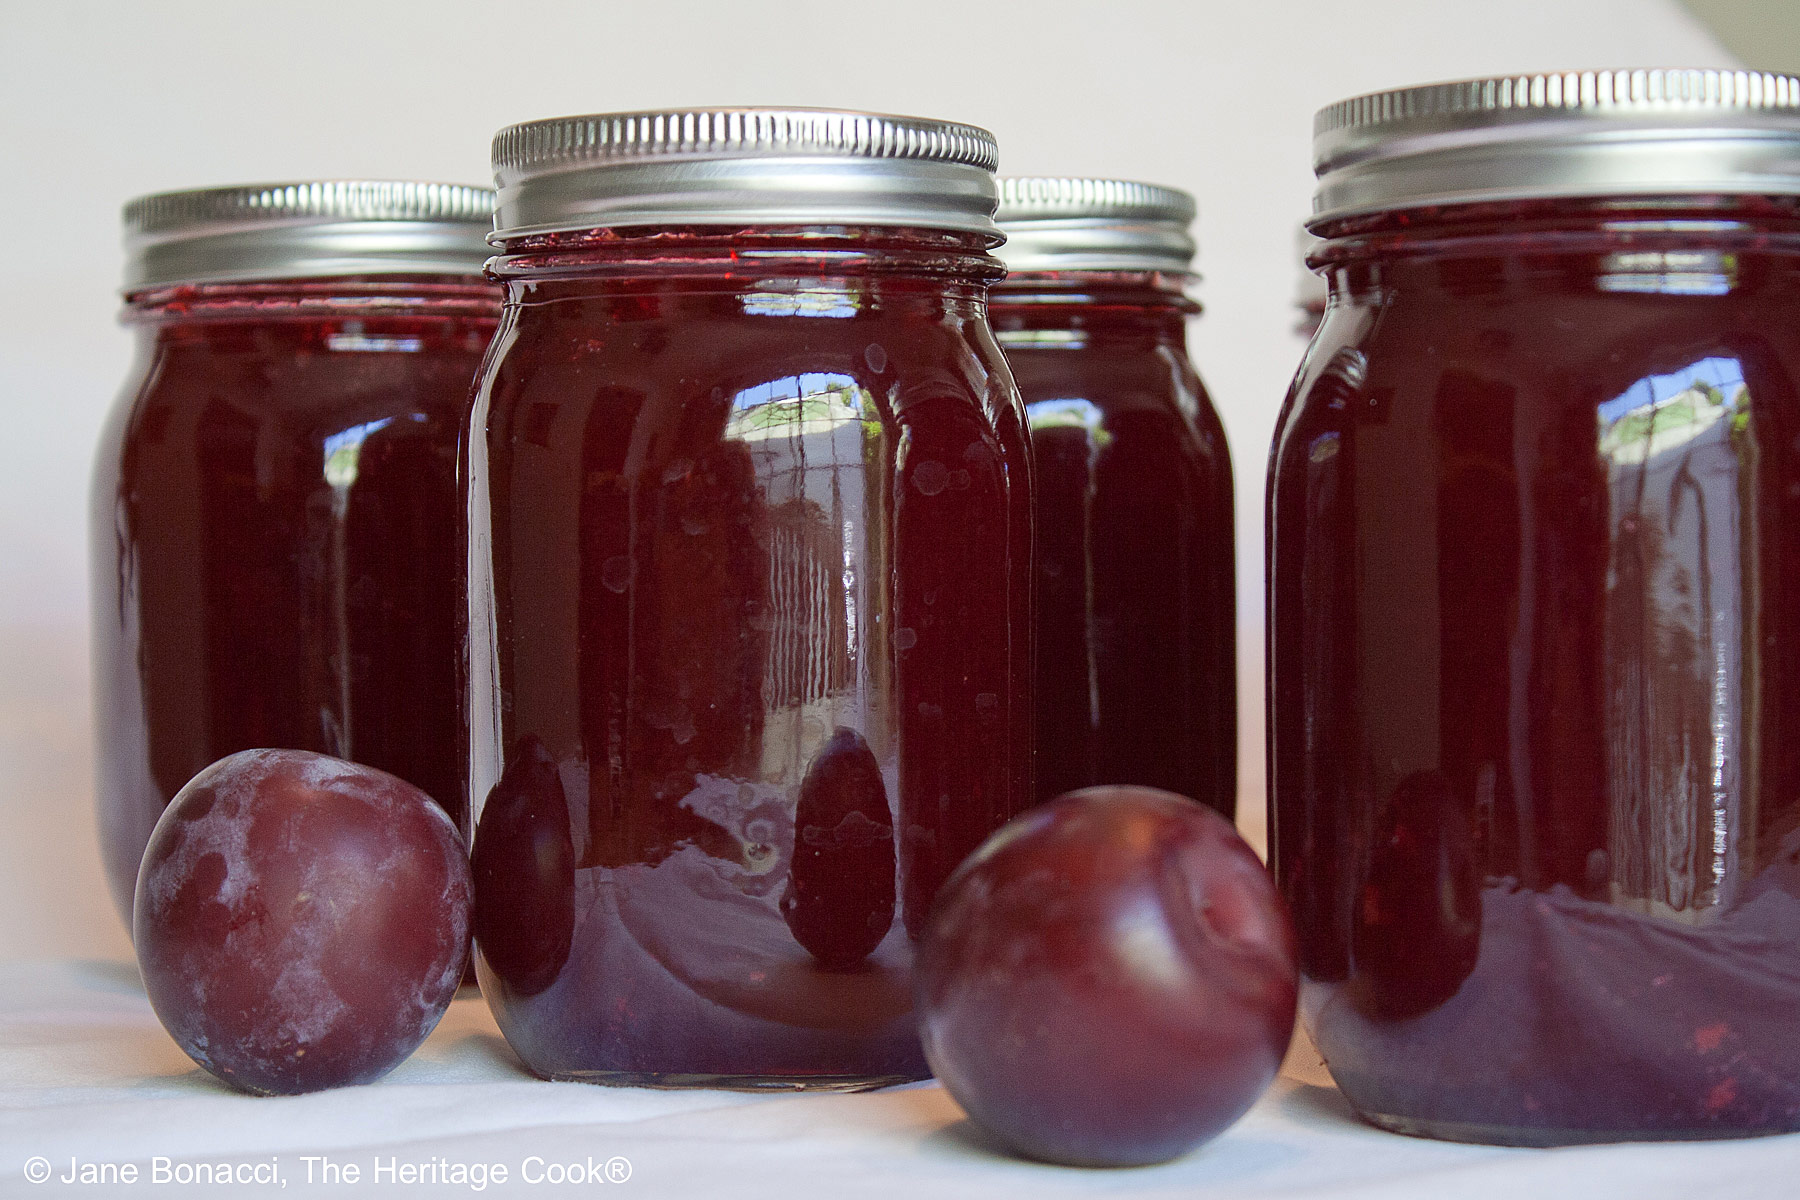
Homemade plum jam. One of life’s greatest pleasures with deep rich fruit flavor with a touch of tartness to balance the sweet. Perfect spread on toast or a bagel, or if you’re like me, eaten straight out of the jar with a spoon!
The Artist and I are incredibly lucky. His big Italian family has made jams and jellies for decades, passing the skills and traditions down from one generation to the next. This was one thing my family didn’t make, so I was thrilled to learn from the master, my father-in-law.

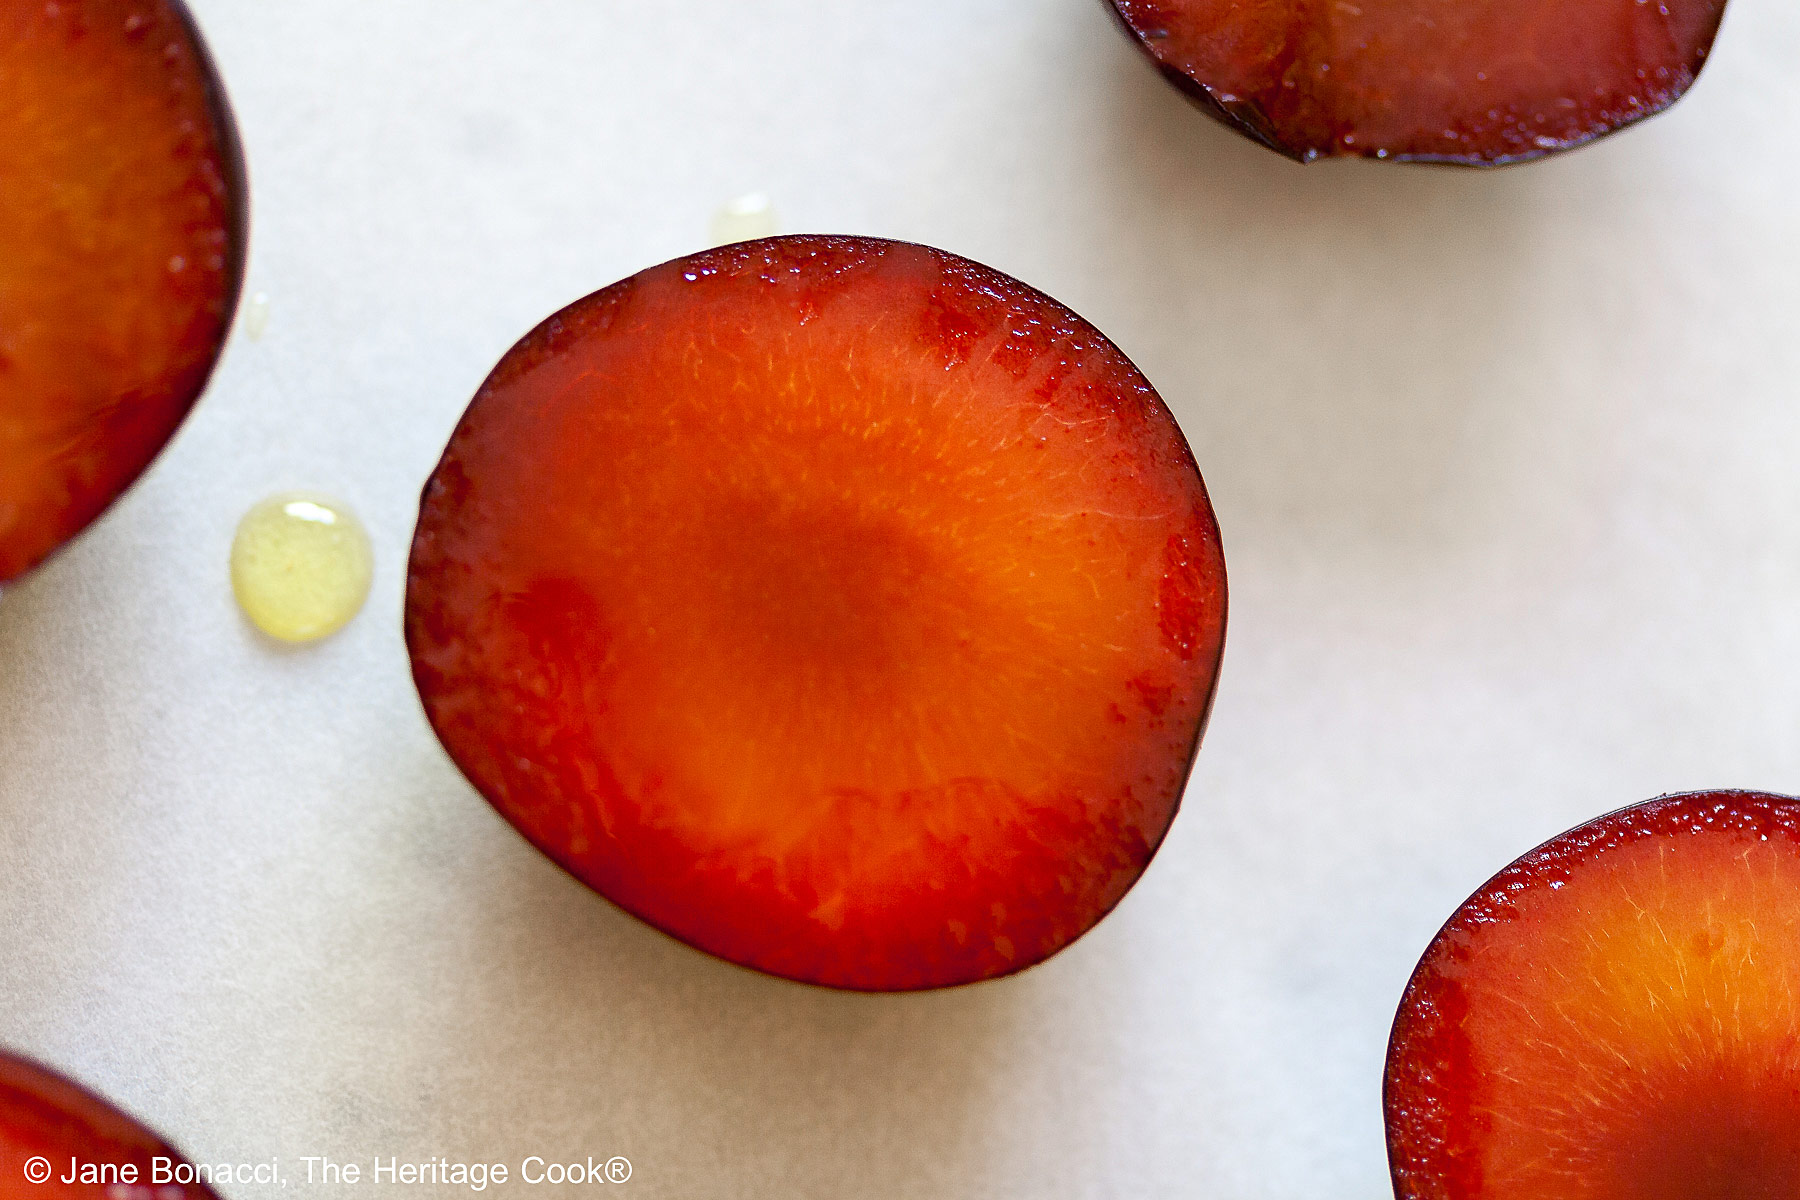
The other thing my father-in-law has is a beautiful tall plum tree that produces incredible fruit. Fully tree-ripened, there is nothing better in the world. The skins slip right off and the fruit nearly falls off the pits making it super easy to cook down for jam. Much less work than store bought plums that aren’t fully ripe.

When I decided to make a batch of jam, I followed the simple directions inside the box of Sure-Jell pectin and it cooked exactly the way it was supposed to. I borrowed a trick I learned from Jamie Schler, the owner/resident jam maker of Hotel Diderot in Chinon, France. We had the opportunity to visit her and watch as she made a batch of one of her famous jams.
Instead of ladling the boiling jam straight into the jars (which usually results in my making a huge mess), she scoops it into a large liquid measuring cup with a spout and then uses that to cleanly pour the jam into the jars. What an improvement!! We were so tidy that there were only a few drops to clean up when we were done! Thank you Jamie for the inspiration and a great new way to get the jam into jars!
If you are visiting the central Loire Valley, I urge you to stay at Hotel Diderot. It is charming and you’ll be welcomed by Jamie and her husband, as you relax in the enchanting hotel and darling town of Chinon, France. It is easy to get to a number of the most popular chateaux in the area. It is truly a dream place to visit!!
You can make jam or jelly out of nearly any fruit. Just follow the directions provided by the maker of the pectin you bought. I used Sure-Jell. Be sure to follow the directions in the package to a “T” and you’ll be a pro in no time!
I hope you give this Homemade Plum Jam a try while the fruit is abundant in the grocery stores and farmers’ markets! What flavor of jam are you going to make? Have fun and dive in!
If you try this recipe, let me know! Please leave a star rating in the recipe card, comment below, and don’t forget to snap a pic and tag it @theheritagecook on Instagram! Seeing your creations makes my day and I love hearing from you!

Ingredients needed for Homemade Plum Jam:
- Pitted and chopped fruit from about 4 lb (1.8 kg) fully ripe plums, water, fruit pectin (your favorite brand), butter, sugar
PRO Tip:
Because you need to stir while the jam is cooking, be sure to have all your ingredients measured out and handy by the stove before you get started. You won’t be able to stop stirring to measure out the sugar for example.
PRO Tip:
Use a large measuring cup with a spout to transfer the jam into the jars. This greatly reduced the mess I got when I tried to ladle the jam directly into the jars. The measuring cup allows you to pour the hot jam cleanly into the jars and gives you more control. A win all the way around!
Recommended Tools for Homemade Plum Jam (affiliate links; no extra cost to you):
- Large canning pot and canning set
- Canning jars with lids
- Baking sheet pan and silicone baking mat (Silpat)
- Large saucepan or Dutch oven
- Food mill
- Stockpot
- Ladle
- Angled 4-cup measuring cup with a spout
PRO Tip:
If you are going to be making jam or other preserves on a regular basis, it would be worth investing in a canning set with all the tools you will need to make beautiful homemade preserves like jams and pickles.
Gluten-Free Tips:
You will get the best results by using a digital kitchen scale and weighing your ingredients, especially when you are baking.
All recommended ingredients are gluten-free as of the writing of this article. Always check to be sure the products haven’t changed and are still safe to consume.
Homemade Plum Jam (GF)

Homemade Plum Jam is one of life's greatest pleasures. Deep rich fruit flavor with a touch of sourness to balance the sweet. Perfect spread on toast or if you're like me, eaten straight out of the jar with a spoon!
Ingredients
- 6 cups (1.42 L) pitted and chopped fruit (from about 4 lb (1.8 kg) fully ripe plums)
- 1/2 cup (118 ml; 113g) water
- 1 box (49g) original Sure-Jell Fruit Pectin (if you use another brand, follow their directions and amounts)
- 1/2 tsp butter (to lessen foaming)
- 8 cups (1.9 L; 1584g) granulated sugar
Instructions
1. Prepare the Jars: Bring a large canning pot, half-full with water, to a simmer. This pot of hot water will be used later on for the water bath. Wash canning jars and screw bands in hot soapy water; rinse with warm water. Pour boiling water over flat lids in a bowl next to the stove. Let the jars stand in the hot water until ready to use. Drain jars well before filling. Alternately, once washed and dried, you can keep the jars and lids warm in a low oven on a baking sheet lined with a silicone baking mat (Silpat) so they don’t slide around as you move them in and out of the oven.
2. Place a small plate in the freezer. You will use this to test the thickness of the jam. Place a triple layer of kitchen towels on your countertop. This is where you will set the filled jars.
3. Prepare the Fruit: Remove pits from the plums. You can leave the peels on the plums (the peels add deep color) if you are using a food mill. If the plums are small you can simply quarter them and use a food mill later, otherwise peel and coarsely chop them. Place the fruit in a large saucepan, stockpot, or Dutch oven; the fruit should not fill more than about half of the volume of pan. Use two pans if needed. Add 1/2 cup (118 ml) water to the pot (or half to each pan if using two). Bring to a boil over high heat. Reduce heat to med-low, cover, and simmer 5 min.
4. Transfer the cooked fruit to a food mill set over a very large bowl. It makes it easy to separate and remove the bitter skins as well as break down the fruit.
5. Measure exactly 6 cups (1.42 L) of the prepared fruit into an 8- or 10-quart stockpot (7.6 L to 9.5 L) or large Dutch oven.
6. Measure the sugar into a large bowl and set next to the stove. Set the pectin beside the sugar. Have a timer ready.
7. Make the Jam: Place the 6 cups prepared fruit in its pan on the stove. Stir the pectin into the fruit, stirring well to make sure it is fully dissolved. Add the butter to reduce foaming. Stirring constantly, bring this mixture to full rolling boil (a boil that doesn't stop bubbling when stirred) over high heat. Slowly add the sugar, stirring constantly to be sure the sugar is fully dissolved. Return to the full rolling boil and boil exactly 1 min., stirring constantly. Remove the pan from the heat.
8. Skim off any foam from the surface with a metal spoon and discard.
9. Check the thickness of a small amount of the cooked jam on the frozen plate. It should set up quickly with the cold. If it doesn't set, return the pot to the heat and cook for another 30 seconds; test again. When it reaches the right consistency on the plate, it is ready to pour into jars.
10. Place the hot jars and lids on the stove next to the pot of jam. Use a jar lifter or heatproof work gloves to handle the jars. To make cleanup easier, you can work over a sheet of parchment to catch any drips.
11. Fill the Jars: Ladle the jam into an angled 4-cup (1 qt; 1 L) measuring cup (it has the sharpest pouring spout), then carefully pour from there into the prepared jars, filling to within 1/8-inch (3 mm) of tops. Wipe the jar rims and threads clean with a damp cloth or paper towel to remove any spills or drips. Cover with the two-piece lids. Screw bands on tightly.
12. Place the jars upside down on the towel-covered counter for about 15 minutes, and then turn them upright. This will help set the seal of the lids.
13. Water Bath: Place the jars on an elevated canning rack. Lower the rack into the canner. The water must cover the jars by 1 to 2 inches [2.5 to 5 cm] – add more boiling water if needed. Cover; bring water to a gentle boil and boil for 10 min.
14. Carefully remove the jars from the water and place them upright on the towels to cool completely. You will hear the lids popping as each one seals. After the jars cool, check the seals by pressing the centers of the lids with your finger. If the lid springs back, the jar is not sealed and you must keep it in the refrigerator.
15. Sealed jars are shelf-stable for about 1 year. Once you have opened a jar, keep it in the refrigerator and use it within 2 to 3 weeks.
Recipe found at www.theheritagecook
Notes
All recommended ingredients are gluten-free as of the writing of this article. Always check to be sure the products haven’t changed and are still safe to consume.
Nutrition Information:
Yield:
20Serving Size:
1Amount Per Serving: Calories: 20Total Fat: 0gSaturated Fat: 0gTrans Fat: 0gUnsaturated Fat: 0gCholesterol: 0mgSodium: 6mgCarbohydrates: 5gFiber: 0gSugar: 3gProtein: 0g
The nutritional information for recipes on this site is calculated by online tools and is merely an estimate. If you need nutritional calculations for medical reasons, please use a source that you trust.
If you enjoyed this recipe, be sure to follow me on social media so you never miss a post:

Create a New Tradition Today!
Welcome! The suggestions here are not intended as dietary advice or as a substitute for consulting a dietician, physician, or other medical professional. Please see the Disclaimers/Privacy Policy page for additional details. Unauthorized use, distribution, and/or duplication of proprietary material from The Heritage Cook without prior approval is prohibited. If you have any questions or would like permission, please contact me. We participate in the Amazon Services LLC Associates Program, an affiliate advertising program designed to provide a means for sites to earn advertising fees by advertising and linking to amazon.com. As an Amazon Associate, I earn a small amount from qualifying purchases without any additional cost to you. This page may contain affiliate links. The author makes no claims regarding the presence of food allergens and disclaims all liability in connection with the use of this site. This post was first shared in June 2017. The article was updated in 2024.