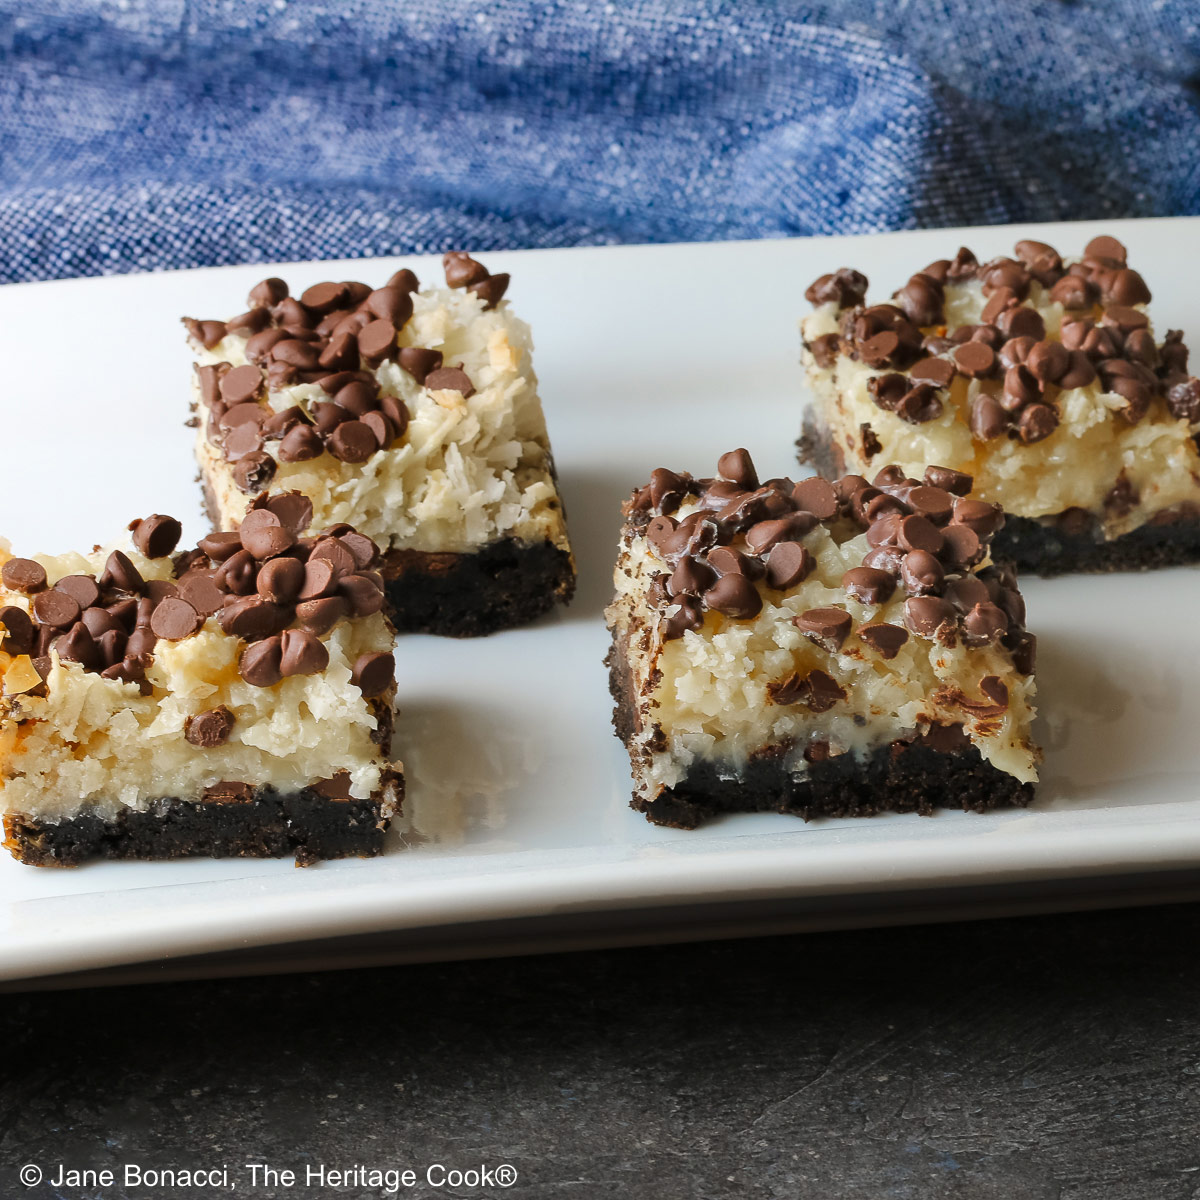
If you are searching for an easy and quick dessert, look no further. These Almond Joy Magic Squares take just six ingredients and about three hours (including chilling time), and you’ve got a sweet treat everyone will love.
I have loved Almond Joy candy bars since I was a little girl and anytime I can get the same flavors it puts a smile on my face. These magic squares have all the coconut, chocolate, and almonds that we crave.

Two brands of GF Oreo-style cookies that work in this recipe.
The recipe calls for lining the baking pan with parchment paper. The easiest way to do this is to turn your pan over and lay the parchment over the bottom of the pan. Use your fingers to crease the paper at each side of the square. Take the paper off, turn the pan right-side-up and insert the parchment, it will fit surprisingly well.

Leave two opposite ends long enough to create a sling. This will help you remove the block from the pan once chilled and you can easily cut them into squares.
To press the cookie crumbs into the pan and make a flat base crust, use a spatula or the bottom of a metal measuring cup. Pack fairly tightly for less crumbling when cutting and eating the squares.

It is wonderful how easy these are to make and how little actual time it takes to make them. The most time is spent chilling them before cutting and serving.
Don’t skimp on the chilling time. If you cut them while still warm or at room temperature, the filling will run and you’ll have a mess on your hands. Be sure you leave enough time to fully chill!

If you have a long knife, now is the time to use it. It will give you leverage as you cut the squares. I used my 12-inch chef’s knife and it spanned the squares easily. For the cleanest cuts, run the knife under hot running water after each slice and wipe dry so you have a clean blade for each cut. These squares are really intense and smaller 2-bite pieces are the perfect serving size.

If you love coconut and chocolate candy bars, you’re going to adore these magic squares. Packed with all the flavors you love, you will swoon when you take your first bite!
Give these Almond Joy Magic Squares a try and I bet you save the recipe to repeat regularly leading up to and including the holidays. They are so easy to make with most of the time spent in the refrigerator chilling. This gives you plenty of time to do other baking or making dinner to enjoy before indulging in this decadent dessert.
If you try this recipe, let me know! Please leave a star rating in the recipe card, comment below, and don’t forget to snap a pic and tag it @theheritagecook on Instagram! Seeing your creations makes my day and I love hearing from you!
Ingredients needed for Almond Joy Magic Squares:
- Crust: gluten-free Oreo cookies, melted butter
- Layers: mini chocolate chips, sweetened coconut, sliced almonds, sweetened condensed milk
PRO Tip:
Be sure you fully chill these squares before cutting them or the filling will run and make a big mess. You need to be sure they are firm before lifting them out of the pan and cutting into squares.
PRO Tip:
If you don’t have a food processor, put the cookies in a resealable plastic bag and use a rolling pin to crush them. It will take longer than a food processor but it is a lot easier to clean up, LOL.
How to make Almond Joy Magic Squares:
- Line an 8×8-inch (20×20 cm) baking pan with parchment to create a sling.
- Crust: Put the Oreo cookies with the cream filling in a food processor and pulse into fine crumbs. Press into the lined baking pan. Bake at 350°F (180°C) for 8 minutes. Remove from the oven.
- Layers: Carefully sprinkle 3/4 of the mini chocolate chips over the crust, then add the coconut, and sliced almonds. Drizzle with the sweetened condensed milk over the top and sprinkle with remaining mini chocolate chips. Return to the oven and bake 15 minutes. Tent the pan with a sheet of foil and cook for an additional 10 to 15 minutes until the filling is set.
- Chill: Cool on a wire rack for 45 minutes and then place in the refrigerator to chill all the way through. When thoroughly cool, cut into about 12 squares.
PRO Tip:
The recipe calls for lining the baking pan with parchment paper. The easiest way to do this is to turn your pan over and lay the parchment over the bottom of the pan. Use your fingers to crease the paper at each side of the square. Take the paper off, turn the pan right-side-up and insert the parchment, it will fit surprisingly well.
PRO Tip:
If your knife is sticking when you are cutting the squares, run it under hot water and wipe dry after each cut. This makes a knife glide through the dessert!
Recommended Tools (affiliate links; no extra cost to you):
Gluten-Free Tips:
* You can adjust any baking recipe to gluten-free by using 120 grams per cup of my favorite gluten-free flour blend. If you are using another brand of flour or regular flour, whisk it, spoon it lightly into a measuring cup until mounded, level off the top with a knife, and weigh the flour left in the cup. Use that weight as your standard per cup of that specific flour. Do this for each flour blend you use. Commercial gluten-free blends such as Pamela’s All-Purpose Artisan Blend, Bob’s Red Mill 1-to-1, or King Arthur Measure for Measure are all good choices.
You will get the best and most consistent results by using a digital kitchen scale and weighing your ingredients, especially when you are baking.
All recommended ingredients are gluten-free as of the writing of this article. Always check to be sure the products haven’t changed and are still safe to consume.
Almond Joy Magic Squares (GF)

If you are hunting for an easy and quick dessert, look no further. Just six ingredients with about three hours (including chilling time), and you’ve got a sweet treat everyone will love.
Ingredients
Cookie Crust
- 20 gluten-free Oreo cookies (not double stuffed!) with the filling
- 5 tbsp (71g) butter, melted
Filling Layers
- 1 cup (177g) mini semisweet chocolate chips, divided
- 1-3/4 cup (149g) shredded sweetened coconut
- 1/2 cup (43g) sliced almonds
- 14 oz (398g; 414 ml) sweetened condensed milk *(see note)
Instructions
1. Preheat the oven to 350°F (180°C). Line an 8x8-inch (20x20 cm) baking pan (preferably metal) with parchment paper, leaving an overhang on two opposite side, to create a sling for easy removal. Set aside.
2. For the Crust: Place the cookies, with the cream filling included, in a food processor and pulse until they become fine crumbs. Alternately you can put them in a heavy-duty plastic bag and use a rolling pin to break them up. Pour the melted butter into the crumbs and pulse until completely incorporated and they hold together when pressed with your hand. Press the mixture evenly in the bottom of the prepared pan, compacting the crumbs. Bake for 8 minutes.
3. Make the Layers: Remove pan from the oven and carefully sprinkle with 3/4 of the mini chocolate chips, almonds, and the coconut. Pour the sweetened condensed milk over the top and sprinkle with reserved mini chocolate chips. Then return the pan to the oven and bake for 15 minutes.
4. Loosely tent the pan with aluminum foil to prevent browning. Cook an additional 10 to 12 minutes until the filling is set. Remove the pan from the oven.
5. Cool at room temperature for an hour on a wire rack and then place in the refrigerator to cool all the way through, about 1 hour. DO NOT cut the squares while they are still warm or the loose filling will run and you’ll have a mess on your hands.
6. Cut the Squares: Once chilled, use the parchment paper sling to lift them out of the pan and place on a cutting board. Peel back the parchment and using a very sharp long knife, slice into about 12 squares. Run your knife under hot water and wipe dry after each cut for the cleanest presentation. Be sure to cut them while still cold! Serve and enjoy!
Recipe found at www.theheritagecook.com
Notes
* To get the sweetened condensed milk out of the can, use a can opener to take the lid off the can so you can easily get the sticky, thick milk out.
You will get the best results by using a digital kitchen scale and weighing your ingredients, especially when you are baking.
All recommended ingredients are gluten-free as of the writing of this article. Always check to be sure the products haven’t changed and are still safe to consume.
Adapted from Jenn of Eat Cake for Dinner
Nutrition Information:
Yield:
12Serving Size:
1Amount Per Serving: Calories: 405Total Fat: 17gSaturated Fat: 12gTrans Fat: 0gUnsaturated Fat: 4gCholesterol: 15mgSodium: 205mgCarbohydrates: 60gFiber: 4gSugar: 49gProtein: 5g
The nutritional information for recipes on this site is calculated by online tools and is merely an estimate. If you need nutritional calculations for medical reasons, please use a source that you trust.
If you enjoyed this recipe, be sure to follow me on social media so you never miss a post:

Create a New Tradition Today!
Welcome! The suggestions here are not intended as dietary advice or as a substitute for consulting a dietician, physician, or other medical professional. Please see the Disclaimers/Privacy Policy page for additional details. Unauthorized use, distribution, and/or duplication of proprietary material from The Heritage Cook without prior approval is prohibited. If you have any questions or would like permission, please contact me. We participate in the Amazon Services LLC Associates Program, an affiliate advertising program designed to provide a means for sites to earn advertising fees by advertising and linking to amazon.com. As an Amazon Associate, I earn a small amount from qualifying purchases without any additional cost to you. This page may contain affiliate links. The author makes no claims regarding the presence of food allergens and disclaims all liability in connection with the use of this site.