Rich espresso chocolate brownies surround your favorite ice cream for a fun, delicious, and easy dessert. These Espresso Brownie Ice Cream Sandwiches are sure to become a family favorite.
I had the opportunity to develop this recipe for the good folks at Cake Boss, featuring their products for a marketing campaign. Gee, great baking equipment, good people to work with, and the requirement to include ice cream? Oh yeah, they had me at Hello. 🙂
 So, I started thinking about things I could make with ice cream, wanting to create a dessert that could be customized easily, making it perfect for any occasion. Something fun and festive. And, of course it needs to be gluten-free. Hmmm, what would I make?
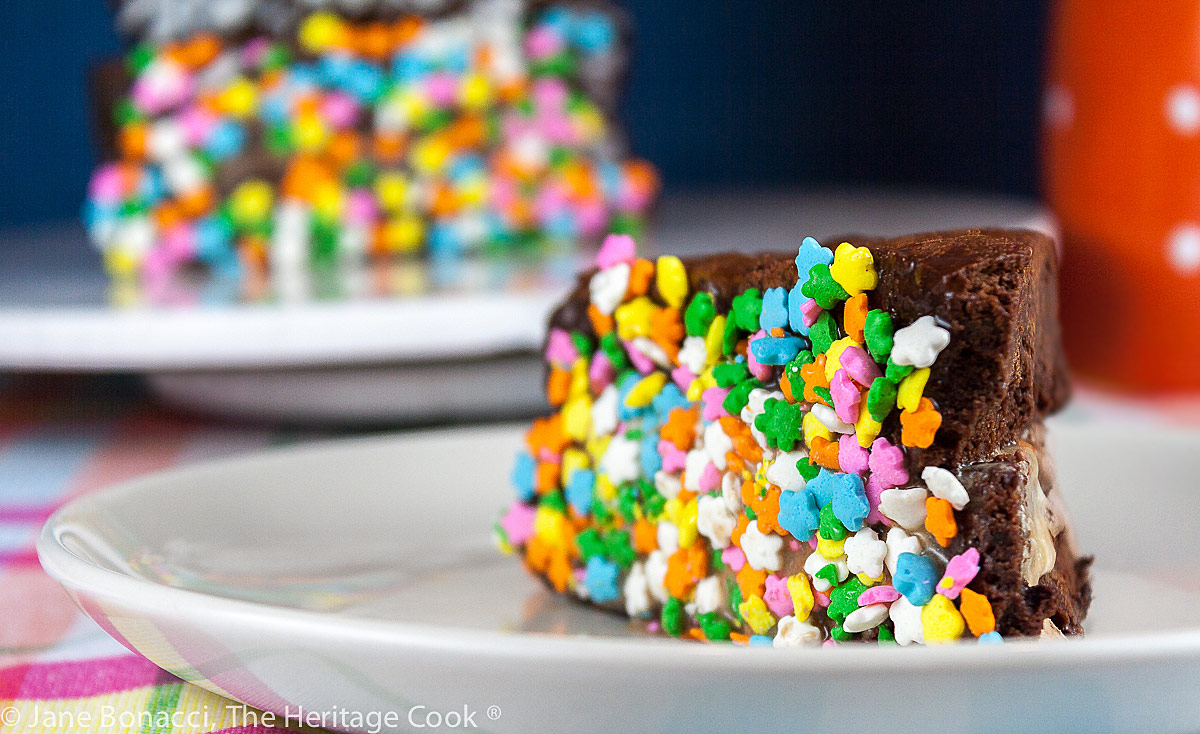
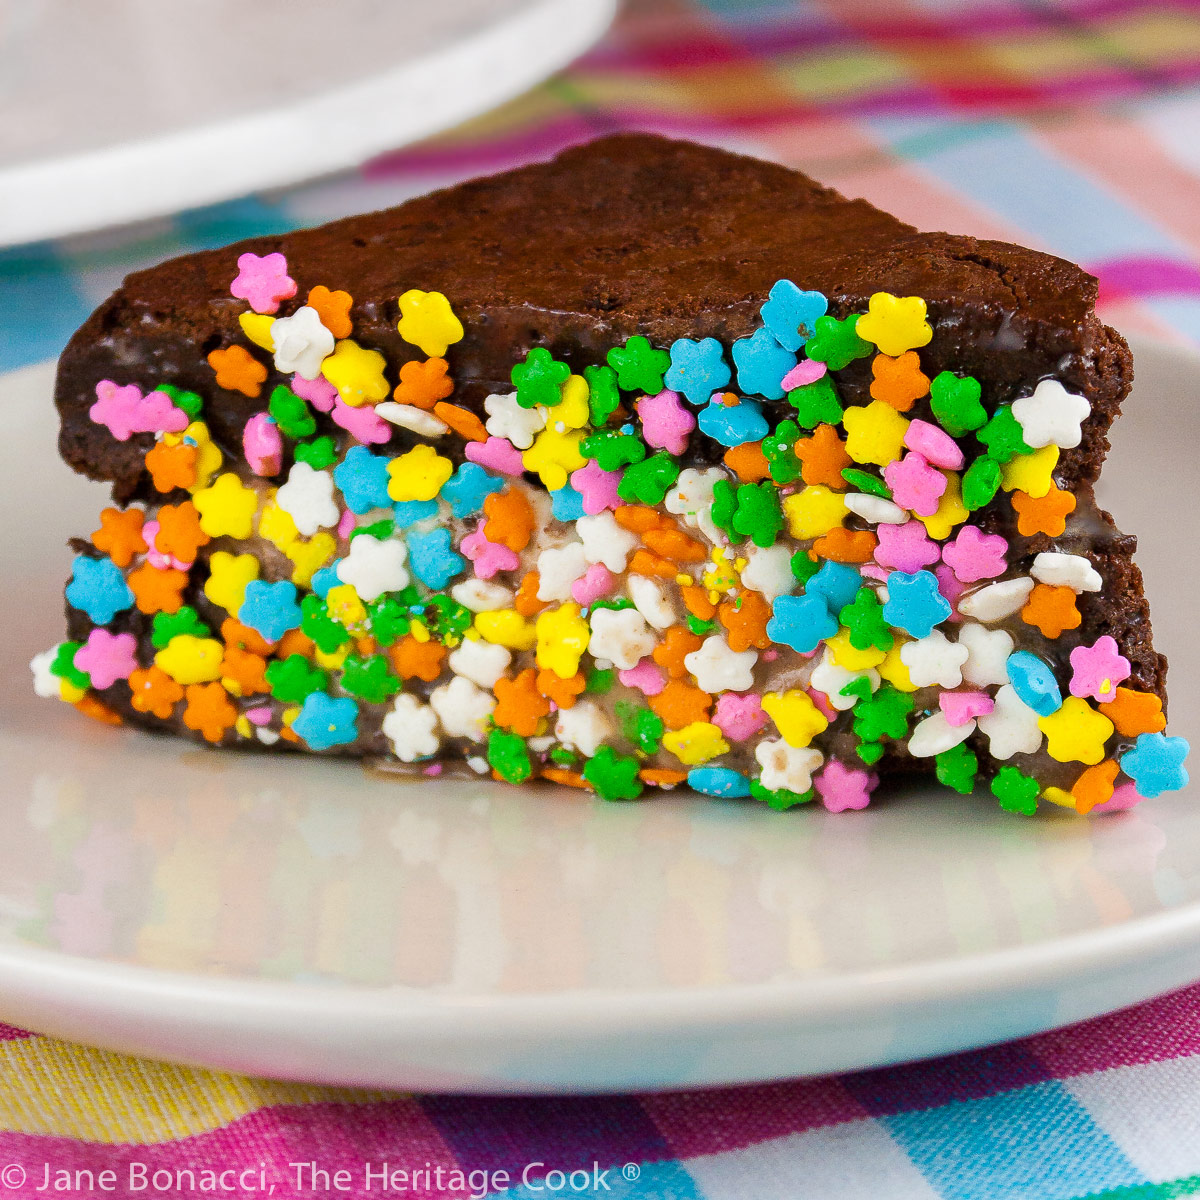
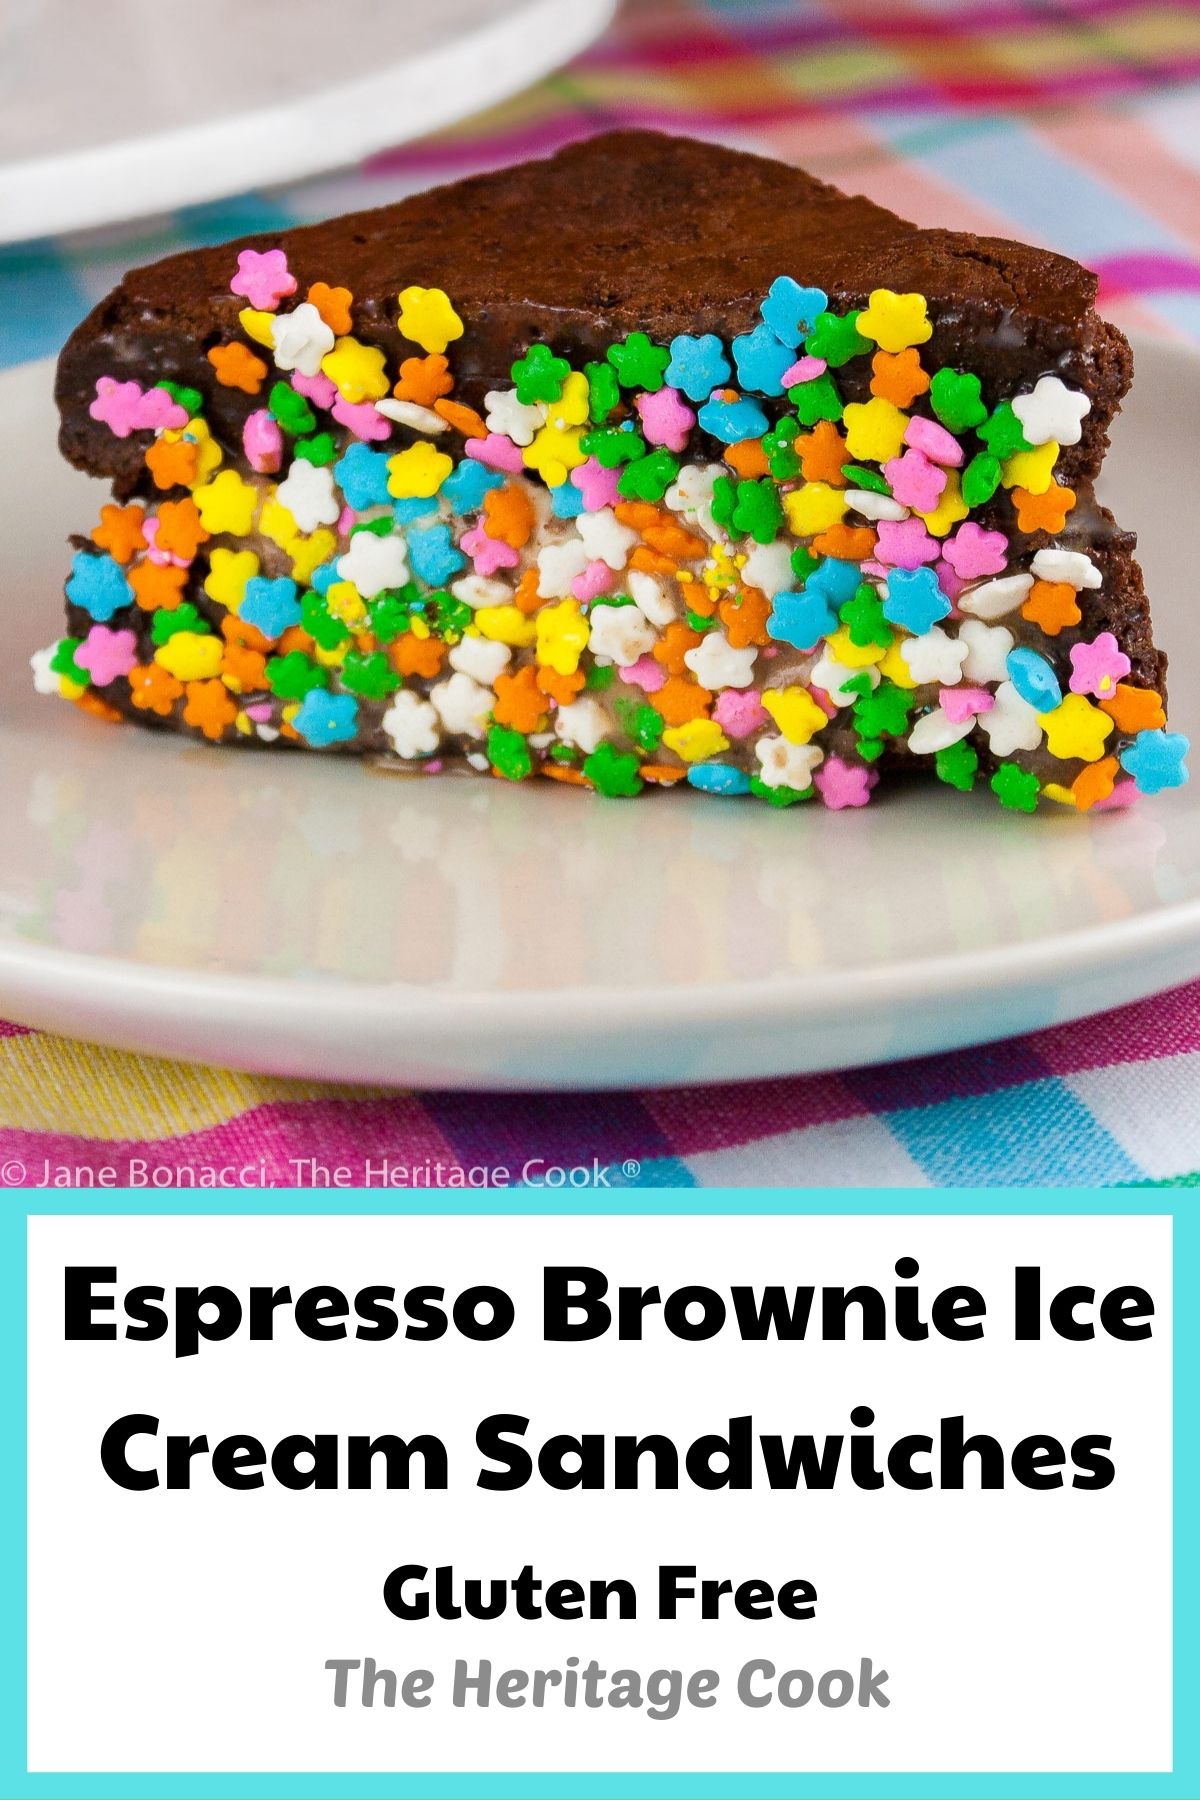
I thought brownies would be perfect for ice cream sandwiches. Beautiful triangles of fudgy, chocolate-packed goodness combined with cold luscious ice cream is a heavenly match. You can use any flavor ice cream that you like, and this time the Caramel Swirl was calling my name!
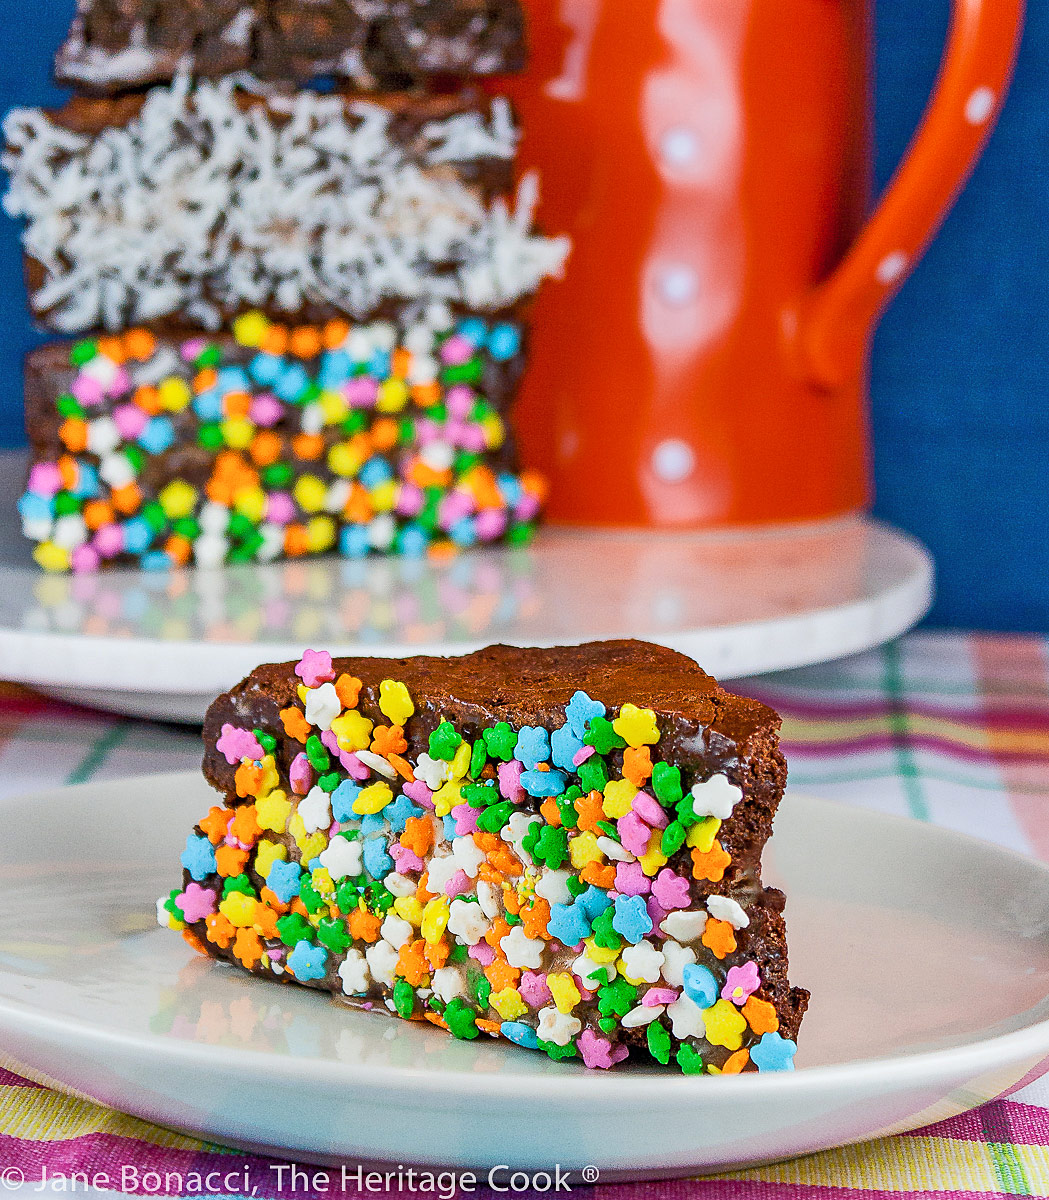 For this recipe I used two 8-inch square pans. I was able to easily cut the brownies into quarters and then each quarter in half to create eight perfect triangles. They were so rich that next time I will cut each triangle in half to create 16 smaller sandwiches. These would be adorable and perfect for smaller appetites, ladies luncheons or baby/wedding showers. They would also be great on a dessert buffet if you can keep them cold.
The pans are so efficient in transferring heat that your baked goods may take a touch less time to fully bake. Watch things carefully toward the end and pull the brownies out as soon as they are close to finished. They will continue to cook with the residual heat of the pans. You don’t want to risk overcooking and getting dried out baked goods.
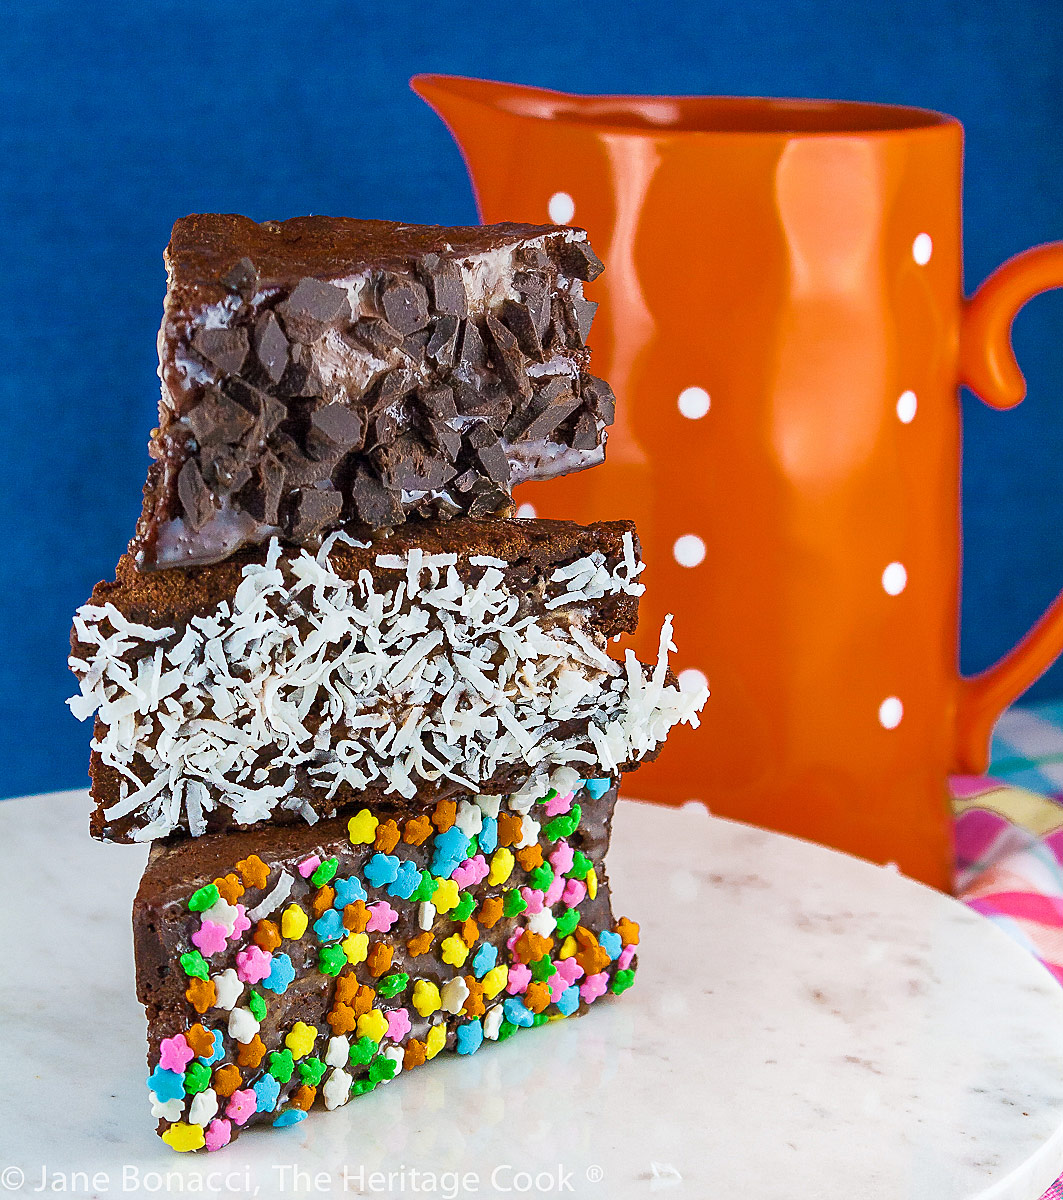
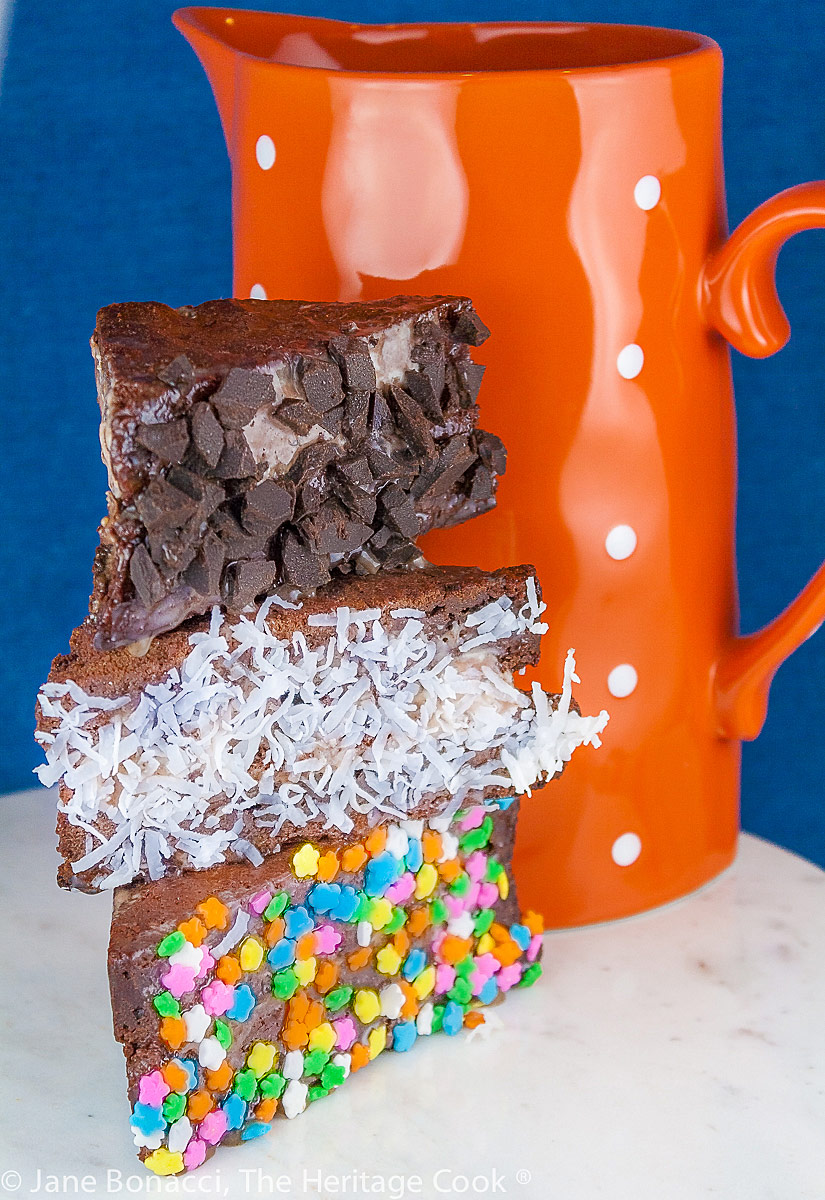
You can make the components ahead and then set out all the fixin’s and let each person make their own, choosing the flavor of ice cream and which decorations they want to use. I had coconut, sliced almonds, chocolate chunks, chopped chocolate covered toffee, and colorful sprinkles. Very festive and most definitely fun! 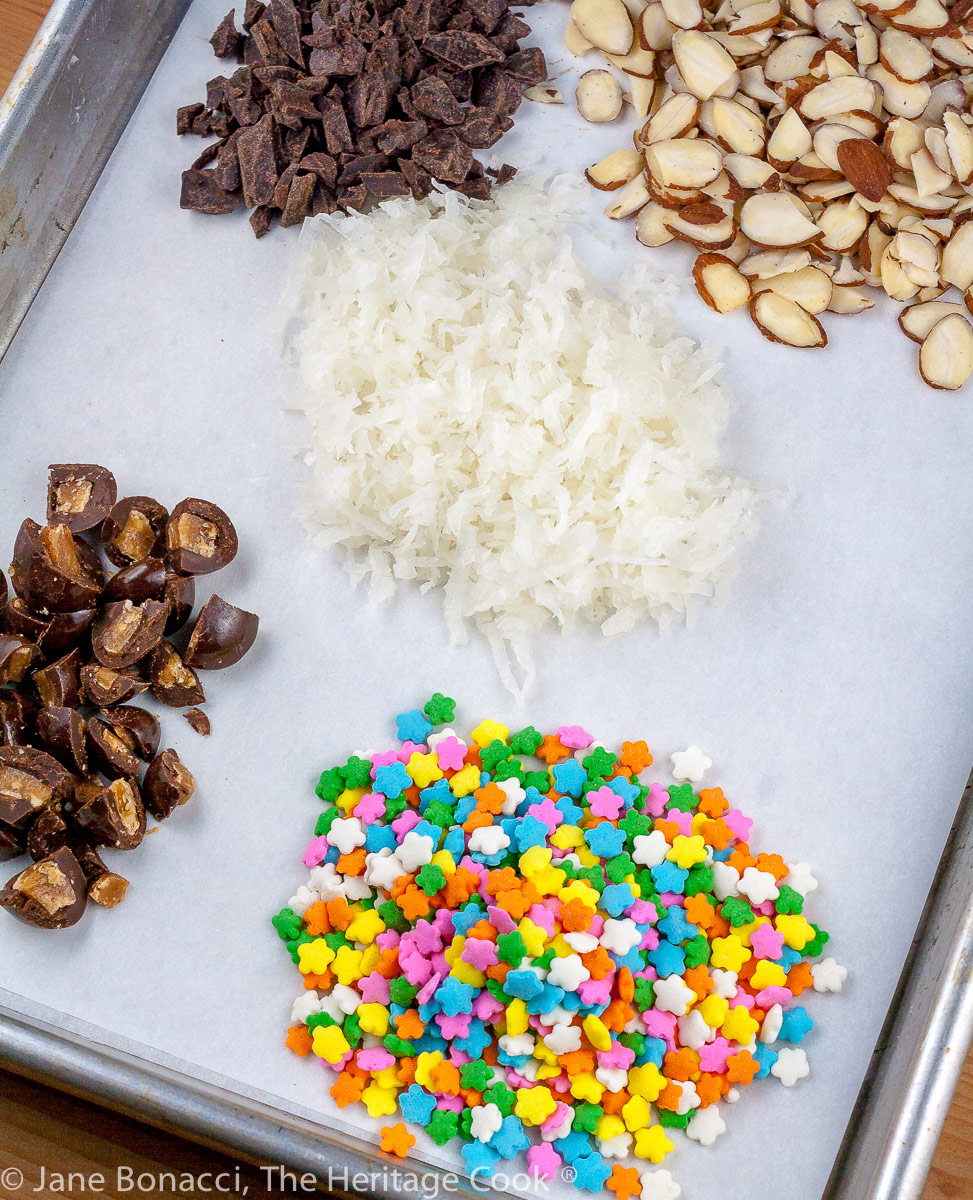
These Espresso Brownie Ice Cream Sandwiches are a delight, especially in the hot summer months. Nothing is better than a cold sweet treat on a blistering hot day!
Did you enjoy this recipe? Let me know in the comments, I love hearing from you!
Key Ingredients for Espresso Brownie Ice Cream Sandwiches:
- Sugar, cocoa powder, salt, butter, bittersweet chocolate, espresso
- Vanilla, eggs, flour, ice cream, decorations (optional)
PRO Tip:
If you are using dark colored baking pans, they tend to cook faster and brown more quickly. Start checking a bit ahead of the suggested timing to be sure you pull your baked goods at the right time.
PRO Tip:
You can use any flavor ice cream that you like or that you have on hand. You could stay with all chocolate, be classic with vanilla, or branch out with more daring flavor combinations. For me, the caramel swirl ice cream was the perfect filling for these fun sandwiches.
How to make Espresso Brownie Ice Cream Sandwiches:
- Butter two 8-inch square pans and line with parchment, leaving two ends hanging over the edges to form a sling; whisk together the sugar, cocoa powder, and salt
- Set a heatproof bowl over a pan with simmering water, add the butter, chocolate, espresso, and vanilla, melt them together, stirring often; when the chocolate is mostly melted, move the bowl off the pan and set on a dishtowel, whisking until smooth and fully melted
- Transfer to the bowl of your stand mixer or use a hand mixer, add the sugar mixture and beat on medium until smooth and you can hold the bottom of the bowl comfortably in your hand; reduce speed to low and add the eggs, one at a time, incorporating fully before adding the next one
- Turn the speed up to medium and beat until lightened in color and fluffy; stop the mixer and add the flour, beating on low until there are no white streaks, don’t over beat
- Scrape the sides and bottom of the bowl, incorporating anything that wasn’t already mixed in; pour batter into the two pans dividing them evenly, tap on the counter to bring any air bubbles to the surface, pop them with a toothpick
- Bake the brownies 30 to 35 minutes, spinning the pans halfway through; when done remove from the oven and set on a cooling rack and cool thoroughly
- When cool, use the parchment slings to lift the brownies out of the pans, setting them on a cutting board, place the parchment back into the pans; working with one layer at a time, cut into quarters and then each quarter on the diagonal into two triangles, reassemble the brownies and place back in the parchment lined baking pan, repeat with the second layer and freeze 15 minutes
- Using a scoop, place a small scoop of ice cream on each of the triangles, top with the matching piece from the second layer pressing down gently to spread the ice cream to the edges; wrap each triangle in plastic wrap and return to the freezer to firm up
- Press one or more sides of the triangles into decorations if you like; rewrap in plastic to help retain their shape, return to the freezer and keep in the freezer until 20 minutes before serving
PRO Tip:
You can bake the brownies ahead, pre-cut them, and assemble on the day of your party. Or make them entirely ahead of time, wrap in plastic and freeze, and have dessert ready to go. Just remember to bring them out of the freezer about 20 minutes before serving to soften slightly.
Recommended Tools (affiliate links; no extra cost to you):
- Kitchen scale
- Chef’s knife
- Cutting board
- Measuring spoons
- 8-inch square baking pans
- Parchment paper sheets
- Saucepan
- Stand mixer or hand mixer
- Ice cream scoop
Gluten-Free Tips:
You can adjust any recipe to gluten-free by using 120 grams per cup of my favorite gluten-free flour blend. If you are using another brand of gluten-free flour, whisk the mix, spoon it lightly into a measuring cup until mounded, level off the top with a straight edge, and weigh the flour left in the cup. Use that weight as your standard per cup of that specific flour. Do this for each flour blend you use. Commercial blends such as Pamela’s, Bob’s Red Mill 1-to-1, or King Arthur Measure for Measure are all good choices.
Espresso Brownie Ice Cream Sandwiches (Gluten Free)
Rich chocolate brownies surround your favorite ice cream for a fun, delicious, and easy dessert you can make in advance. Perfect for elegant dinner parties or children’s birthday parties, these treats will become a family favorite.
Ingredients
Brownies
- 2 cups (400 g) granulated sugar
- 1 tablespoon unsweetened cocoa powder (gluten-free if needed)
- 1/2 teaspoon kosher or sea salt
- 1 cup (2 sticks; 227 g) cool butter, cut into small cubes
- 14 ounces bittersweet chocolate, chopped coarsely
- 2 tablespoons espresso or heavy cream
- 1 teaspoon pure vanilla extract
- 4 large eggs
- 1 cup (120 g) all-purpose flour or gluten-free flour blend
Ice Cream and Decorations
- 1 pint (2 cups) ice cream of your choice, such as mocha, cookies and cream, caramel swirl, cherry, etc.
- Assorted decorations such as jimmies, coconut, candy sprinkles, chocolate shavings, etc. (optional)
Instructions
Make the Brownies: Set oven rack in center and preheat oven to 375°F. Lightly butter two 8-inch square baking pans. Line both pans with parchment paper long enough that it drapes over two edges creating handles you will use later to lift the brownies out of the pan. Butter the parchment.
In a medium bowl, whisk together the sugar, cocoa powder and salt. Set aside.
Set another bowl over a saucepan of barely simmering water, making sure that the water doesn’t touch the bottom of the bowl. Note: I use the metal bowl from my KitchenAid mixer, saving a step. Add the butter, chocolate, espresso, and vanilla to the bowl and melt together, stirring regularly with a heatproof spatula. When the chocolate is mostly melted, using hot pads, carefully move the bowl off the saucepan and set on a dishtowel.
Whisk the chocolate mixture until completely melted and smooth. Transfer to the bowl of your standing mixer (or place the bowl on the mixer if you used your mixer bowl to melt the chocolate). Add the sugar mixture and, using the paddle attachment, beat on medium until smooth and you can comfortably hold the bottom of the pan in your hand. Note: If the mixture is too hot, the eggs will scramble when you add them.
Reduce the speed to low and add the eggs, one at a time, incorporating fully before adding the next one. Turn mixer up to medium and beat until lightened in color and fluffy. Stop the mixer, add the flour, and beat on low just until you no longer see any white streaks. Do not over beat.
Remove the bowl from the mixer and using a flexible spatula, scrape the beater and sides of the bowl, making sure that there are no dry ingredients that haven’t been mixed in. Pay special attention to the bottom of the bowl – that is where unmixed ingredients tend to hide!
Pour the batter into the prepared pans. Tap each pan on the counter a few times to dislodge any trapped air bubbles. Smooth the tops with an offset spatula. Transfer to the hot oven and bake 15 minutes. Spin the pans so the front is now facing the back of the oven. Continue baking until the brownies start to pull away from the sides of the pans and a toothpick inserted in the center comes out with moist crumbs clinging to it, about 15 to 20 more minutes. Note: In my oven they took 5 to 8 minutes longer to be done; bake as long as needed for your oven. Remove from the oven and set onto a wire rack to cool.
When the brownies are completely cooled, remove them from the pan using the parchment slings to lift them and set the brownies onto a clean surface. Place the parchment back into the pans. Move the ice cream down to the refrigerator to soften slightly.
Set the brownie layers on a cutting board, and working with one layer at a time, cut into quarters. Then cut each quarter into two triangles (cut point to point). Reassemble the brownie and set it back into the parchment lined baking pan. Repeat with the second layer.
Place both pans in the freezer and freeze for 15 minutes.
Assemble the Sandwiches: Remove the pans of baked brownies from the freezer. Using a small ice cream scoop, place a small scoop of ice cream on each triangle in one of the pans. Top with matching triangles from the other pan and very gently press down to spread the ice cream out to the edges. Wrap each sandwich in small squares of plastic wrap and return to the freezer to firm up.
Press one or more of the sides of each triangle in decorations if desired. Or you can set out bowls and let the kids choose which sweet treat they want to dip the edges of their sandwiches into.
Rewrap each triangle with plastic and place them on a baking sheet. Wrapping them individually helps them retain their shape and makes serving really easy. Return them to the freezer to firm up. Keep in the freezer until about 20 minutes before serving. Can be made a day ahead.
Recipe found at www.theheritagecook.com
Notes
You can adjust any recipe to gluten-free by using 120 grams per cup of my favorite gluten-free flour blend. If you are using another brand of gluten-free flour, whisk the mix, spoon it lightly into a measuring cup until mounded, level off the top with a straight edge, and weigh the flour left in the cup. Use that weight as your standard per cup of that specific flour. Do this for each flour blend you use. Commercial blends such as Pamela's, Bob's Red Mill 1-to-1, or King Arthur Measure for Measure are all good choices.
Nutrition Information:
Yield:
8Serving Size:
1Amount Per Serving: Calories: 620Total Fat: 38gSaturated Fat: 22gTrans Fat: 0gUnsaturated Fat: 13gCholesterol: 117mgSodium: 251mgCarbohydrates: 54gFiber: 10gSugar: 11gProtein: 16g
The nutritional information for recipes on this site is calculated by online tools and is merely an estimate.
If you enjoyed this recipe, be sure to follow me on social media so you never miss a post:
| Facebook | Pinterest | Instagram | Twitter |
Create a New Tradition Today!
Disclaimer: I was compensated for creating the recipe for Cake Boss and received products for review.
Welcome! The suggestions here are not intended as dietary advice or as a substitute for consulting a dietician, physician, or other medical professional. Please see the Disclaimers/Privacy Policy page for additional details. Unauthorized use, distribution, and/or duplication of proprietary material from The Heritage Cook without prior approval is prohibited. If you have any questions or would like permission, please contact me. We participate in the Amazon Services LLC Associates Program, an affiliate advertising program designed to provide a means for sites to earn advertising fees by advertising and linking to amazon.com. As an Amazon Associate, I earn a small amount from qualifying purchases without any additional cost to you. This page may contain affiliate links. This post was first shared in July 2014. The article was updated in 2022.


amanda whitley
i would make my sons birthday cake with these pans.
Annette
I’d make brownies and sheet cakes in those great pans.
barbara n
I would love to make a birthday cake for my mom
April @ Angels Homestead
I love the idea of a tiered cake as others are suggesting. I recently seen a tiered rice crispy cake that I think would be a lot of fun to make!
Dorothy at Shockingly Delicious
I would make blondies! And crisps. And sheet cake.
Katrina
Brownies are most definitely my families favorite thing made in cake pans. And yours sure look perfect! My son has been bugging me to let him make a cake with fondant. If I won these pans, I might have to do that with him in honor of Cake Boss. 😉
Sarah
I’m not sure I’m ready to start trying tiered cakes, but it would be fun to try 🙂 For the right occasion, of course.
Renee's Kitchen Adventures
I have no idea what I’d make, but I do know it would be fantastic in these pans! lol
Sarah K. @ The Pajama Chef
i’d make brownies! or a tiered cake if i’m feeling fancy 🙂
Jeffrey
I would make a tiered cake for my anniversary!
Wendy, A Day in the Life on the Farm
Your ice cream sandwiches look luscious. I would love an opportunity to create something with these pans.
Jessie Weaver
Woohoo! I bake a ton during the school year for our dorm boys, so I know I would put them to good use with brownies, cakes, and other delicious treats.
Melba Obertis
I would start with the ice cream sandwich’s, looks soooooooooo yummy!
Lori
Of course I would make brownies and I was thinking a chocolate molten cake 😉
Lisa
I’d make something chocolatey.
anne hill
i would make a tiered cake
Kelly D
I would make a chocolate cake for my mom’s birthday.
Samantha
My kids would go crazy for this recipe, I love that you can customize it with the toppings, I would go for the coconut and my daughter would hands down go for the colored sprinkles. I would make this in a heartbeat.
Jane Bonacci
These are the perfect dessert to make with kids Samantha. They will LOVE being able to choose their own ice cream flavor and decorations. Enjoy!!
Lindsay Lee
Umm these brownie ice cream sandwiches for sure! YUM these look amazing!!!
Jane Bonacci
Thanks Lindsay! I loved making them and I hope you do too. Good luck with the Giveaway!
Jill J
Too many things to choose from – brownies, cakes, crisps, oh my!! 🙂
Jane Bonacci
I know how you feel Jill, but if you try, eventually you will get them all made, LOL! 🙂
Kate Freeman
Jane, these look so yummy! What a great act of love!
Jane Bonacci
Thank you dear Kate. You could make yours with frozen dairy-free ice cream! Hugs!!
Terri B
I would make blueberry buckle!
Jane Bonacci
Oh my, Yum! Blueberry Buckle is such a classic. I might have to invite myself over for supper, LOL!
Betty Campbell
love to win so I can mke brownies
Jane Bonacci
Brownies are a favorite of mine too. Good luck!!
Margot C
At first I thought ‘brownies’ (and that’s bound to happen), but what about a three tiered rectangular cake!
Jane Bonacci
I hope you get a chance to make your tiered cake Margot – good luck!