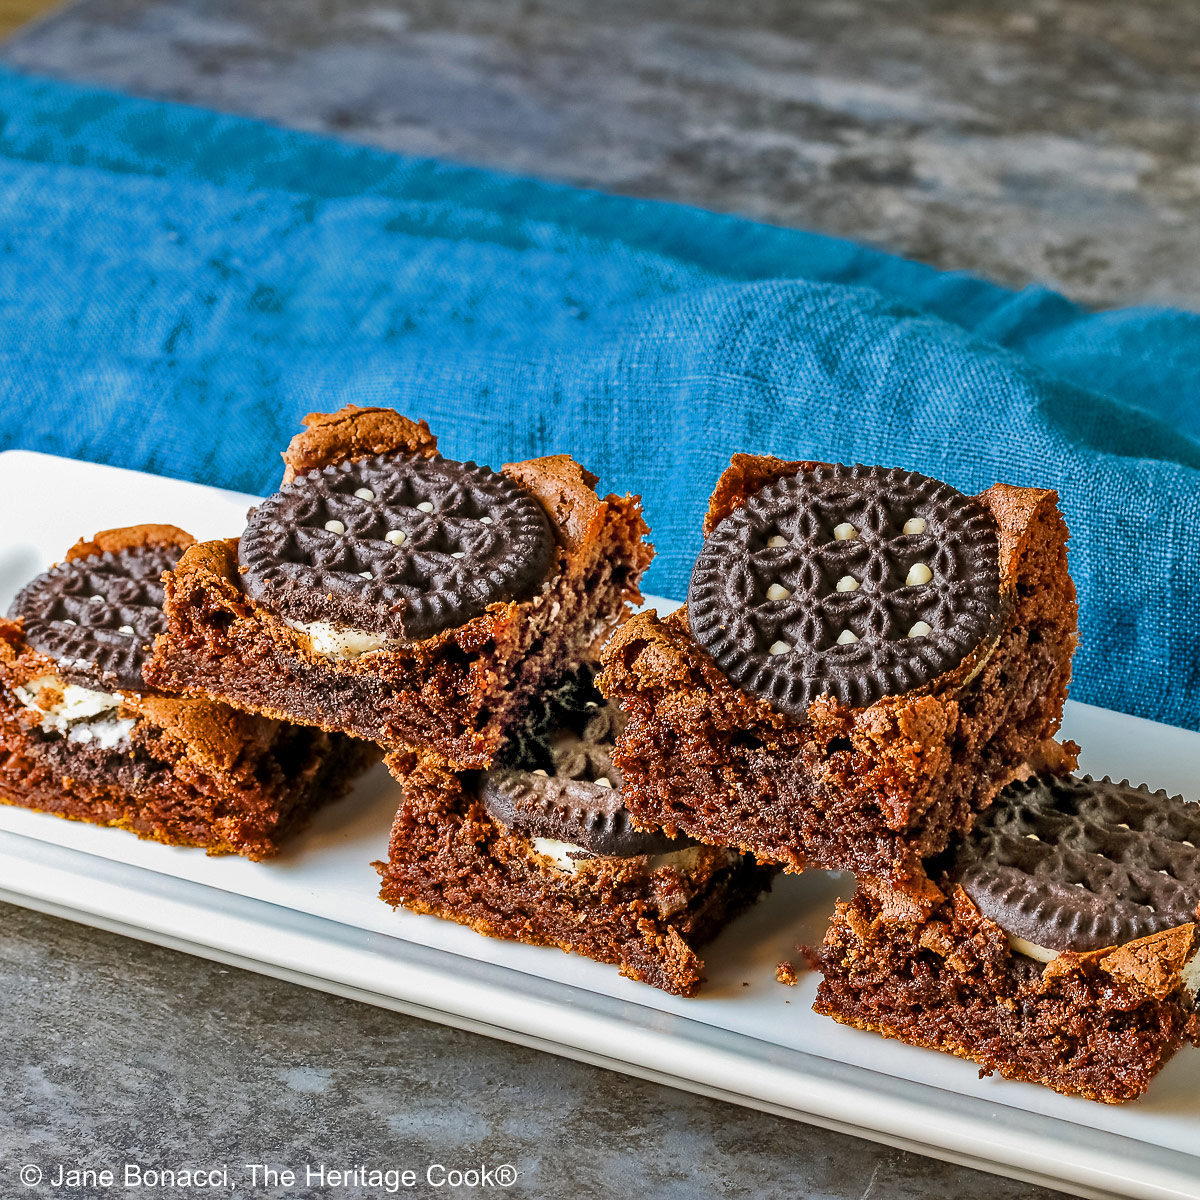
One of America’s favorite desserts or sweet treats are brownies and these Decadent Oreo Brownies are absolute winners! Brownies baked with Oreo cookies or gluten-free “Oreo” cookies on the top are a delight and very popular with your family and friends.
I love the juxtaposition of the cookies and brownies – creamy goodness and slight crunch against the lusciousness of the brownies. It is a beautiful combination that everyone loves!

Gluten-free alternative for recipes calling for Oreo cookies!
If you are baking gluten free, be sure to use safe cookies along with your favorite GF flour blend. I am partial to Glutino’s chocolate sandwich cookies that are surprisingly close to real Oreos and I actually prefer them. They are often found in grocery stores or you can order them online.
My favorite gluten-free flour is made with flours from Authentic Foods, a dedicated gluten-free company that sells super-fine rice flours that make a huge difference in GF baking. No one will know they are gluten free! There is none of the grittiness found in most GF baked goods. In my opinion it is worth the extra cost – I order mine directly from the company online.

Top: Cookies placed on brownie batter; Bottom: fresh from the oven with batter rising around cookies
This recipe makes a small batch in an 8×8-inch (20cm) baking pan that yields about 16 pieces. If you want to make more for a larger party, it is best to bake one batch, then make a second batch rather than doubling the recipe. You will get better results and they will bake more evenly.
These brownies are lovely on their own, but you could drizzle them with a little ganache or melted white chocolate. If you add one of these you can sprinkle edible decorations on the tops and make them even more fun!

Gluten-free chocolate sandwich cookies (GF “Oreos”) are smaller than the regular kind. It took 16 cookies to cover the top instead of the 9 called for in the original recipe. 16 GF cookies filled the 8-inch (20cm) pan perfectly!
I used a 10-inch (25cm) carving knife to cut these brownies. Having the extra length meant I could evenly press down on both ends of the knife at the same time and get smooth, even cuts.

Also, the original called for pouring in half of the batter, adding the cookies and covering with the remaining batter. I chose to place them on the top where they show more and the batter rises between each cookie. You can make yours either way you prefer.
I hope you make these Decadent Oreo Brownies and enjoy every bite. They are simple to make and assemble and ready as soon as they have cooled. Perfect for dessert, an after-school treat, or to take to a potluck. This is a winning recipe!
If you try this recipe, let me know! Please leave a star rating in the recipe card, comment below, and don’t forget to snap a pic and tag it @theheritagecook on Instagram! Seeing your creations makes my day and I love hearing from you!
Ingredients needed for Decadent Oreo Brownies:
- GF or regular Oreo cookies, unsweetened chocolate, vegetable oil,
- Eggs, sugar, all-purpose flour, salt, baking soda, chocolate chips
PRO Tip:
You should find unsweetened chocolate near the chocolate chips in the baking aisle. They may be in small boxes. Look at the box for how much each piece weighs. It makes it easier to figure out how much you need to chop.
How to make Decadent Oreo Brownies:
- Line a baking pan with parchment to create a sling. Melt the unsweetened chocolate and cool slightly.
- Mix together the flour, salt, and baking soda; set aside. Mix the melted chocolate with the oil and beat until you can hold the bowl comfortably in your hand. Mix in the sugar and eggs until well combined. Add the dry ingredients, mixing just until smooth then fold in the chocolate chips (optional).
- Spread the batter in the lined pan, smoothing into an even layer. Top with 16 whole cookies in rows if using GF cookies, 9 cookies if using regular Oreos (or whatever fits your pan). Press lightly into the batter.
- Bake at 350°F (180°C) for about 30 minutes until a toothpick inserted in the center comes out with a few moist crumbs. Transfer the pan to a wire rack and cool completely.
- Use the parchment sling to lift the cooled brownies out of the pan. Cut into squares and serve.
PRO Tip:
How to easily make a parchment or foil sling – turn the pan over and pinch the paper over the bottom of the pan creating a box shape. Use scissors to make a cut at each corner to make it fit more easily. Flip the pan back over and slip the paper “box” inside. Fold down any excess at the corners, leaving two ends extending beyond the pan, and use binder clips to hold it in place until you can fill it with the batter. Remove the binder clips before baking.
Recommended Tools (affiliate links; no extra cost to you):
- Kitchen scale
- Chef’s knife
- 8×8-inch (20x20cm) square baking pan
- Parchment paper
- Medium saucepan
- Mixing bowls
- Stand mixer or hand mixer
Gluten-Free Tips:
* You can adjust any baking recipe to gluten-free by using 120 grams per cup of my favorite gluten-free flour blend. If you are using another brand of flour or regular flour, whisk it, spoon it lightly into a measuring cup until mounded, level off the top with a knife, and weigh the flour left in the cup. Use that weight as your standard per cup of that specific flour. Do this for each flour blend you use. Commercial gluten-free blends such as Pamela’s All-Purpose Artisan Blend, Bob’s Red Mill 1-to-1, or King Arthur Measure for Measure are all good choices.
** To easily make a parchment or foil sling, turn the pan over and pinch the paper over the bottom of the pan creating a box shape. Use scissors to cut a slit at each corner to make it easier to fit. Flip the pan back over and slip the paper “box” inside. Fold down any excess at the corners, leaving two ends extending beyond the pan, and use binder clips to hold it in place until you can fill it with the batter. Remove the binder clips before baking.
You will get the best and most consistent results by using a digital kitchen scale and weighing your ingredients, especially when you are baking. And use grams, they are much more accurate than pounds and ounces.
All recommended ingredients are gluten-free as of the writing of this article. Always check to be sure the products haven’t changed and are still safe to consume.
Decadent Oreo Brownies (GF)

One of America’s favorite desserts or sweet treats are brownies and these Decadent Oreo Brownies are absolute winners! Brownies baked with Oreo cookies or gluten-free “Oreo” sandwich cookies on the top are a delight and very popular with your family and friends.
Ingredients
- 16 gluten-free Oreo-style cookies or 9 regular Oreos
Brownies
- 2 oz (57g) chopped unsweetened chocolate
- 1/3 cup (66g) vegetable oil
- 2 large eggs
- 1 cup (200g) granulated sugar
- 3/4 cup (90g*) gluten-free* all-purpose flour blend* or regular all-purpose flour (such as Gold Medal)
- 1/2 tsp kosher salt
- 1/4 tsp baking soda
- 1/2 cup (85g) semisweet gluten-free chocolate chips, such as Guittard brand, optional
Instructions
Preheat the oven to 350°F (180°C). Line an 8x8-inch (20x20cm) square baking dish with foil or parchment leaving two ends hanging over the edges to create a sling**. You will use this to lift the brownies out of the pan.
Set a heatproof bowl over a medium saucepan with about 2-inches of simmering water in the bottom. Place the chopped unsweetened chocolate in the bowl and melt, stirring occasionally until smooth. Remove from the heat and let cool for a few minutes.
In a small bowl, whisk together the flour, salt, and baking soda. Set aside.
In a large bowl or the bowl of your stand mixer, combine the melted chocolate with the oil. Beat until you can comfortably hold your hand on the bottom of the bowl. Add the sugar and eggs. Mix until well combined. Then stir the dry ingredients into the batter and fold in the chocolate chips (optional).
Spread the batter into the bottom of the prepared pan with an offset spatula. Place the whole Oreo's in 4 rows of 4 if using GF cookies and 3 rows of 3 if using regular Oreos, on top of the batter, or whatever fits your pan in even rows.
Bake for about 30 minutes, or until a toothpick inserted in the center comes out with a few moist crumbs. Transfer the pan to a wire rack and cool completely.
Use the sling to lift the brownies out of the pan and set on a cutting board. Use a long sharp knife to cut into squares and serve. You can use the cookies as a guide on where to cut. These brownies are best eaten on the day they are baked.
Recipe found at www.theheritagecook.com
Notes
* You can adjust any recipe to gluten-free by using 120 grams per cup of my favorite gluten-free flour blend. If you are using another brand of gluten-free flour, whisk the mix, spoon it lightly into a measuring cup without a spout until mounded, level off the top with the back of a knife, and weigh the flour left in the cup. Use that weight as your standard per cup of that specific flour. Do this for each flour blend you use. Commercial blends such as Pamela's, Bob's Red Mill 1-to-1, or King Arthur Measure for Measure are all good choices.
** How to easily make a parchment or foil sling – turn the pan over and pinch the paper over the bottom of the pan creating a box shape. Flip the pan back over and slip the paper “box” inside. Fold down any excess at the corners, leaving two ends extending beyond the pan, and if you want, use binder clips to hold it in place until you can fill it with the batter. Remove the binder clips before baking.
You will get the best results by using a digital kitchen scale and weighing your ingredients, especially when you are baking.
All recommended ingredients are gluten-free as of the writing of this article. Always check to be sure the products haven’t changed and are still safe to consume.
Adapted from a recipe on Dinners, Dishes and Desserts
Nutrition Information:
Yield:
16Serving Size:
1Amount Per Serving: Calories: 208Total Fat: 8gSaturated Fat: 4gTrans Fat: 0gUnsaturated Fat: 4gCholesterol: 23mgSodium: 142mgCarbohydrates: 31gFiber: 2gSugar: 12gProtein: 4g
The nutritional information for recipes on this site is calculated by online tools and is merely an estimate. If you need nutritional calculations for medical reasons, please use a source that you trust.
If you enjoyed this recipe, be sure to follow me on social media so you never miss a post:

Create a New Tradition Today!
Welcome! The suggestions here are not intended as dietary advice or as a substitute for consulting a dietician, physician, or other medical professional. Please see the Disclaimers/Privacy Policy page for additional details. Unauthorized use, distribution, and/or duplication of proprietary material from The Heritage Cook without prior approval is prohibited. If you have any questions or would like permission, please contact me. We participate in the Amazon Services LLC Associates Program, an affiliate advertising program designed to provide a means for sites to earn advertising fees by advertising and linking to amazon.com. As an Amazon Associate, I earn a small amount from qualifying purchases without any additional cost to you. This page may contain affiliate links. The author makes no claims regarding the presence of food allergens and disclaims all liability in connection with the use of this site.