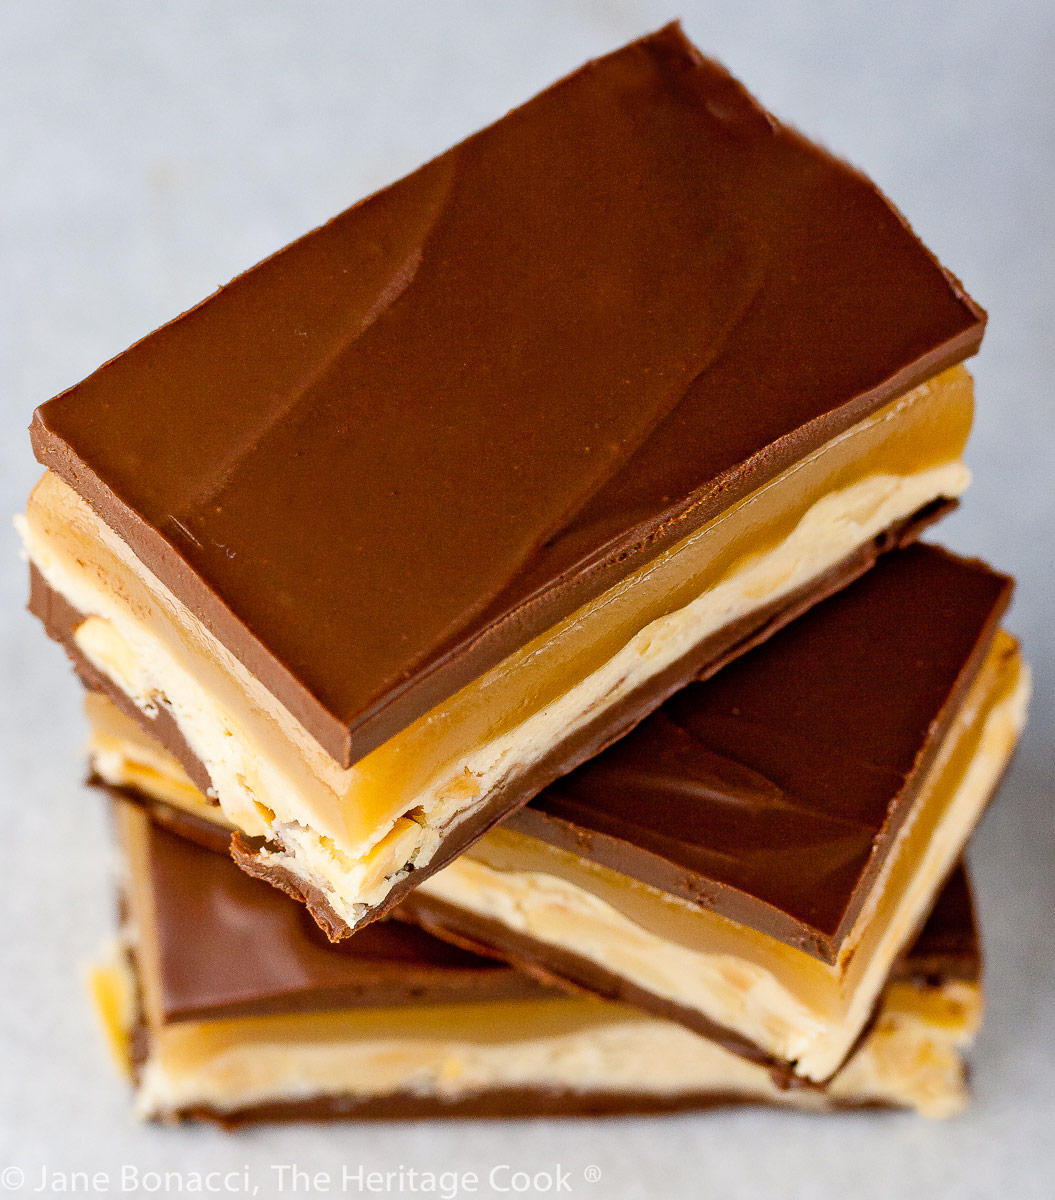
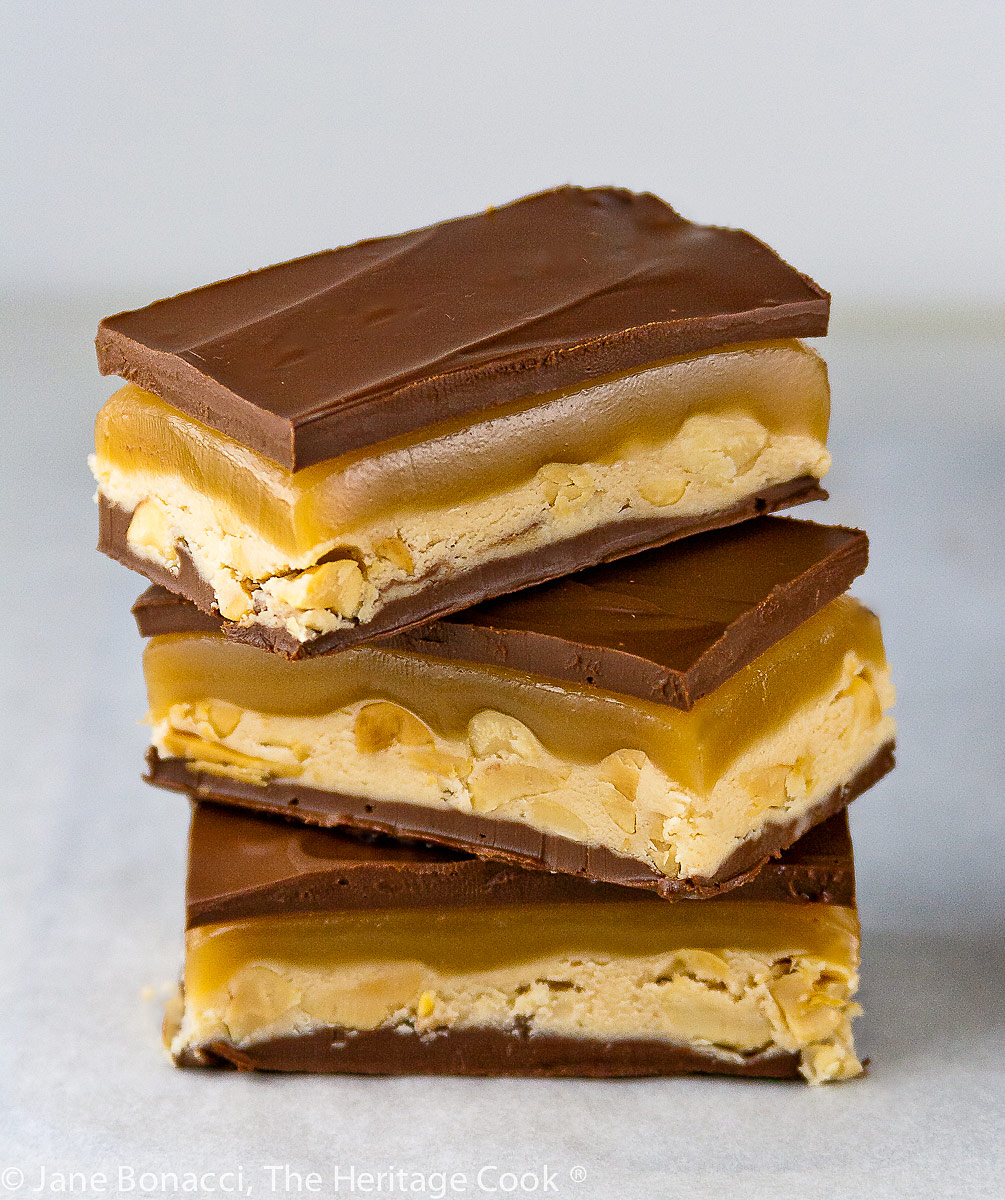
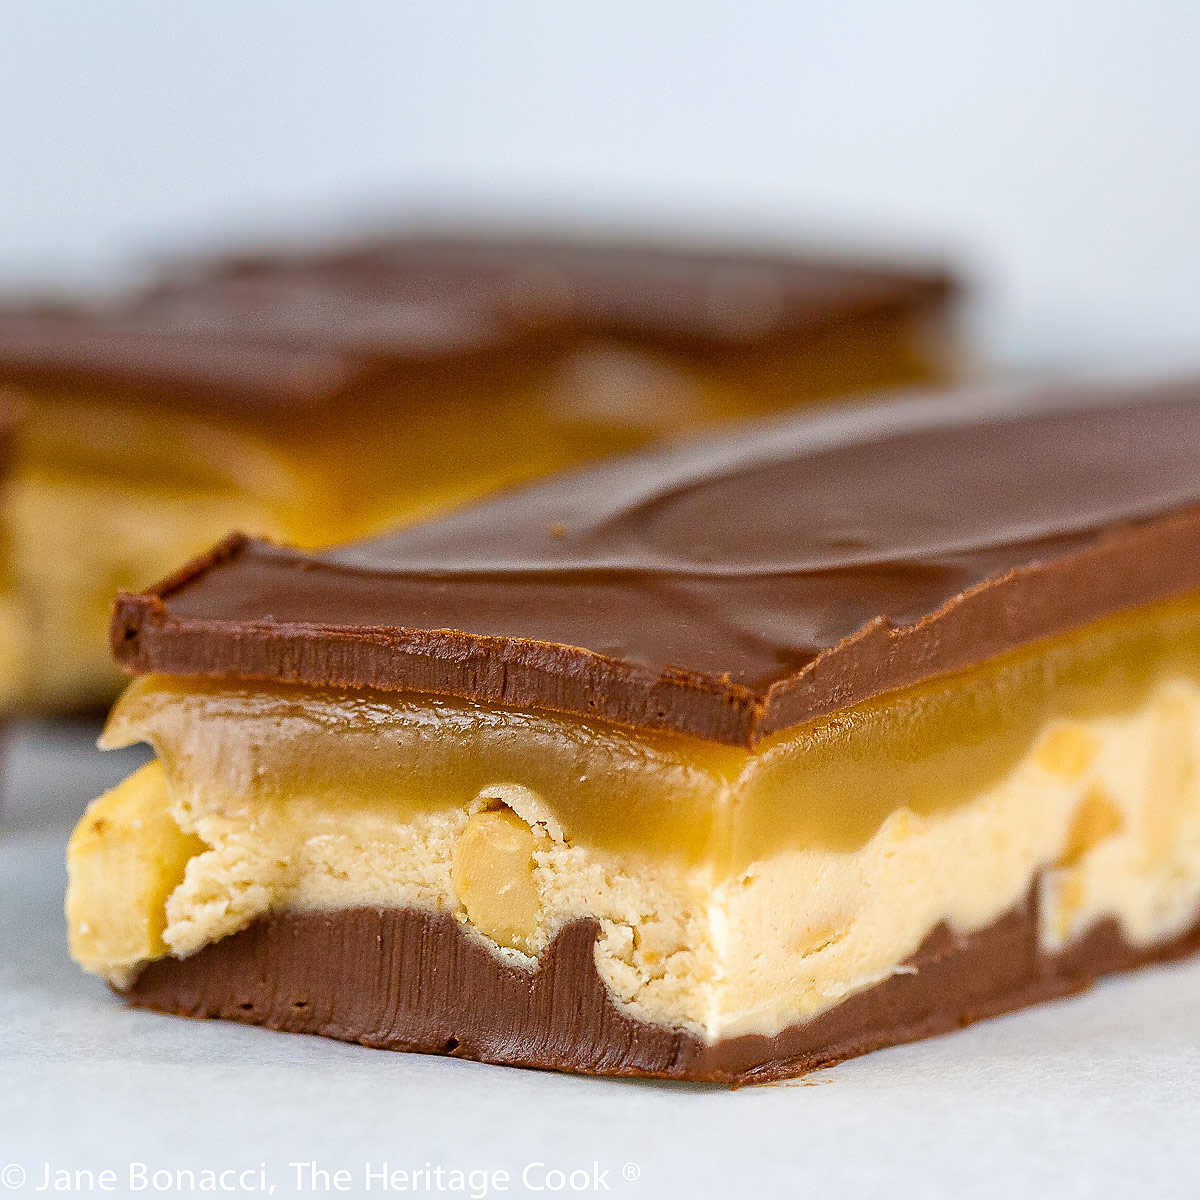
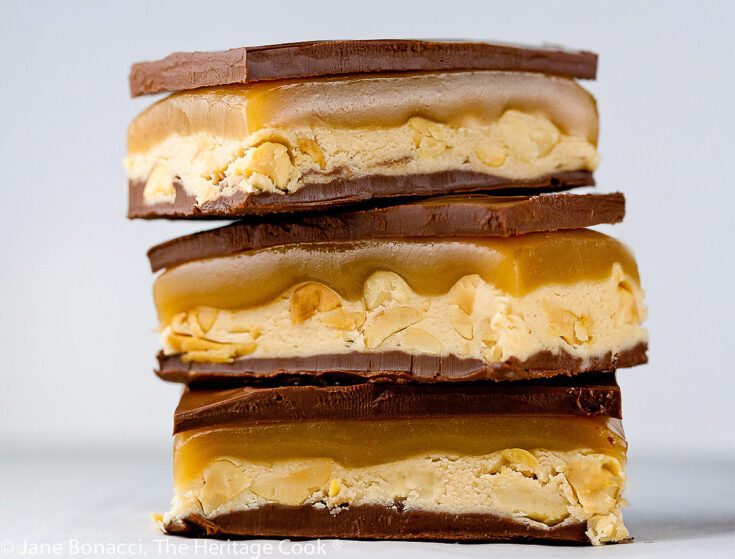
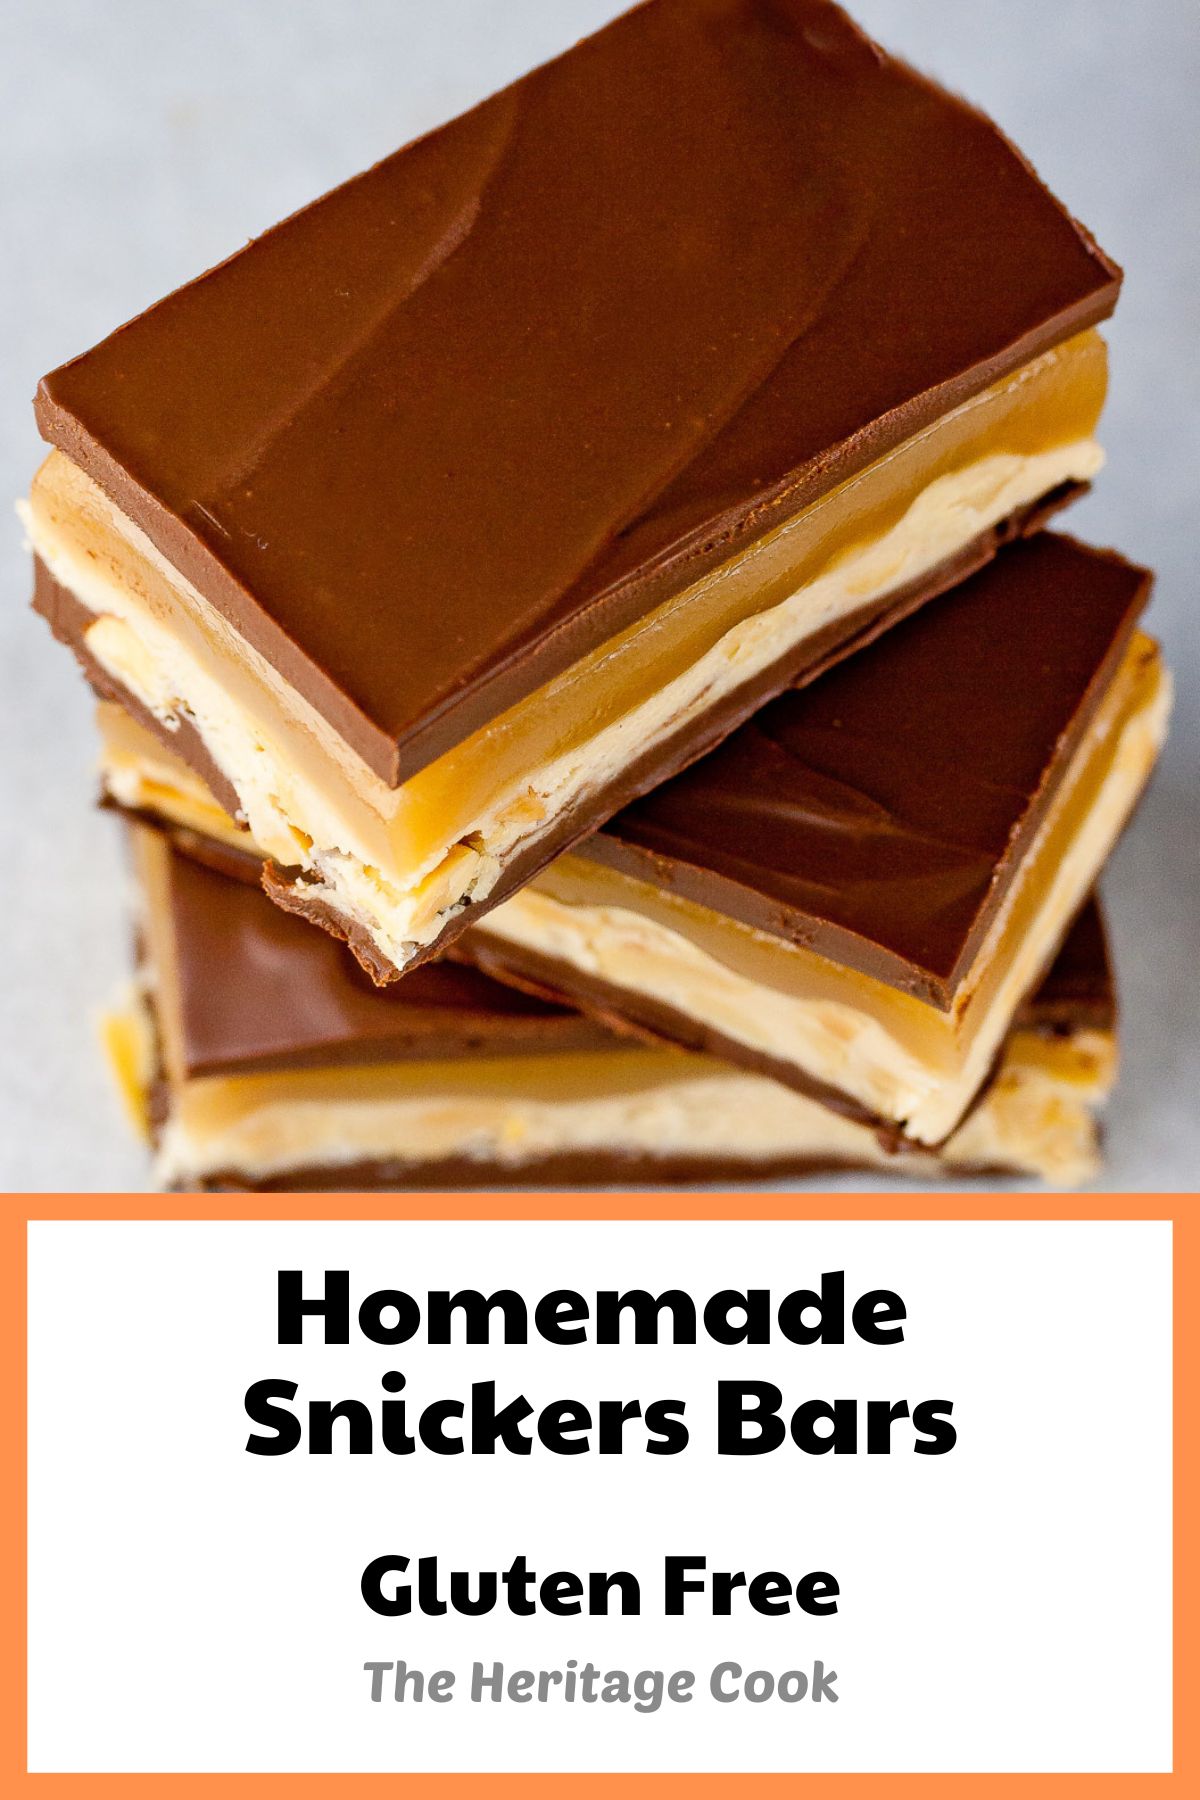
Homemade Snickers Bars are incredible – perfectly sweet with a touch of salty goodness from the peanuts. Is there anything better than vanilla nougat with peanuts, homemade caramel, and chocolate? I don’t think so! These do take time to make and you need some patience, but boy are they worth the effort!
If you love Snickers bars, you are going to pass out when you taste this homemade version. They. Are. Amazing!! Run, don’t walk to the kitchen and make them. You don’t need an excuse or reason, just go do it! Even The Artist, who doesn’t really care for Snickers, told me that mine were good enough to sell. Oh, my heavens, that is one heck of a compliment!
Making these candy bars today took me right back to my childhood, standing next to my grandmother Mimi at the stove, watching every move as she made pull taffy for my brothers and me.
Being a military kid, I was always well behaved, but I was enthralled whenever Mimi cooked. She made everything from scratch, which fascinated me and was unbelievably delicious.
Mimi never used a candy thermometer. For her it was all about watching to see when the candy spun a thread and the consistency when some of the caramel was dropped in a bowl of cold water. And she never made a mistake! I cannot imagine not having a thermometer to make sure I take the candy off the heat at exactly the right moment, LOL.
When I was growing up and well into my adult years, I used a standard candy thermometer every time I made anything requiring careful measurement of temperature and still have one today.
These days I have converted to my handy dandy instant read thermometer because it is SO much more accurate, and easy to use. Both work great, but an instant read thermometer can measure temperatures in all areas of your pan, letting you know if you have hotspots to watch out for! I know they are expensive, but I consider it a worthwhile investment in the success of my cooking and candy making projects!
Following in Mimi’s footsteps, I made my own caramel today, but not everyone is as comfortable with candy making as I am. If the thought of making caramel scares you silly, you can use store-bought caramels (the kind that come individually wrapped) and melt a 14 oz bag of them (unwrap first!) in a saucepan with 1/4 cup heavy whipping cream. Voila! The next best thing to homemade caramel sauce!
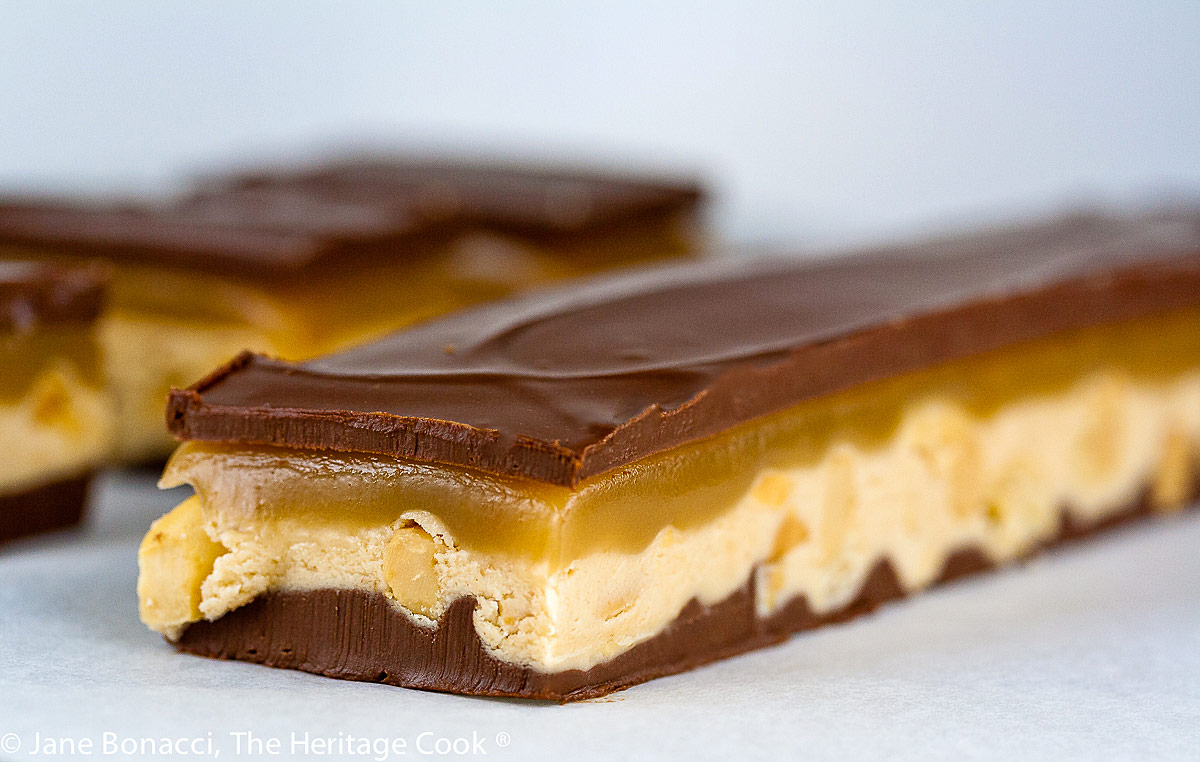
Most of the other versions of this candy you find on the web call for using milk chocolate for the top and bottom layers. The Artist and I prefer dark chocolate, so I used Guittard semisweet and it was heavenly. If you are making these for kids who want everything excessively sweet, definitely use milk chocolate. If you want something in between, use half semisweet and half chocolate – these are your candy bars, make them the way you love them!!
Is there anyone who doesn’t love Snickers bars? I mean, really, what’s not to love. Vanilla flavored nougat studded with salty peanuts, covered with a layer of caramel and coated with chocolate. Oh my, I’m nearly drooling just talking about it. And it wasn’t Halloween without mini Snickers in our treat bags.
These Homemade Snickers Bars are truly amazing and could be used to bribe people or pay your way out of a parking ticket – I’m kidding of course, but they are really THAT good! They would be absolutely perfect any time of the year, but must be kept in the refrigerator to keep the chocolate layers from melting. If you are transporting them, cut them at home and slip them back in the pan you made them in. Then keep them in a cooler so they don’t melt and serve them when you get to your destination.

The next time you have a bunch of kids coming over, are hosting a party, or just want a treat that is guaranteed to perk up the worst of days, make these candy bars. I promise, the world will be a brighter place and people will be singing your praises!
Happy Chocolate Monday everyone – have a wonderful week!!
Did you enjoy this recipe? Let me know in the comments, I love hearing from you!
Ingredients needed for Homemade Snickers Bars:
- Chocolate chips, peanut butter, butter, sugar,
- Evaporated milk, marshmallow crème, vanilla
- Peanuts, brown sugar, cream, corn syrup
PRO Tip:
Be sure that you have plenty of time to make each layer and let them firm up before adding the next. This dessert is an effort of love and patience. None of the layers are hard to make, but they each need enough time before adding the next.
PRO Tip:
If you don’t want to use a disposable aluminum pan to make your bars, you can use a regular 9×13-inch baking pan that is lined with foil that is long enough to drape over the ends and is well buttered. You can use the long ends of foil as handles to the sling to remove the candy from the pan for cutting into bars.
How to make Homemade Snickers Bars:
- Thoroughly butter an aluminum 9×13-inch foil pan or line a regular 9×13 pan with foil or parchment and butter the foil; for the first layer melt the chocolate and peanut butter together in either a saucepan or the microwave, stirring until smooth
- Pour the chocolate/peanut butter into the prepared pan and spread into an even layer, then set aside to harden; for the nougat layer, melt the butter then add the sugar and milk, stirring until dissolved
- Bring to a boil and cook for 5 minutes, stirring occasionally, then stir in the marshmallow crème, peanut butter, and vanilla, again stirring until smooth; off the heat fold in the peanuts and pour over the chocolate layer in the pan, and let cool completely and get firm
- For the caramel layer combine the sugar, brown sugar, butter, milk, whipping cream, and corn syrup in a large saucepan and cook over medium heat until it comes to a boil; attach a candy thermometer and cook without stirring to the firm ball stage, about 248°F; carefully pour in the vanilla because it will splutter and splash, then stir it in until smooth
- Immediately pour over the nougat layer, smoothing until even; then let cool and firm up
- For the top layer, melt together the chocolate and peanut butter, stirring until smooth; refrigerate for an hour before cutting into bars
- To do so place a piece of parchment over the top of the pan and invert the candy onto a cutting board; top with another piece of parchment and turn the block back over
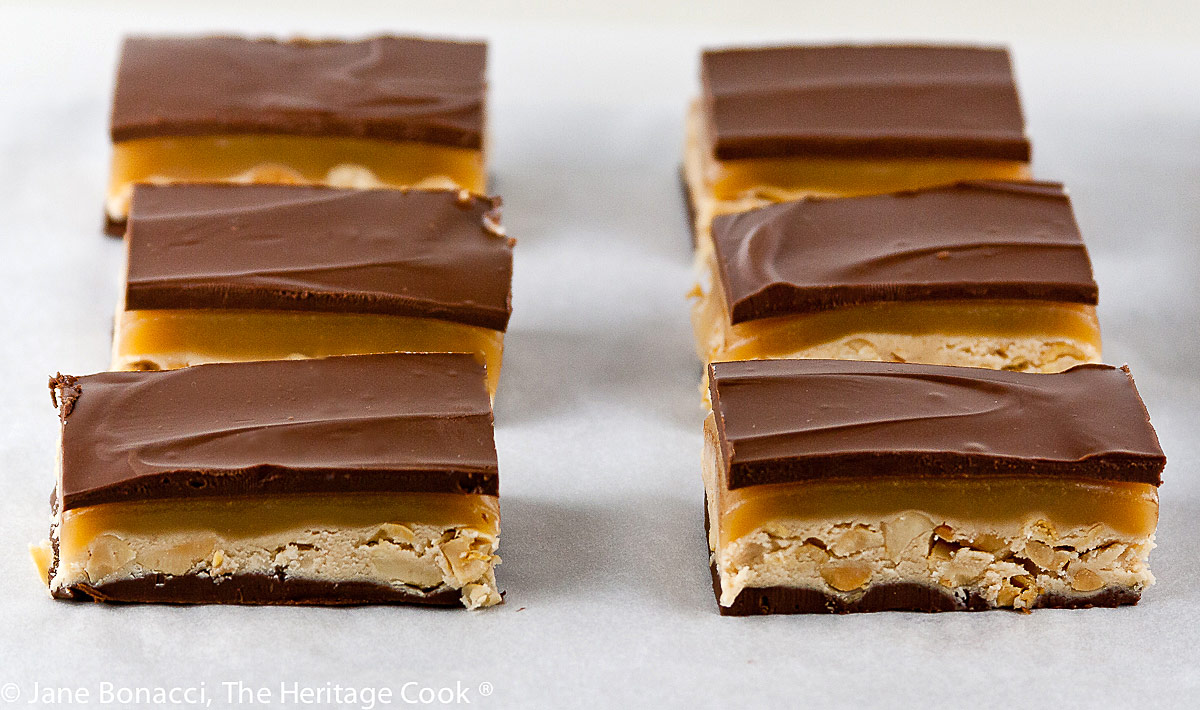
- Using a long, sharp knife, trim a little off each edge then cut the bar lengthwise into equal pieces and then crosswise into pieces about 2-inches long; serve at room temperature if you like them soft, or for a firmer texture, serve straight from the refrigerator
PRO Tip:
When you are making caramel, be sure you use a large saucepan because the sugar boils up and you don’t want it to boil over! And don’t start your caramel until the nougat layer is firm and cooled.
PRO Tip:
When you’ve poured the caramel over the bars in the pan, immediately fill the saucepan with water and bring to a boil. The remaining candy will dissolve in the water and make your clean up much easier!
Recommended Tools (affiliate links; no extra cost to you):
- Dry measuring cups and measuring spoons
- Aluminum 9×13-inch pan or regular 9×13-inch baking pan
- Pastry brush
- Saucepan
- Mixing bowls
- Large nonstick saucepan
- Candy thermometer or Instant Read Thermometer
- Parchment paper
- Long sharp knife
Gluten-Free Tips:
These Homemade Snickers Bars are naturally gluten-free, but always check the labels of every ingredient if you are Celiac or are cooking for someone with reactions to wheat and gluten.
All recommended ingredients are gluten-free as of the writing of this article. Always check to be sure the recipe hasn’t changed and is no longer safe.
Homemade Snickers Bars (Gluten Free)
Homemade Snickers Bars are incredible – perfectly sweet with a touch of salty goodness and crunch from the peanuts. Is there anything better than vanilla nougat with peanuts, homemade caramel, and chocolate? I don’t think so! These do take time to make and you need some patience, but boy are they worth the time and effort!
Ingredients
Layer 1 - Bottom Chocolate Layer
- 1-1/2 cups (255g) chocolate chips (milk or semisweet, or a combination)
- 1/4 cup (68g) creamy peanut butter
Layer 2 - Nougat Layer
- 1/4 cup (4 tbsp; 1/2 stick; 57g) butter
- 1 cup (200g) granulated sugar
- 1/4 cup (57g) evaporated milk
- 1-1/2 cups (one 7oz jar; 192g) marshmallow fluff or crème
- 1/4 cup (68g) creamy peanut butter
- 1 tsp pure vanilla extract
- 1-1/2 cups (213g) salted peanuts, roughly chopped
Layer 3 - Homemade Caramel Layer
- 1 cup (200g) granulated sugar
- 1/2 cup (100g) firmly packed brown sugar
- 1/2 cup (1 stick; 113g) butter
- 1/2 cup (113g) heavy whipping cream
- 1/2 cup (156g) light corn syrup
- 1/2 tsp pure vanilla extract
Layer 4 - Top Chocolate Layer
- 1-1/2 cups (255g) chocolate chips (milk or semisweet, or a combination)
- 1/4 cup (68g) creamy peanut butter
Instructions
- For the easiest removal, use a disposable aluminum 9x13-inch baking pan that you can twist to pop the bars out of, making extra sure that all the nooks and crannies are well buttered with soft butter using a pastry brush. Otherwise, you can line a 9x13 pan with foil or parchment and butter it, leaving an overhang that will work like a sling.
- Make Layer 1/Bottom Chocolate Layer: In a saucepan over low heat or a heatproof bowl in the microwave, melt the chocolate and peanut butter together, stirring until smooth. If you are using the microwave, heat in 2 (30-second) bursts. Remove from the oven and stir until all the chips have melted. There is plenty of residual heat in the bowl.
- Pour into the prepared pan and spread to cover the bottom evenly. It may not seem as though you have enough, but there is plenty for a nice layer. Set aside to cool and harden completely.
- Set the bowl you used aside to be used again for the final top chocolate layer.
- Make Layer 2/Nougat Layer: Melt the butter in a saucepan over medium heat. Add the sugar and milk; stir until dissolved and then bring to a boil. Cook for 5 minutes, stirring occasionally. Stir in the marshmallow fluff, peanut butter and vanilla; continue stirring until smooth. Remove from the heat and fold in the peanuts. Pour over the bottom chocolate layer. Let cool completely.
- Make Layer 3/Caramel Layer: Do not start this layer until the nougat is quite firm. You will not have any leeway when this is done and ready to pour into your pan.
- In a heavy 4-qt saucepan, combine the sugar, brown sugar, butter, milk, whipping cream, and corn syrup. Cook over medium heat, stirring occasionally, until the butter is melted and the mixture comes to a boil. Try to stir carefully so that you don’t get any excess liquid or sugar on the sides of the pan.
- Attach a candy thermometer to the saucepan and continue cooking, without stirring, until the thermometer reaches the firm ball stage (about 244°F to 248°F). The temperature will rise quickly at first and then take a long time to come to the final temperature, about 15 to 25 minutes total. Remove from the heat and standing back from the stove, carefully pour in the vanilla - be prepared that it will sputter and splash. Stir it in with a heatproof spatula.
- Pour the caramel over the nougat layer, smoothing until evenly distributed. Let cool and firm up.
- Make Layer 4/Top Chocolate Layer: In a saucepan over low heat or a heatproof bowl in the microwave, melt the chocolate and peanut butter together, stirring until smooth. Pour over caramel layer and set aside to cool and harden thoroughly.
- Place pan in the refrigerator and let cool for at least 1 hour before cutting into bars. Place a piece of parchment paper on the top of the pan and invert onto a cutting board. You may have to wiggle the edges to release the cold butter and candy, but eventually it will slip out of the pan. Using a disposable aluminum or silicone pan gives you more flexibility and makes release easier.
- Set a second piece of parchment on the candy and flip the block back over. For the neatest presentation, take a very long carving knife and trim a thin piece off the edges.
- Cut the bar lengthwise into equal parts. Cut each long piece into pieces about 2-inches long. If you like a softer, gooey, fudgy type of candy bar, serve these at room temperature. If you like them firmer, eat them straight from the refrigerator.
Recipe found at www.theheritagecook.com
Notes
Bars adapted from How Sweet It Is
Caramel layer adapted from Land O’ Lakes
If you pour this caramel into its own buttered dish, you can cut them into homemade caramels. Just wrap individually in plastic wrap and you have bites of pure heaven!!
Nutrition Information:
Yield:
20Serving Size:
1Amount Per Serving: Calories: 454Total Fat: 25gSaturated Fat: 10gTrans Fat: 0gUnsaturated Fat: 13gCholesterol: 8mgSodium: 122mgCarbohydrates: 59gFiber: 4gSugar: 52gProtein: 8g
The nutritional information for recipes on this site is calculated by online tools and is merely an estimate.
If you enjoyed this recipe, be sure to follow me on social media so you never miss a post:
Create a New Tradition Today!
Welcome! The suggestions here are not intended as dietary advice or as a substitute for consulting a dietician, physician, or other medical professional. Please see the Disclaimers/Privacy Policy page for additional details. Unauthorized use, distribution, and/or duplication of proprietary material from The Heritage Cook without prior approval is prohibited. If you have any questions or would like permission, please contact me. We participate in the Amazon Services LLC Associates Program, an affiliate advertising program designed to provide a means for sites to earn advertising fees by advertising and linking to amazon.com. As an Amazon Associate, I earn a small amount from qualifying purchases without any additional cost to you. This page may contain affiliate links. This post was first shared in May 2013. The article was updated in 2022.


Chris David
Really love it yummy!!
Jane Bonacci
Thank you Chris!
Karen Allyn
Ok I’m done. Have to make these asap. Shared everywhere already. Wonder what I should add/remove to make a Milky Way?
Thank you. 🤭🤭🤭🤭
Jane Bonacci
Thank you so much Karen, I really appreciate it! Not sure about the Milky Way bar, they are quite different and a quick search didn’t turn up anything substantial to point you to. Good luck finding that!!
mindy
totally agree! it looks way better than snickers bar and healthier.
munchkin
looks better than the snickers bar, many layers but worth it! what could I use instead of evaporated milk and corn syrup?