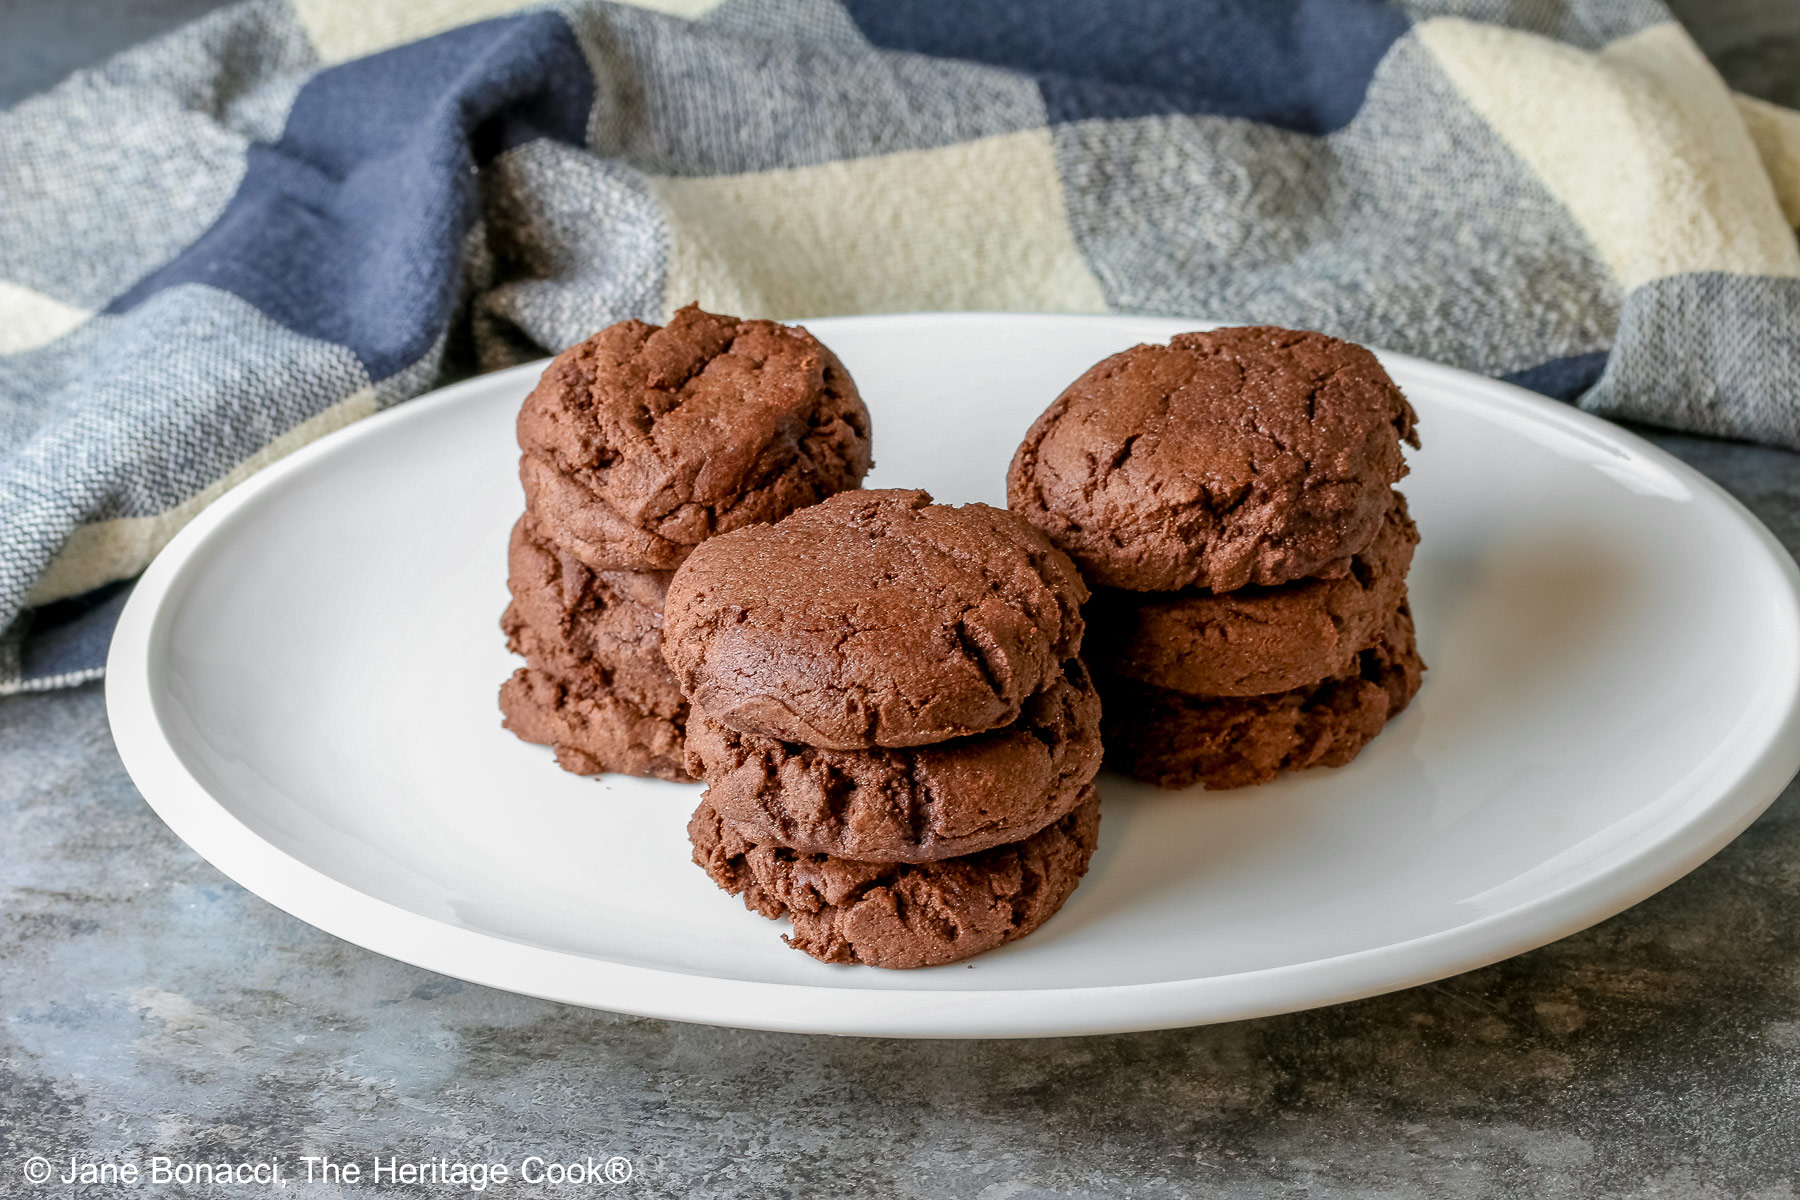
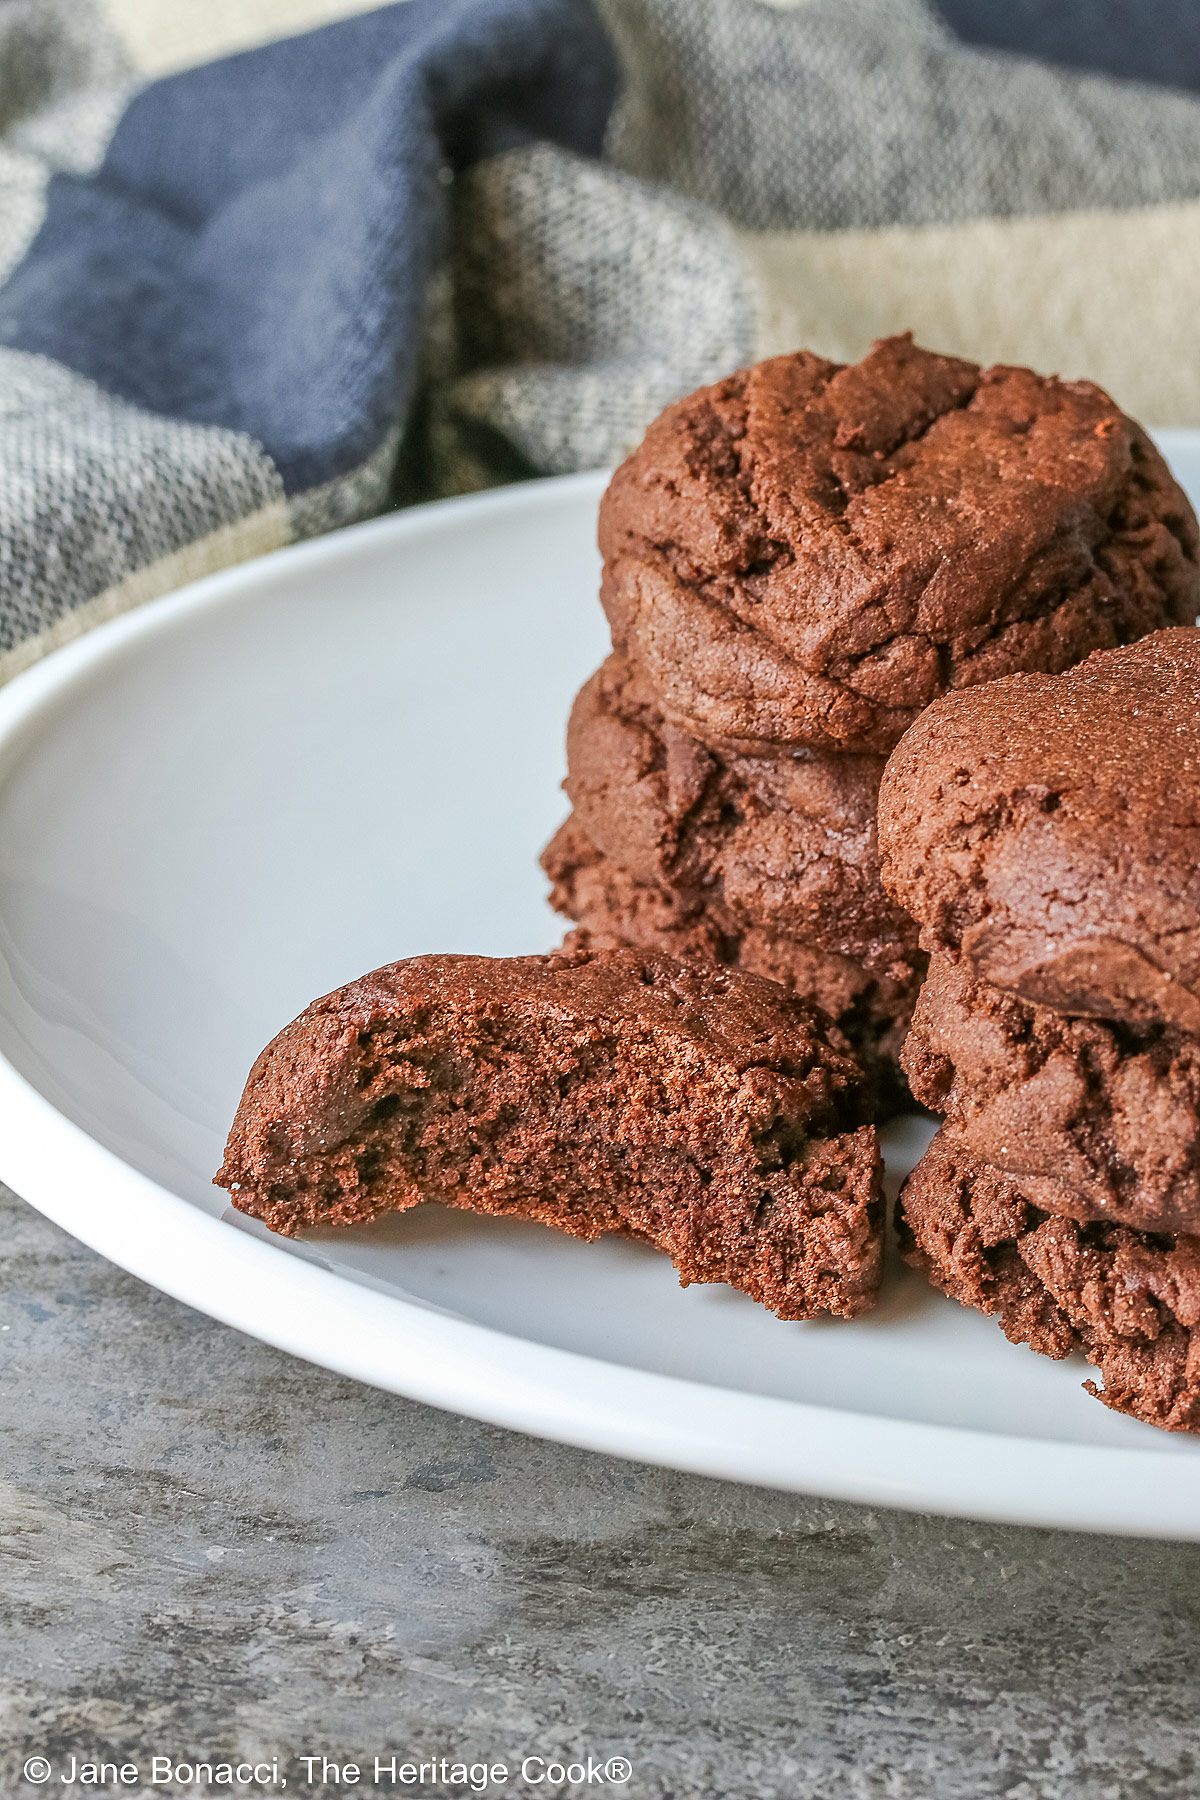
 Are you a chocolate lover? If the answer is yes then you’re going to adore these Rich Chocolate Brownie Cookies. A cross between brownies and cookies, they satisfy every craving and delight even the most ardent chocoholics.
Who doesn’t love a great chocolate cookie? Especially when they have a texture similar to brownies! These cookies will become your favorite to make for family and guests, especially when they are begging for them!

These cookies are so easy to make. Nothing fancy, just great ingredients put together in the right way. Your kids will love to help you prepare these beauties, especially using the cookie scoop!
You follow the standard method of creaming the butter and sugar together, adding an egg and some vanilla. Then adding the dry ingredients and mixing them in until you have a beautiful dough.

The only thing that is a little different is that you chill the dough for an hour or more before you bake them off. This is really helpful with gluten-free doughs because it gives time for the flours to fully absorb the liquids and become less grainy.
You might be surprised by the amount of baking powder called for in this recipe, but I promise it is correct. Dutch process cocoa or dark cocoa, doesn’t play well with baking soda and you may wind up with a soapy tasting product. The answer is to use three times the amount of baking powder! No flavor issues and plenty of leavening.

I like the depth of color you get with the darker cocoa powder. If you don’t have Dutch cocoa (like Droste or Guittard) or Hershey’s Special Dark cocoa in your pantry, you can use natural cocoa. But this is one case where you might want to make a quick run to the grocery store to pick some up.
This is a very heavy dough and it easily handled by my stand mixer (a Kitchenaid) but may be hard for a hand-held mixer. If you have access to a stand mixer, I recommend you use that if possible.

If you haven’t gotten cookie scoops yet, you are missing out. They make my life so much easier. I can portion an entire batch of cookies in half the time it used to take me using two spoons and every one is the same size and bakes at the same rate. I love saving time and energy!
For this recipe I used a #40 scoop which holds about 1.5 tbsp of dough which is slightly larger than what I was looking for but it worked just fine.
Don’t forget to dip the glass in water before pressing each ball of dough a bit. This helps the dough release more easily.
Chocolate cookies are always a little tricky to tell when they are done because you can’t see any browning. Watch the carefully and follow your nose. It will tell you when they are close to done – you can smell the difference. Also, when the tops switch from shiny to a matte finish (non-reflective) they will be done. Watch closely in the last few minutes because your oven may cook differently, shorter or longer than the recipe says.

Give these Rich Chocolate Brownie Cookies a try and I promise everyone will be clamoring for seconds! I like them even better on the second day so make them ahead of your event and save yourself some work on the day of the party.
If you try this recipe, let me know! Please leave a star rating in the recipe card, comment below, and don’t forget to snap a pic and tag it @theheritagecook on Instagram! Seeing your creations makes my day and I love hearing from you!
Ingredients needed for Rich Chocolate Brownie Cookies:
- Butter, brown sugar, egg, vanilla, flour, dark cocoa powder, cornstarch, baking soda, salt, xanthan gum
PRO Tip:
Whisk then weigh the ingredients using a kitchen scale (see Gluten Free Tips*). If you measure the flour by the cup, these cookies may be dry! Weighing is much more accurate and easier once you get used to it.
How to make Rich Chocolate Brownie Cookies:
- Whisk together the dry ingredients. Use xanthan only if your GF blend doesn’t already include it.
- Cream the butter and sugar on medium speed until light and fluffy. Add the egg and vanilla and continue beating another 2 to 3 minutes. Scrape the bowl thoroughly.
- Add dry ingredients, half at a time, and mix on low just until combined. Cover and refrigerate at least 1 hour.
- Scoop the dough into balls about 1 to 1-1/2 tablespoons each. Press each one slightly with the flat bottom of a wet glass. Bake at 350°F (180°C) for 8 to 9 minutes or until the edges have set and the top is no longer shiny, being careful not to overbake them. Transfer to a wire rack to cool.
- Repeat with remaining dough.
PRO Tip:
Special dark cocoa is virtually the same as Dutch processed cocoa and either works in this recipe. But black cocoa behaves differently and won’t be as successful in this application.
Recommended Tools (affiliate links; no extra cost to you):
- Kitchen scale
- Large bowl
- Stand mixer or hand mixer
- Cookie scoop
- Parchment paper or silicone baking mat
Gluten-Free Tips:
* You can adjust any baking recipe to gluten-free by using 120 grams per cup of my favorite gluten-free flour blend. If you are using another brand of flour or regular flour, whisk it, spoon it lightly into a measuring cup until mounded, level off the top with a knife, and weigh the flour left in the cup. Use that weight as your standard per cup of that specific flour. Do this for each flour blend you use. Commercial gluten-free blends such as Pamela’s All-Purpose Artisan Blend, Bob’s Red Mill 1-to-1, or King Arthur Measure for Measure are all good choices.
You will get the best and most consistent results by using a digital kitchen scale and weighing your ingredients, especially when you are baking. And use grams, they are much more specific than pounds and ounces.
All recommended ingredients are gluten-free as of the writing of this article. Always check to be sure the products haven’t changed and are still safe to consume.
Rich Chocolate Brownie Cookies (GF)

Are you a chocolate lover? If the answer is yes then you're going to adore these Rich Chocolate Brownie Cookies. A cross between brownies and cookies, they satisfy every craving and delight even the most ardent chocoholics.
Ingredients
- 1-1/2 cups (180g*) sifted all-purpose gluten-free flour or regular all-purpose flour
- 1/2 cup (42g) unsweetened Dutch-processed cocoa or special dark cocoa (NOT black cocoa!)
- 1 tsp cornstarch
- 2-1/4 tsp baking powder
- 1/4 tsp xanthan gum, only if your GF flour doesn't contain it
- 1/8 tsp salt optional
- 1/2 cup (1 stick; 113g) unsalted butter at room temperature
- 3/4 cup (160g) brown sugar firmly packed
- 1 large egg, at room temperature
- 1 tsp pure vanilla extract
Instructions
1. In a bowl, weigh out the flour, cocoa, cornstarch, baking powder, xanthan gum (if using), and salt (if using). Whisk together so everything is evenly distributed and there are no pockets of either flour or cocoa unmixed. Set aside.
2. In the bowl of a stand mixer (preferable) or a large bowl if using a hand mixer, combine the butter and sugar. Once blended, mix on medium speed until the mixture is light and fluffy, about 2 to 3 minutes. Scrape the sides and bottom of the bowl. Add the egg and vanilla and mix another 2 to 3 minutes.
3. With the mixer off, scrape down the sides of the bowl and add half the dry ingredients. Then with the mixer on low, mix just until the ingredients are combined. Turn off the mixer, scrape the bowl, and add the remaining dry ingredients, mixing until combined and everything comes together, about 1 to 2 minutes. Scrape the bowl again and gather the dough in the center of the bowl. Cover and refrigerate the dough at least 1 hour.
4. Preheat the oven to 350°F (180°C). Line a baking sheet with parchment paper.
5. Using a cookie scoop, portion dough balls, a little over 1 tbsp each (I used a #40 scoop which holds about 1.5 tbsp of dough), and place them about 2-inches apart onto the sheet pan lined with parchment paper. Dip the flat bottom of a glass in water and flatten the cookie dough balls slightly. Do not flatten too much!
6. Bake for 8 to 9 minutes or until the edges have set and the tops are just beginning to set. The tops will change from being shiny to being more matte (non-reflective). Be careful not to overcook them, they will firm up as they cool.
7. Remove the cookies from the oven and allow to rest on the cookie sheet for 2 minutes. Then transfer with a thin spatula to a wire rack to cool completely. Repeat with remaining dough.
8. Store these cookies in an airtight container at room temperature for up to one week. Alternatively, unbaked cookie dough can be stored in an airtight container in the refrigerator for up to 5 days. Freeze for longer storage.
Recipe found at www.theheritagecook.com
Notes
* You can adjust any recipe to gluten-free by using 120 grams per cup of my favorite gluten-free flour blend. If you are using another brand of gluten-free flour, whisk the mix, spoon it lightly into a measuring cup without a spout until mounded, level off the top with the back of a knife, and weigh the flour left in the cup. Use that weight as your standard per cup of that specific flour. Do this for each flour blend you use. Commercial blends such as Pamela's, Bob's Red Mill 1-to-1, or King Arthur Measure for Measure are all good choices.
You will get the best results by using a digital kitchen scale and weighing your ingredients, especially when you are baking.
All recommended ingredients are gluten-free as of the writing of this article. Always check to be sure the products haven’t changed and are still safe to consume.
Adapted from a recipe by Call Me PMC
Nutrition Information:
Yield:
20Serving Size:
1Amount Per Serving: Calories: 79Total Fat: 1gSaturated Fat: 0gTrans Fat: 0gUnsaturated Fat: 0gCholesterol: 10mgSodium: 118mgCarbohydrates: 15gFiber: 1gSugar: 0gProtein: 2g
The nutritional information for recipes on this site is calculated by online tools and is merely an estimate. If you need nutritional calculations for medical reasons, please use a source that you trust.
If you enjoyed this recipe, be sure to follow me on social media so you never miss a post:

Create a New Tradition Today!
Welcome! The suggestions here are not intended as dietary advice or as a substitute for consulting a dietician, physician, or other medical professional. Please see the Disclaimers/Privacy Policy page for additional details. Unauthorized use, distribution, and/or duplication of proprietary material from The Heritage Cook without prior approval is prohibited. If you have any questions or would like permission, please contact me. We participate in the Amazon Services LLC Associates Program, an affiliate advertising program designed to provide a means for sites to earn advertising fees by advertising and linking to amazon.com. As an Amazon Associate, I earn a small amount from qualifying purchases without any additional cost to you. This page may contain affiliate links. The author makes no claims regarding the presence of food allergens and disclaims all liability in connection with the use of this site.