Today’s Recipes: Brioche Cloverleaf Rolls and Tom Colicchio’s Parker House Rolls.

Dinner rolls, fresh out of the oven
Imagine this … watching the miracle of yeast dough rising, forming the perfect rolls and baking them, the aroma wafting through the house, pulling them hot from the oven, perfectly golden brown. Now imagine that you are pulling one apart and slathering it with butter, just about to take that first bite … Yes! You can make these for your Thanksgiving dinner, I promise!
One of the best things about making fresh bread or rolls is that your house fills with the incredible scent of baking. I immediately get a smile on my face when I walk past a bakery and smell the bread. Just the aroma of yeast proofing in a bowl makes me salivate. This year for your Thanksgiving dinner I hope you make your own rolls, but even if you buy them from a bakery or the grocery store, reheat them in the oven to get that amazing aroma.
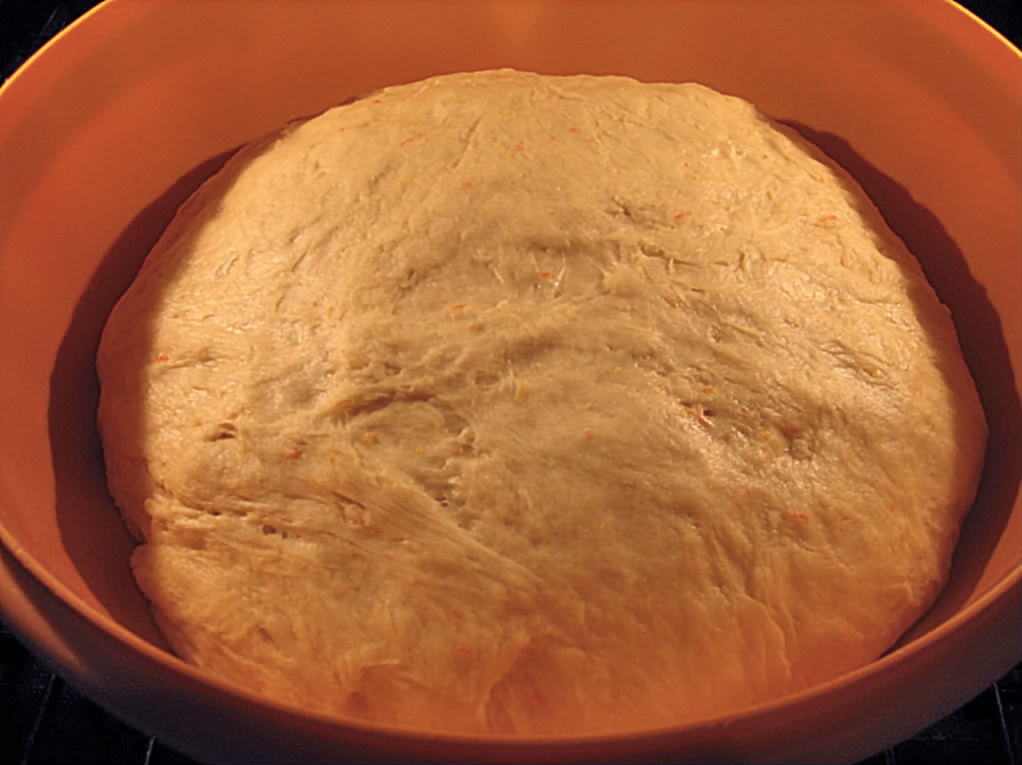
Dough ready to start rising
Making bread is a very sensuous experience. The smell of the yeast, the feel of the dough as you knead it, changing from a sticky glob into a smooth and satiny dough, the satisfaction you feel when it comes out of the oven, perfectly risen and golden brown. I started baking bread in high school and was immediately hooked. This was long before the big mixers we have today so I would spend a long time kneading the dough by hand until it was just right. It is really good training because you learn to trust how the dough feels. There is nothing quite like it and the sense of accomplishment you feel when it turns out is worth all the time and effort.
Now is a good time to go out and buy new packages of yeast. If yours are nearing or just past the date on the package, it is safer to buy new. Always proof your yeast to make sure it is still alive! If it isn’t actively foaming up, it is dead. There are a few things than can kill the yeast, but the most common is that your liquid is too hot. Use an instant read thermometer to measure it. For those of you who own a bread machine, you can use your machine to mix and knead the dough, then take it out and place in a buttered bowl to rise. Just follow the directions for your specific machine, layering the ingredients in the order given.
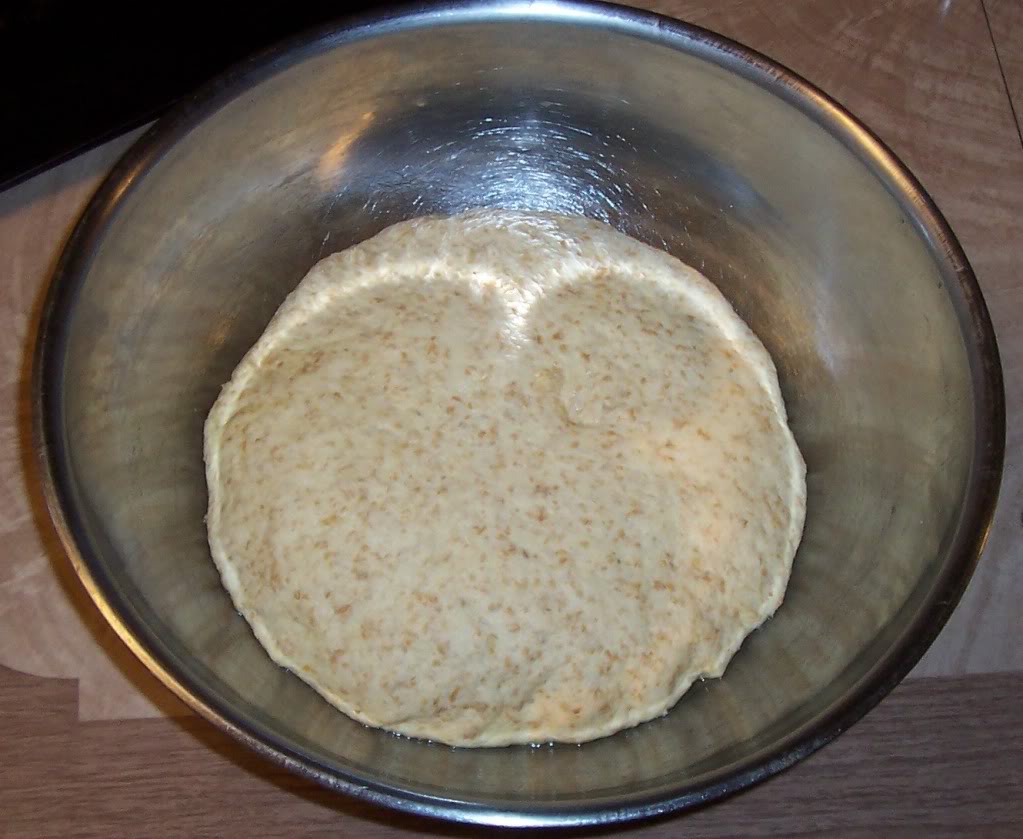
Dough after the first rise, nearly doubled in volume
These recipes are very flexible and give you lots of options on taste and timing. If you want, you can add minced herbs or garlic to the dough when you mix it. Rosemary and dill are favorites of mine. You can make and bake them all in the same day if you are having dinner later in the day, or you can make the dough a day ahead and let them rise overnight in the refrigerator, and then do the final rise and baking the next day. You can even make and bake them a week ahead, freeze them, and then thaw and reheat for your dinner. Your guests will never know you baked them early.
Yeast converts the sugar into carbon dioxide which raises the dough. Most recipes use regular granulated sugar, but Tom Colicchio’s recipe uses barley malt syrup, a molasses-like sweetener that gives the dough a slight malty flavor that is addicting. You can find malt syrup at most grocery stores or you can buy it online. But if you can’t find it, dark corn syrup works just as well.

Cloverleaf Rolls ready to rise
If making rolls from scratch adds too much to an already very busy day, you can make store-bought rolls seems like homemade. I have a few tricks up my sleeve that I’ve learned over the years, LOL. Dust them lightly with flour before reheating them to make them look more rustic. Also, make an herb butter and brush it on the hot rolls. People will swear you made them from scratch! One of my favorite compound butters is minced shallots slowly cooked until the butter is infused. Then you can strain the solids out or leave them in. Add some fresh herbs and let it sit off the heat for a few minutes. Minced thyme, rosemary, and dill are all great with shallots. Herbed compound butter makes everything taste better!
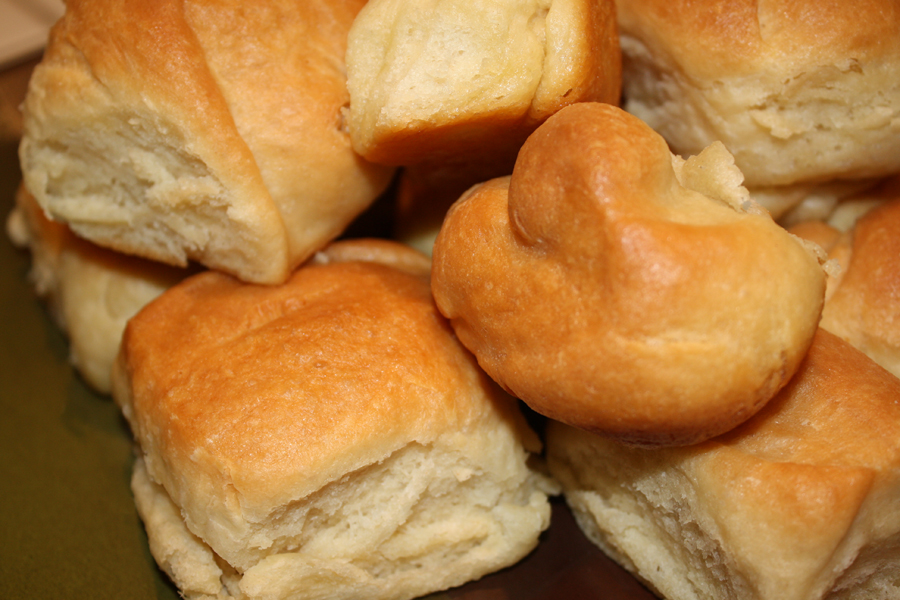
Pile of fresh rolls

- 1/4 cup warm water (110°F to 115°F)
- 1/4 cup warm whole milk (110°F to 115°F)
- 3 tsp active dry yeast (empty two envelopes into a bowl and measure)
- 2-3/4 cups all-purpose flour
- 1-1/2 tsp salt
- 3 large eggs, at room temperature
- 3 tbsp granulated sugar
- 12 tbsp (1-1/2 sticks) unsalted butter, at room temperature, cut into 1 tbsp cubes
- 1 large egg beaten with 1 tsp water (for egg wash)
- Combine 1/4 cup warm water and warm milk in bowl of heavy-duty mixer. Sprinkle yeast over the top and stir to moisten evenly. Let stand until yeast dissolves and becomes foamy, stirring occasionally, about 10 minutes.
- Add flour and salt to yeast mixture. Blend at medium-low with the paddle attachment until mixture becomes shaggy, scraping down sides of bowl occasionally, 1 to 2 minutes. Add eggs, one at a time, beating until blended after each addition. Beat in sugar. Increase mixer speed to medium; beat until dough is smooth, about 3 minutes.
- Reduce speed to low. Add butter, 1 tbsp at a time, beating until blended after each addition, about 4 minutes (dough will be soft and silky). Increase speed to medium-high and beat until dough pulls away from sides of bowl and climbs the paddle, 8 to 9 minutes. This effectively kneads the dough, developing the gluten, without adding any additional flour that can make the dough tough.
- Lightly butter large bowl. Transfer dough to bowl, turning to coat entirely with butter. Cover bowl with plastic wrap or a clean kitchen towel. Let dough rise in a warm draft-free area until almost doubled in volume, about 1 hour 15 minutes to 1-1/2 hours. The top of the refrigerator works well, or you can turn the oven on for 1 minute then turn it off and set dough in oven to rise.
- When doubled in volume, gently deflate dough by lifting around edges, then letting dough fall back into bowl, turning bowl and repeating as needed. Cover bowl tightly with plastic wrap and chill, deflating dough in the same way every 30 minutes until dough stops rising, about 2 hours. Chill overnight.
- The following day, butter 12 standard (1/3-cup) muffin cups. Divide dough into 12 equal pieces; cut each piece into thirds. Roll each small piece between palms into ball. Place 3 balls, side-by-side, in each prepared cup (dough will fill cup).
- Place muffin pan in warm draft-free area; cover with a clean kitchen towel. Let dough rise until light and almost doubled, above the top rim of muffin cups, about an hour. After 30 minutes, position rack in center of oven and preheat to 400°F. Fully preheating the oven guarantees the rolls will bake properly.
- Place muffin pan on rimmed baking sheet. Gently brush egg glaze over risen dough, being careful that glaze does not drip between dough and pan (which can limit the final rising in the oven). Bake brioches until golden brown, tenting with foil if browning too quickly, about 20 minutes. Transfer pan to wire rack. Cool 10 minutes. Remove brioches from pan. Serve warm or at room temperature.
- Yield: 12 rolls
- Time: about 6 hours plus overnight refrigeration
- 3/4 cup milk, heated to 110°F (about 45 seconds in a microwave)
- 1 tsp barley malt syrup or dark cornsyrup
- 1 packet active dry yeast, about 2-1/4 tsp (buy new packets before the holidays for the “freshest” yeast!)
- 2 cups flour
- 3/4 tsp kosher salt or 1/4 tsp of table salt
- 2-1/2 tbsp butter, cut into 1/2-inch cubes, softened
- 3 tbsp melted unsalted butter
- Fleur de sel or other coarse salt for sprinkling on top (don't use if you brushed the tops with regular salted butter)
- Butter a medium glass bowl*; set aside. Stir together milk and malt syrup in a small bowl. Stir in yeast and let sit until foamy, about 10 minutes. Transfer to the bowl of your heavy-duty mixer.
- In a medium bowl, whisk together flour and salt. Add to milk mixture along with butter and mix (using the paddle attachment) on low speed about 1 to 2 minutes, until a dough has formed and is wrapping around the paddle and cleaning the sides of the bowl. Turn out onto a lightly floured surface and knead lightly for 2 to 3 minutes until satiny and no longer sticky.
- Roll into a smooth ball, set into the buttered bowl and turn so all the surface are coated with the butter. Cover with a clean kitchen towel and set in a draft-free warm place to rise until doubled in volume. The first rise will take about 60 to 75 minutes. If you are mixing the dough by hand, stir with a wooden spoon until a dough forms. Transfer to a lightly floured surface and knead until dough is satiny and no longer sticky, up to 5 or 6 minutes.
- If your room is cold the dough will take longer to rise. You can turn your oven on for 1 to 2 minutes then shut it off. Place the covered bowl in the oven with the door cracked open for 5 minutes. Then shut the oven door and let rise. If you are baking something in the oven you can set the bowl near the oven vent to stay warm.
- When dough has risen, uncover and press it down in the center, deflating the dough. Form into a smooth ball again, cover and let sit until risen again. The second rise will take another 60 to 75 minutes.
- Butter an 8x8-inch baking pan. Portion dough into fourteen equal pieces and roll into 1-1/2″ diameter balls, about the size of a ping pong ball, (a bench scraper cuts the dough beautifully) and transfer to prepared baking pan, distributing them evenly. They do not need to be touching, but as they rise, they will merge together. Cover loosely with the kitchen towel and let sit until doubled in size. The third rise will take about 2 hours.
- To make ahead, instead of letting the dough do the third rising, form the rolls and place in baking pan as directed. Cover the pan loosely with plastic wrap and let them rise slowly in the refrigerator overnight. Remove from refrigerator and let sit at room temperature about 2 to 3 hours before baking.
- To Bake: 30 minutes before rolls are ready to bake preheat oven to 375°F. Fully preheating the oven guarantees the rolls will bake properly. Brush with melted butter, sprinkle with coarse salt if desired, and bake until puffed and tops are lightly golden brown, 20 to 30 minutes. If they are browning too quickly, tent loosely with a piece of foil. If they are not browning quickly enough, raise temperature to 400°F. Remove from oven and transfer to a cooling rack. Serve warm or at room temperature. Once cool you can store the rolls in a resealable plastic bag at room temperature overnight. Refrigerate if holding longer.
- Yield: 10 to 12 rolls
- This dough surprised me. First, the recipe makes very little dough. It took forever to rise and I did the final two risings on the top of the stove where it was warmer than I normally would use to raise a bread dough. I got fewer pieces than the original recipe said and they didn't seem as though they would fill the pan. Even as I put the rolls in the oven they didn't look very tall. But they did finish rising in the oven and came out fine.
- * Using a glass bowl allows you to see how much the dough is rising without disturbing it. When you first set the dough in the bowl, put a piece of tape on the outside marking the initial level. Then compare the new height to the original height. Don't forget that if the dough expands to fill the bottom of the bowl without rising much vertically, it is still increasing in volume.
Thank You!


Amy
Jane, I found your site and the tweaked Colicchio recipe after I first excitedly made the Saveur recipe and then was hugely disappointed. There is a restaurant in my old neighborhood of San Francisco, Spork, which has amazing Parker House rolls (topped with a bit of rosemary and salt); since we moved away, my husband and I have been waxing nostalgic over them. I tried your recipe yesterday and the rolls didn’t do a final rise in the oven. Any ideas why? I also turned them up to 400 at the fifteen minute point; then they spent the full 30 minutes in the oven before they browned, getting overcooked in the process. (I’m thinking I might just do them at 400 for closer to 20 minutes next time.) I’m also curious why you decided to leave off the clarified butter part of Colicchio’s recipe. I’ve been doing it but questioning the added step. Thanks!
Jane Bonacci, The Heritage Cook
Hi Amy, Thanks so much for writing! I didn’t top the rolls with butter because when I did they wound up really greasy – my husband preferred them without the extra butter. But you can certainly add it if you like. The addition of rosemary would be wonderful – both on the top and kneaded into the dough!
My rolls never did rise tall like some recipes, and I’m not sure why. I think for your oven (each is different) you probably are right to put them up to 400 for 20 minutes. The surge of heat helps with the final rise.
This is definitely a bit tricky, but a lot of baked goods are – especially anything with yeast in it. I hope these pointers have helped! I love the final product that I baked and it sounds like you are close to your favorite too!
BTW, I have heard of Spork, but haven’t eaten there yet. I just checked out the menu and it is now on the top of our list to try!!! Thanks for the tip!
Kate
So glad I saw the comments on Saveur before I started these! Thanks for tweaking, Jane. I will let everyone know how these turn out. Can’t wait to look around the rest of your beautiful site. Happy Turkey Day to all 😀
Jane Bonacci, The Heritage Cook
Hi Kate – I’m so pleased you’ll be trying these rolls. They are terrific (with the modifications) and so easy to make. Come back and let us know how they turn out!!
Take a look around the site and let me know what you think. I always welcome suggestions and constructive criticism. Enjoy your holidays!
Ruth
Your rolls look so amazing! My Mother’s maiden name was Parker so she always made Parker house rolls. But I’ve never had luck with them. We lost her last year and Thanksgiving day is her birthday this year. I’d like to try making the rolls again in honor of her. We will be driving 5 hours to my brother’s house on Thursday. I was thinking about making them ahead of time leaving them a little bit uncooked them finish baking when I get there. Any other ideas?
Jane Bonacci, The Heritage Cook
Hi Ruth, I am so sorry for your loss. I understand how difficult this holiday season will be for you and your family. My heart goes out to you all.
You have a few options for transporting the rolls. I think the easiest is for you to bake them before you go. Make the dough either today or Wed, let them rise in the refrigerator overnight (see directions in the recipe) and bake either on Wed or Thurs morning. Once they are cool you can store them in an airtight container or zip-top plastic bags. Reheat for a few minutes before serving.
You can also make the dough on Wed morning, let it rise during the day, and bake the rolls off in the afternoon or evening. And thirdly, you could make the dough Wed night, let it rise in the refrigerator overnight, and in the morning, transfer the unbaked rolls – carefully covered – to a cooler with some ice for the drive to your brother’s house. Then you could bake them once there. This may be a little riskier because you can’t control the temperature as well in a cooler and the jostling in the car may affect the rising of the dough – although it shouldn’t.
When you are making the dough, make sure your yeast is very active (foaming up when added to liquid) and knead the dough until it is satiny and smooth and barely sticky. If you’ve made bread before you will recognize when it feels right. If you want to be extra sure they turn out, make a batch today for practice!!
I know that no matter how they turn out, everyone will cherish the memory of your mother’s Parker House rolls and be grateful for your efforts!!
sue
Discovered your reworked parker house rolls after I took mine from the oven – pale and unattractive. Saw all the reviews on Saveur after the fact. My better instincts told me 325 was too low. Will try your modifications before thanksgiving. Really appreciate the tip to refrig overnight.
Thanks for the help.
Jane Bonacci, The Heritage Cook
Hi Sue, I am so glad you will try the rolls again with the modifications. I had the same reaction when I read the recipe the first time. I baked mine at 375F and raised it to 400F for a few minutes right at the end (my oven tends to run a little cool.) And don’t overwork the dough. I used my KitchenAid mixer with the paddle until it cleaned the bowl and then finished kneading by hand – it only took a minute or two until it wasn’t sticky and felt smooth and satiny. Follow your instincts, it sounds like they are good!!
I hope they turn out perfectly for your Thanksgiving dinner!!
Carrie
Oh, and what kind of yeast do you recommend?
Jane Bonacci, The Heritage Cook
Active Dry Yeast (not Instant yeast) in the packets is the easiest to work with. You just have to “proof” it (warm, not hot water!) to get the little critters moving!
There are three main brands that are widely available, SAF, Red Star, and Fleischmann’s. All are good and reliable. Just make sure that the expiration date is a long way off and if the yeast doesn’t react, throw it out and start over with a fresher packet.
You can do a trial run tomorrow if you want so you are more confident before baking for Thanksgiving. You can never have enough rolls around the house, LOL. I can’t wait to hear how they turn out!
Carrie
Thanks, Jane! Could I really make both? I’m a bit intimidated by bread, but I guess it would be easier with mixer. Can you make the dough the day before and then bake when serving?
Jane Bonacci, The Heritage Cook
Carrie – you absolutely can make both kinds because you can make the dough the day before and do the final rising in the refrigerator overnight. You can also bake them early in the day and rewarm before serving if that makes it easier for you! If you have any questions, I’m happy to help!
Carrie
Hi! I found your website while reading Saveur’s reviews of the PH rolls and love it. Which rolls do you prefer? The cloverleaf or the PH? I bought the barley malt syrup, but am wondering which would be easier and taste better.
Jane Bonacci, The Heritage Cook
Hi Carrie,
Welcome to The Heritage Cook! I grew up making cloverleaf rolls and love them, but the slight sweetness of the PH rolls are addictive. Depending on how many people you have coming to dinner, you might want to make some of each and have people vote!
I’m going to make the PH this year for Thanksgiving, and will probably make the cloverleafs for Christmas. Equal opportunity baking, LOL. If you have a big mixer, both are easy to make. I made the PH is just a few minutes (not counting the waiting between rising etc.). Follow your instincts on how long to work the dough and go by the feel and look rather than timing. Every kitchen is different. Come back and let me know how everything worked out!!
Chris
Jane
Are you confident in the tweaks to the Parker House. the recipe as written in saveur seems to be a failure judging by the reviews.
Jane Bonacci, The Heritage Cook
The original recipe had a couple of errors that I fixed. If you follow my directions they will turn out beautifully. I hope you make them and let me know how they turn out! If you want to do a trial run, they are delicious!
Carolyn Jung
Oooh, I saw that Tom Colicchio Saveur recipe, too, and was drooling over it. You have me sold now. I’m definitely making it.
Jane Bonacci, The Heritage Cook
Wonderful Carolyn! I know we’ll both enjoy Tom’s family tradition!!
Julia
Mmmm…your description on making bread has inspired me to bake my own bread. I have never done this before, but I want to create the smell of baking bread in my house. I think I may just have to try the Brioche Cloverleaf Rolls—they sound simply amazing. I work with Better Recipes.com and I am always in search of new recipes…especially since Thanksgiving is quickly approaching. If you are in search for the same, I recommend you check out their Thanksgiving Dinner Recipes
Jane Bonacci, The Heritage Cook
Hi Julia,
I hope you do make the rolls and that you enjoy them as much as I do! If you are planning on making them for Thanksgiving, I would suggest you do a trial run first so you are less stressed for the holiday!! Thanks for the referral to your site – friends, here is another source for Thanksgiving recipes!!
rebecca
wow amazing homemade breads can’t beat it 🙂
Jane Bonacci, The Heritage Cook
Hi Rebecca, Noting can beat homemade baked goods, but there is something special about bread and rolls. I hope you try these soon and let me know how they turn out!