
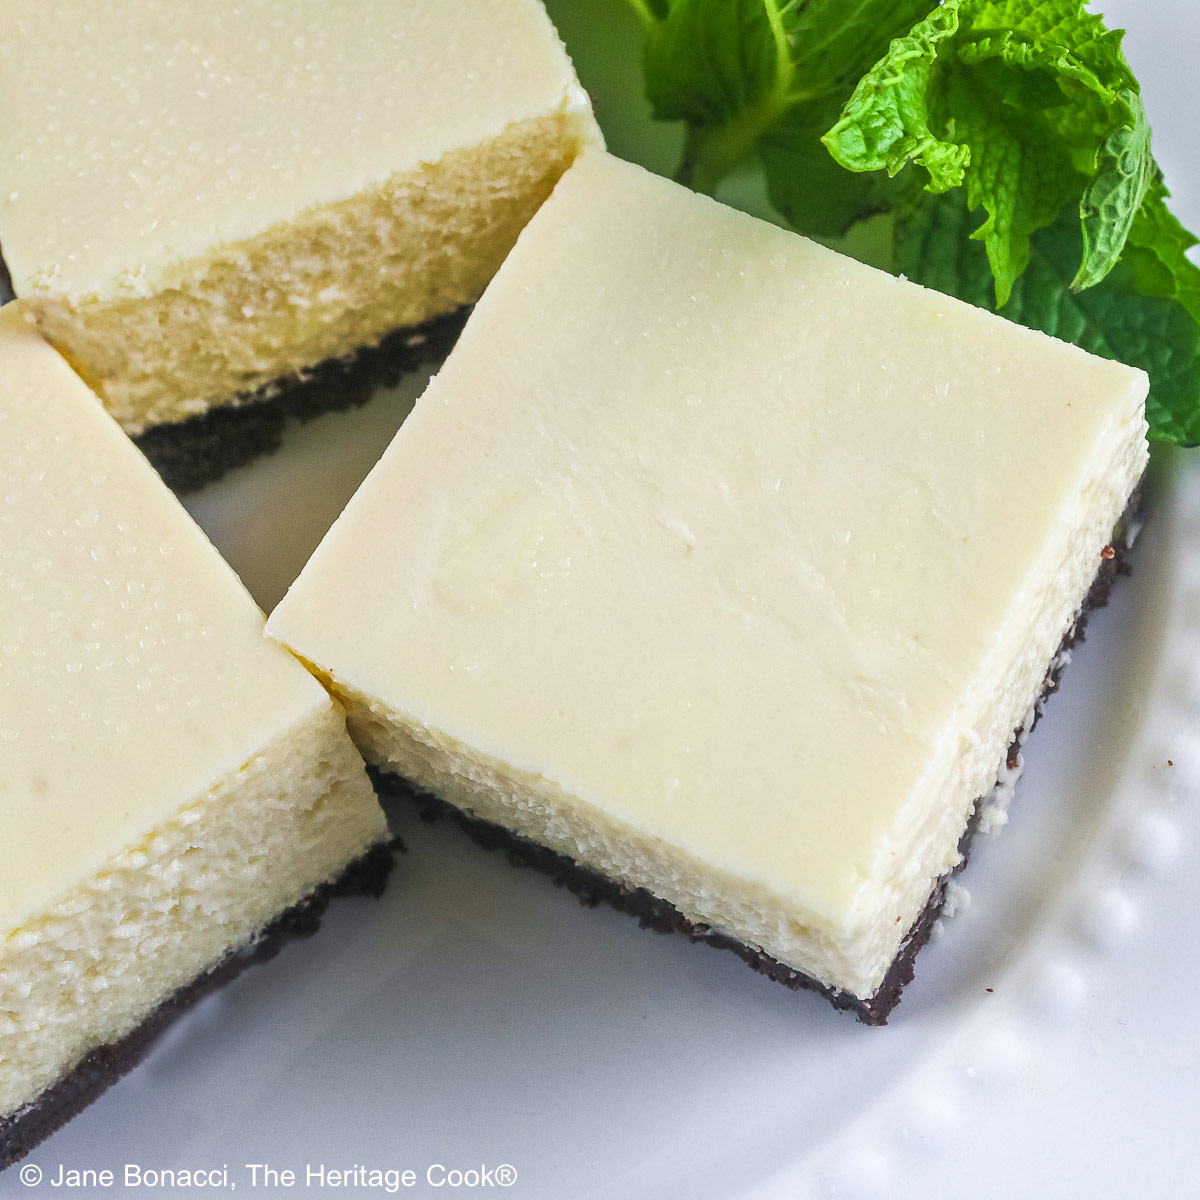
With just 10 ingredients, these Cheesecake Bars with a Chocolate Crust are the perfect way to enjoy both making and eating cheesecake! I love, love, love cheesecake but surprise, I hate to make them. My springform pan always leaks in the water bath (bain-marie) and I wind up with wet crusts – every time. So, I went looking for a solution and found it in these easy and wonderful cheesecake bars!
These cheesecake bars have all the flavor and texture that you love without the hassle of a water bath which means no soggy crust! Hallelujah!

Use a measuring cup to pack the cookie crumb crust in the pan
Be sure to line your pan with a sheet of parchment and let it extend over two opposite ends of the pan. This creates a sling you can use later to lift the bars out of the pan!
There is a little flour added to the crust ingredients for structure, giving you a firmer crust to help support the cake as you lift it out of the pan to cut into bars. It needs a little extra help to hold together. Be sure to use gluten-free flour if needed!

If you aren’t gluten-free and prefer graham cracker crusts, just substitute graham cracker crumbs for the chocolate cookie crumbs and leave everything else the same. You’ll get a wonderful dessert that you’ve been dreaming of!
I used gluten-free chocolate cookie crumbs for my crust that I found on King Arthur Flour.com. They come in a convenient 8 oz size that makes a perfect 9-inch pie crust. Very easy to use and delicious!

If I don’t have the crumbs on hand, I like to use Pamela’s Gluten-Free Extreme Chocolate Mini Cookies and grind them myself in my food processor. Beware, they are delicious and you’ll be tempted to eat them all! They are available online if you can’t find them in your local grocery store.
If you have any trouble getting the parchment to release from the pan, set the pan on a hot towel or heating pad on low to warm up the butter. The bars should lift right out. Set the bars on a cutting board before slicing.

If you have any trouble getting the parchment to release from the pan, set the pan on a hot towel or heating pad on low to warm up the butter. The bars should lift right out. Set the bars on a cutting board before slicing.
These cheesecake bars with only 10 ingredients are the perfect dessert to make. Easy to eat and they will be inhaled by your guests and family. Just be sure to keep them cold until serving!

I hope you love these cheesecake bars with chocolate crust as much as The Artist and I do! They are deceptively good – not so much to look at, but boy oh boy are they delicious! And you can always adorn the top with some brightly colored sprinkles for even more fun!
If you try this recipe, let me know! Please leave a star rating in the recipe card, comment below, and don’t forget to snap a pic and tag it @theheritagecook on Instagram! Seeing your creations makes my day and I love hearing from you!
Ingredients needed for Cheesecake Bars with Chocolate Crust:
- Chocolate Crust: GF Oreo cookies or chocolate cookies, GF flour, xanthan gum (optional), sugar, butter
- Cheesecake Filling: Cream cheese, eggs, sugar, sour cream, vanilla
PRO TIP:
To get the cleanest slices on any sticky or soft center dessert, run a long knife under hot water, wipe it dry and make your first cut. Pull the knife straight up, run under hot water, wipe it dry and cut again. Rinse the knife after each cut.
PRO TIP:
Pull the cheesecake bars out of the oven when there is still a little jiggle in the center and let the residual heat finish baking the filling all the way through. You will get a creamier, more luscious cheesecake.
How to make Cheesecake Bars with Chocolate Crust:
- Make the Crust: Line an 8-inch square baking pan (20 cm) and set aside. Pulse the whole cookies (without the cream filling) in a food processor until you have very fine crumbs. Add the flour, xanthan gum, and sugar with the melted butter and pulse until they are the consistency of damp sand.
- Press into the bottom and up the sides of the prepared pan. Use a measuring cup to help compact the crust working your way around the pan compressing the crumbs.
- Bake at 325°F (163°C) for about 10 minutes until fragrant. Transfer to a wire rack and cool completely in the pan.
- Prepare the Filling: Beat together the cream cheese until smooth, then add the eggs, one at a time, beating well after each addition before adding the next. Scrape the bowl thoroughly so there are no lumps in the filling. Add the sour cream and vanilla, mixing until combined. Do not overmix.
- Pour the filling into the crust, spreading it into the corners with an offset spatula and smoothing the top. Bake until the edges are set but the center still jiggles a bit when gently shaken, about 35 to 40 minutes. Spin the baking pan halfway through to evenly bake the cake.
- Transfer to a wire rack and leave to cool completely, about 2 hours. Refrigerate, covered, at least 3 hours or up to overnight.
- To Serve: Using the parchment** carefully lift the bars out of the pan and set on a cutting board. Cut into about 16 pieces and serve. Leftovers will hold, covered, in the refrigerator up to 4 days.
PRO Tip:
To quickly bring eggs to room temperature, place whole eggs (in their shells) in a bowl of hot water and let them sit for about 5 minutes. They will have warmed up quite a bit and will incorporate with the cream cheese much more smoothly.
PRO TIP:
Pull the cheesecake bars out of the oven when there is still a little jiggle in the center and let the residual heat finish baking the filling all the way through. You will get a creamier, more luscious cheesecake.
PRO Tip:
** If you have trouble lifting the bars out of the pan because the parchment is sticking to the cold, hard butter, set the pan on a hot towel or gently submerge slightly in hot water to soften the butter and release the parchment. Set pan on a dry towel and carefully lift the bars out of the pan, setting them on a cutting board. Cut into squares or rectangles and serve.
Recommended Tools (affiliate links; no extra cost to you):
- Kitchen scale
- Food processor
- Stand mixer or hand mixer
- Parchment paper
- 8-Inch (20 cm) square baking pan
- Long, sharp knife
- Heatproof spatula
Gluten-Free Tips:
* You can adjust any baking recipe to gluten-free by using 120 grams per cup of my favorite gluten-free flour blend. If you are using another brand of flour or regular flour, whisk it, spoon it lightly into a measuring cup until mounded, level off the top with a knife, and weigh the flour left in the cup. Use that weight as your standard per cup of that specific flour. Do this for each flour blend you use. Commercial gluten-free blends such as Pamela’s All-Purpose Artisan Blend, Bob’s Red Mill 1-to-1, or King Arthur Measure for Measure are all good choices.
You can use either a gluten-free flour, like rice or sorghum flour, or a gluten-free flour blend in the crust. Xanthan gum (or psyllium husk powder) helps keep the crust from crumbling apart. I like Pamela’s Extreme Chocolate Mini Cookies to make a chocolate crumb crust. They pulverize easily in your food processor or with a rolling pin in a plastic resealable bag.
You will get the best and most consistent results by using a digital kitchen scale and weighing your ingredients, especially when you are baking.
All recommended ingredients are gluten-free as of the writing of this article. Always check to be sure the products haven’t changed and are still safe to consume.
Cheesecake Bars with a Chocolate Crust (GF)

These Cheesecake Bars with Chocolate Crust are the perfect way to enjoy both making and eating cheesecakes! These cheesecake bars have all the flavor and texture that you love without the hassle of a water bath which means no soggy crust – hallelujah!
Ingredients
Crust
- 2 cups (6 oz; 170g) ground GF Oreo cookies (without the cream centers; about 2 sleeves) or gluten-free chocolate cookies
- 2 tbsp flour or gluten-free flour blend
- 1/4 tsp xanthan gum or psyllium husk powder, only if using gluten-free flour that doesn't already include it
- 2 tbsp granulated sugar
- 1/4 cup (1/2 stick; 57g) butter, melted
Filling
- 16 oz (two 8 oz packages; 454g) cream cheese, at room temperature
- 2 large eggs (100g), at room temperature
- 2/3 cup (132g) granulated sugar
- 1/4 cup (57g) sour cream
- 2 tsp vanilla extract
Instructions
1. Place a rack in the center of the oven and preheat to 325°F (163°C). Lightly butter an 8-inch (20 cm) square pan and line it with parchment, leaving two ends extending beyond the edges to create a sling. Butter the parchment.
2. Prepare the Crust: Pulse whole cookies (without the cream centers) in a food processor about 30 seconds until very finely ground. Add the flour, xanthan gum (if using), and sugar, along with the melted butter, pulsing to combine. You can also do this by hand if you're using pre-ground crumbs. When they are the consistency of damp sand, sprinkle over the bottom of the pan, pressing into an even layer on the bottom and up the sides.
3. Bake until fragrant, about 10 minutes. Transfer to a wire rack and let the crust cool completely in the pan.
4. Make the Filling: In the bowl of your stand mixer or a large bowl if using a hand mixer, beat the cream cheese on low speed until completely smooth, about 1 minute. Add the eggs, one at a time, beating until combined before adding the next one. Scrape the bowl and beater thoroughly. Be sure there are no lumps of cream cheese remaining. Add in the sour cream and vanilla, mixing until combined and creamy. Scrape the bowl and beater, mixing in any solids. Do not over beat or you will add too much air to the filling.
5. Pour the filling into the crust, spreading it into the corners and smoothing the top. Bake until the edges are set but the center still jiggles a little when gently shaken, about 35 to 40 minutes. Spin the baking pan halfway through the baking so the bars bake evenly.
6. Transfer to a wire rack and leave to cool completely, about 2 hours. Refrigerate, covered, until thoroughly chilled through, at least 3 hours and up to overnight.
7. Using the parchment sling, gently lift the bars out of the pan**. Cut into 16 pieces and serve. Refrigerate any leftovers, covered, up to 4 days.
Recipe found at www.theheritagecook.com
Notes
* You can adjust any recipe to gluten-free by using 120 grams per cup of my favorite gluten-free flour blend. If you are using another brand of gluten-free flour, whisk the mix, spoon it lightly into a measuring cup without a spout until mounded, level off the top with the back of a knife, and weigh the flour left in the cup. Use that weight as your standard per cup of that specific flour. Do this for each flour blend you use. Commercial blends such as Pamela's, Bob's Red Mill 1-to-1, or King Arthur Measure for Measure are all good choices.
You can use either a single gluten-free flour, like rice or sorghum flour, or a gluten-free flour blend in the crust. Xanthan gum (or psyllium husk powder) helps keep the crust from crumbling. I like Pamela’s Extreme Chocolate Mini Cookies to make a chocolate crumb crust. They pulverize easily in your food processor or with a rolling pin in a plastic resealable bag.
** If you have trouble lifting the bars out of the pan because the parchment is sticking to the cold, hard butter, set the pan on a hot towel or on a heating pad to soften the butter and release the parchment. Set pan on a dry towel and carefully lift the bars out of the pan, setting them on a cutting board. Cut into squares or rectangles and serve.
You will get the best results by using a digital kitchen scale and weighing your ingredients, especially when you are baking.
All recommended ingredients are gluten-free as of the writing of this article. Always check to be sure the products haven’t changed and are still safe to consume.
Filling adapted from an America's Test Kitchen recipe
Nutrition Information:
Yield:
16Serving Size:
1Amount Per Serving: Calories: 211Total Fat: 11gSaturated Fat: 6gTrans Fat: 0gUnsaturated Fat: 4gCholesterol: 53mgSodium: 205mgCarbohydrates: 18gFiber: 1gSugar: 3gProtein: 9g
The nutritional information for recipes on this site is calculated by online tools and is merely an estimate. If you need nutritional calculations for medical reasons, please use a source that you trust.
If you enjoyed this recipe, be sure to follow me on social media so you never miss a post:

Create a New Tradition Today!
Welcome! The suggestions here are not intended as dietary advice or as a substitute for consulting a dietician, physician, or other medical professional. Please see the Disclaimers/Privacy Policy page for additional details. Unauthorized use, distribution, and/or duplication of proprietary material from The Heritage Cook without prior approval is prohibited. If you have any questions or would like permission, please contact me. We participate in the Amazon Services LLC Associates Program, an affiliate advertising program designed to provide a means for sites to earn advertising fees by advertising and linking to amazon.com. As an Amazon Associate, I earn a small amount from qualifying purchases without any additional cost to you. This page may contain affiliate links. The author makes no claims regarding the presence of food allergens and disclaims all liability in connection with the use of this site. This post was first shared in June 2019. The article was updated in 2024

Rita
Love it, Jane! Two favs in one dessert :o)
Jane Bonacci
It is great Rita! One of my favorites!