
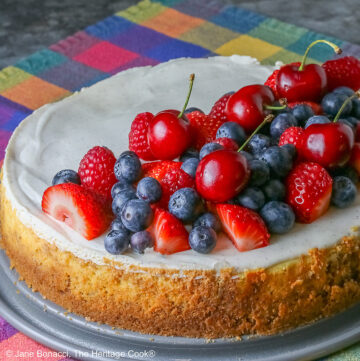
Boston Cream Pie is a delightful end to any meal or way to celebrate a special occasion. This New England classic is a combination of yellow cake layers with vanilla custard in between and then covered with a chocolate glaze. It is a beautiful combination of textures and flavors, sure to please everyone!
Made and served since the mid-1800’s, this dessert is literally a piece of American history. The title most likely came about because pie tins were more common than cake pans in the early days when this dessert was being baked.

When I was looking for a gluten-free version to try, I found this recipe from the Betty Crocker Gluten-Free Cookbook. If you are new to gluten-free cooking and baking, it is wise to start practicing with tested gluten-free recipes rather than adapting a regular recipe. A few successes under your belt and you’ll be confident enough to try anything!
Gluten-free cakes differ significantly from those made with regular wheat-based flours. Gluten-free flours do not have the same lift and structure as regular wheat flour so the batter will be a bit looser and the layers may be slightly thinner than you are used to.

The addition of almond flour in this recipe adds a lot of flavor and a texture similar to whole wheat. I was delighted with the airiness of the cake and I’m sure you will be too.
When I was cooking the custard, I was swept back in time to my childhood. It smelled just like the tapioca pudding my mother used to make me as a special treat and I fell in love with it all over again. Smooth and creamy with the aroma of vanilla wafting through the room, I could almost hear her voice talking to me, telling me about her day. It was a sweet moment in my busy week.
The glaze couldn’t be easier. Just throw all the ingredients in a heatproof bowl (I used a Pyrex measuring cup) and zap them in the microwave. Then a little whisking and the clumpy mess becomes a smooth, shiny chocolate glaze. I love the little miracles that happen every day in the kitchen. You can also whisk it in a bowl on top of a pot of simmering water until fully melted and smooth.

Have fun recreating this New England classic Boston Cream Pie and maybe it will become a family favorite that you pass down through your family’s generations!
Happy Chocolate Monday – have a wonderful week!!

If you try this recipe, let me know! Please leave a star rating in the recipe card, comment below, and don’t forget to snap a pic and tag it @theheritagecook on Instagram! Seeing your creations makes my day and I love hearing from you!
Ingredients needed for Boston Cream Pie:
- Cake: almond flour, flour (gluten free if needed) baking powder, salt, sugar, water, butter, eggs, vanilla
- Custard: whole milk, sugar, egg yolks, cornstarch, butter, vanilla
- Glaze: dark chocolate, butter, light corn syrup
PRO Tip:
Salts vary dramatically by manufacturer. 1 tablespoon of Diamond Crystal Kosher salt weighs 8 grams, Morton’s Kosher is 16 grams and table salt weighs 18 grams. I strongly recommend Diamond Crystal Kosher salt (in the white and red box) for use in your cooking and baking. It is generally considered the industry standard and is my personal favorite.
How to make Boston Cream Pie:
- Make the Cake Layers: Mix together the almond flour, flour blend, baking powder, and salt and set aside; beat the sugar, water, melted butter, eggs, and vanilla together, then slowly add the flour mixture beating for 2 minutes.
- Divide the batter between two buttered round cake pans and bake at 350°F (180°C) for 27 to 30 minutes until a toothpick comes out clean; cool 15 minutes on a wire rack, flip them out of the pans and invert them on the racks to finish cooling completely.
- Prepare the Custard: Whisk together the milk, sugar, yolks, cornstarch, and salt in a saucepan until smooth; bring to a boil whisking constantly and cook 1 minute or until thickened and it coats the back of a spoon.
- Remove from the heat and whisk in the butter and vanilla until smooth; transfer to a bowl, press a piece plastic over the surface to keep a skin from forming and refrigerate until set, 1 to 2 hours.
- Make the Glaze: In a microwavable bowl, combine the glaze ingredients and cook on High for 30 seconds and repeat until the chocolate is melted, then whisk until fully melted and smooth.
- To Assemble: Place one of the cake layers rounded side down on a cake platter, whisk the custard until smooth and slightly warmed up, then spread evenly on the cake layer all the way to the edges.
- Top with the second layer, rounded side up and slowly pour the chocolate glaze in the center of the cake and using a spatula, nudge the glaze to cover the top and drip down the sides; smooth the top and let the glaze solidify before cutting with a serrated knife – wipe the blade with a damp cloth between each cut.
PRO Tip:
If you want to make gluten-free baking simple, mix up a big batch of a neutral-flavored flour blend and store it in an airtight container. I have mine in a plastic bucket that I bought from King Arthur Flour. Then whenever the mood strikes us, we can bake to our heart’s content, creating delicious treats for our families or just for ourself!
Recommended Tools (affiliate links; no extra cost to you):
- 8-inch round cake pans
- Mixing bowls
- Stand mixer or hand mixer
- Heavy saucepan
- Offset spatula
- Serrated knife
Gluten-Free Tips:
You can adjust any baking recipe to gluten-free by using 120 grams per cup of my favorite gluten-free flour blend. If you are using another brand of gluten-free flour, whisk the mix, spoon it lightly into a measuring cup until mounded, level off the top with a straight edge, and weigh the flour left in the cup. Use that weight as your standard per cup of that specific flour. Do this for each flour blend you use. Commercial blends such as Pamela’s All-Purpose Artisan Blend, Bob’s Red Mill 1-to-1, or King Arthur Measure for Measure are all good choices.
You will get the best and most consistent results by using a digital kitchen scale and weighing your ingredients, especially when you are baking. And use grams, they are much more accurate than pounds and ounces.
All recommended ingredients are gluten-free as of the writing of this article. Always check to be sure the products haven’t changed and are still safe to consume.
Boston Cream Pie (Gluten-Free)

Boston Cream Pie is everything you dream of in every bite! This New England classic is a combination of yellow sponge cake layers with vanilla custard in between and then covered with a chocolate glaze. I added some almond flour for interest and texture. Almond flour contains zinc, a mineral that helps us taste and smell. No wonder this cake tastes so good!
Ingredients
CAKE
- 1-3/4 cups (168g) almond flour
- 1-1/4 cups (150g*) all-purpose flour or gluten-free all-purpose flour blend* (see Note below for link)
- 2 tsp baking powder
- 1/2 tsp kosher salt
- 1-1/2 cups (300g) granulated sugar
- 1 cup (227g) water
- 1/2 cup (1 stick; 113g) butter, melted
- 3 whole (150g) large eggs
- 2 tsp pure vanilla or vanilla paste
CUSTARD
- 1-1/4 cups (284g) whole milk
- 1/4 cup (50g) sugar
- 2 egg yolks (28g)
- 2 tbsp cornstarch
- 1/4 tsp kosher salt
- 1 tbsp (14g) butter, cut into small pieces
- 1 tsp (5g) pure vanilla or vanilla paste
GLAZE
- 4 oz (113g) gluten-free dark chocolate, chopped
- 3 tbsp butter, cut into small pieces
- 1 tbsp light corn syrup
Instructions
1. Preheat oven to 350°F (180°C). Butter 2 (8-inch; 20 cm) round cake pans.
2. Make the Cake Layers: In medium bowl, mix almond flour, GF flour blend, baking powder and salt; set aside.
3. In large bowl, beat the sugar, water, melted butter, eggs, and vanilla with a stand or hand mixer on low speed for 1 minute. Gradually add flour mixture, beating on medium speed 2 minutes. Divide the batter evenly between pans. Use an offset spatula to smooth the tops.
4. Bake 27 to 30 minutes or until golden on top, the cake pulls away from the sides of the pans, and a toothpick inserted in the center comes out clean. Cool on a wire rack 15 minutes, then invert cakes out of their pans and flip back right side up to finish cooling on the rack. Cool completely.
5. The cake layers can be made a day ahead. Once thoroughly cooled, wrap tightly in plastic and refrigerate. Return to cool room temperature before assembling cake.
6. Make the Custard: While the cakes are cooling, in a heavy 2-quart (2 L) saucepan, whisk together the milk, sugar, egg yolks, cornstarch, and salt until smooth. Bring to a boil over medium-high heat, whisking constantly. Boil 1 minute or until thickened and the custard coats the back of a spoon.
7. Remove from the heat; whisk in the butter pieces and vanilla, mixing until smooth. Transfer to a medium bowl (aluminum will help it cool faster), cover the surface of custard with plastic wrap (press it onto the top to keep a skin from forming). Refrigerate until set, 1 to 2 hours.
8. The custard can also be made a day ahead. Press plastic wrap on the surface and top the bowl with another piece of plastic wrap to seal it. Let it sit at room temperature about 30 minutes before proceeding so it will be easier to spread.
9. Make the Glaze: When you are ready to assemble the cake, make the glaze. In a small microwavable bowl, combine all the glaze ingredients and cook uncovered on High for 1 minute. Whisk until chocolate is melted and mixture is smooth. Alternately, you can set a heatproof bowl over a saucepan of simmering water and whisk the ingredients together until melted and smooth.
10. To Assemble: Place one cake layer onto a serving platter rounded side down. Whisk the custard to a smooth consistency. Let it warm up a little so it will be easier to work with. Spread it evenly on top of the first layer, making sure it goes all the way to the edges. Top with the second cake layer, rounded side up. Slowly pour glaze in the center of the top of the cake, and using an offset spatula, nudge the glaze to cover, encouraging it to drip down the sides. Smooth the top.
11. Let the glaze solidify slightly before cutting the cake. Slice the cake gently with a serrated knife for the best results, wiping the blade with a damp cloth between each cut. Store leftovers covered in the refrigerator.
Recipe found at www.theheritagecook.com
Notes
You can adjust any recipe to gluten-free by using 120 grams per cup of my favorite gluten-free flour blend. If you are using another brand of gluten-free flour, whisk the mix, spoon it lightly into a measuring cup without a spout until mounded, level off the top with a straight edge, and weigh the flour left in the cup. Use that weight as your standard per cup of that specific flour. Do this for each flour blend you use. Commercial blends such as Pamela's, Bob's Red Mill 1-to-1, or King Arthur Measure for Measure are all good choices.
All recommended ingredients are gluten-free as of the writing of this article. Always check to be sure the products haven’t changed and are still safe to consume.
Nutrition Information:
Yield:
16Serving Size:
1Amount Per Serving: Calories: 350Total Fat: 8gSaturated Fat: 4gTrans Fat: 0gUnsaturated Fat: 3gCholesterol: 69mgSodium: 184mgCarbohydrates: 58gFiber: 2gSugar: 8gProtein: 10g
The nutritional information for recipes on this site is calculated by online tools and is merely an estimate. If you need nutritional calculations for medical reasons, please use a source that you trust.
If you enjoyed this recipe, be sure to follow me on social media so you never miss a post:

Create a New Tradition Today!
Welcome! The suggestions here are not intended as dietary advice or as a substitute for consulting a dietician, physician, or other medical professional. Please see the Disclaimers/Privacy Policy page for additional details. Unauthorized use, distribution, and/or duplication of proprietary material from The Heritage Cook without prior approval is prohibited. If you have any questions or would like permission, please contact me. We participate in the Amazon Services LLC Associates Program, an affiliate advertising program designed to provide a means for sites to earn advertising fees by advertising and linking to amazon.com. As an Amazon Associate, I earn a small amount from qualifying purchases without any additional cost to you. This page may contain affiliate links. This post was first shared in Oct 2014. The article was updated in 2025.


Joseph
Is it possible to replace the almond flour with more gluten free flour mix? I can’t tolerate nut flours
Jane Bonacci
Hi Joseph – You absolutely can replace the almond meal with additional GF flour blend. The almond meal does give the cake a little more structure and protein, so a flour like millet or sorghum would be a better choice than a straight rice flour. As long as the total weight is the same, most GF flours are fairly interchangeable. Give it a try and let us know how it turns out. Fingers crossed for the perfect dessert for you!
Katrina
My husband does not like cake (it’s really the frosting), but he does like Boston Cream Pie.
Jane Bonacci
Funny the way that works Katrina! But if he likes Boston Cream Pie, at least he has very good taste in cakes! 😉
Brian @ A Thought For Food
Oh my gosh… this looks great! I was so surprised by how much I liked a gf cake (had no idea it would be that good). And thank you so much for your sweet words!!!
Jane Bonacci
You’re welcome Brian! Your photos are absolutely gorgeous; of course I had to direct readers over to your site to see them!