Today I am sharing one of my favorite chicken recipes, Fried Chicken Cutlets with Cream Gravy. There are so many others I could have shared with you, from my grandmother’s chicken and dumplings to my old-fashioned roast chicken, but what resonated with me most was fried chicken with gravy.
I have always loved fried chicken, especially when cooked in a cast iron skillet by my grandmother. She would pack the skillet full of flour-coated pieces of chicken and then we would have to wait for what seemed forever until it was done and ready to eat. It was agonizing for a young child.
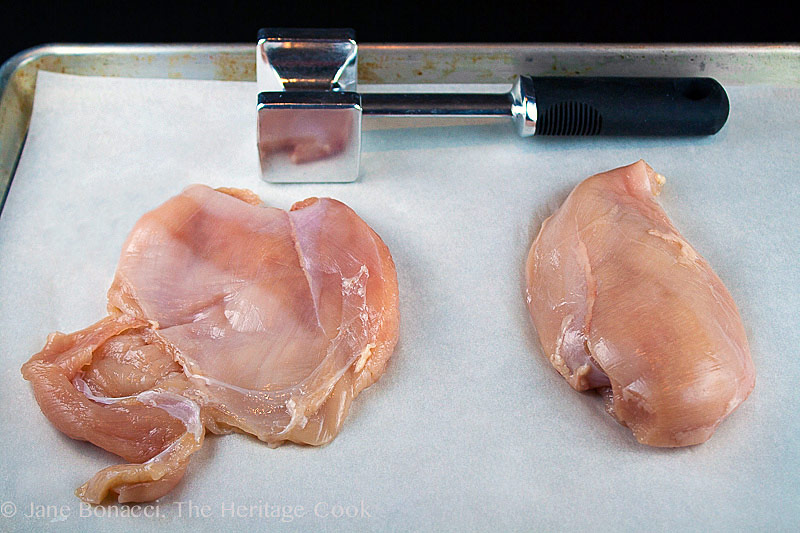
Regular and pounded chicken breast – easy to do but a bit noisy!
Mimi’s seasoning was just salt and pepper and she used a lot of vegetable shortening, until the chicken was half covered with fat. Her food was always the most delicious I ever tasted – so nourishing and comforting! I wanted to make a dish that was reminiscent of my childhood memories, but a little healthier, faster to make, and with touches that make it my own, starting with using a small amount of oil for the frying.
Boneless chicken that is pounded until all the same thickness (or close to it – use the smooth side of the pounder) cooks much more quickly than thicker pieces, especially bone-in. You can have dinner on the table in a fraction of the time it took Mimi to finish cooking her skillet of chicken. Breadcrumbs (regular or gluten-free) add a nice crunch to the crust and where she used minimal seasoning, I like to add some herbs to boost the flavor.
You can make your own breadcrumbs easily with either a chef’s knife or food processor. Just a few pulses in the processor will get you beautiful crumbs. A knife takes a little longer but is still simple, just cut into small cubes and chop those into smaller pieces. Use either regular or gluten-free bread for your own dietary needs.
I put my spin on the gravy too. By sautéing shallots before adding the flour (or gluten-free flour) to the fat in the pan, you get a lovely subtle onion-like flavor and a soft texture. A little wine always makes everything taste better, and Madeira is wonderful to cook with. If you haven’t experienced it, give it a try! And adding thyme mirrors the seasoning in the breading, giving a classic nuance to an old-fashioned, traditional comfort food meal.
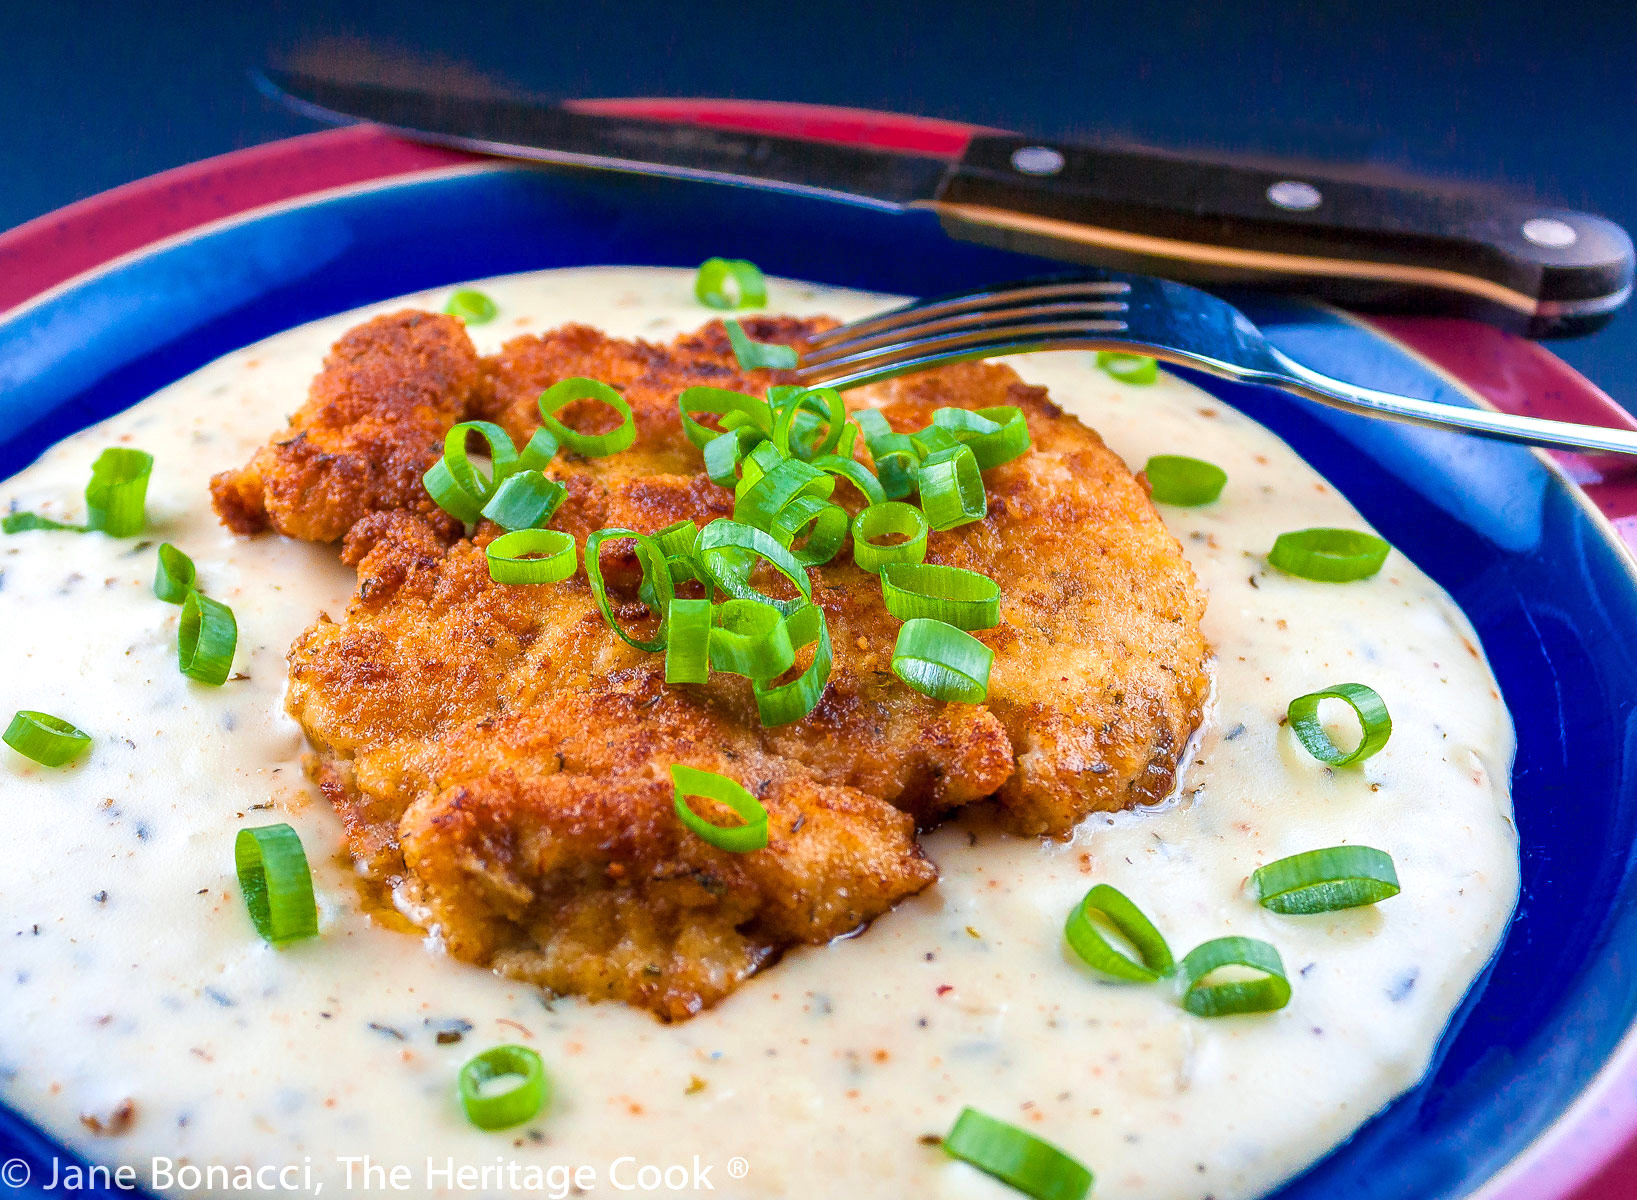
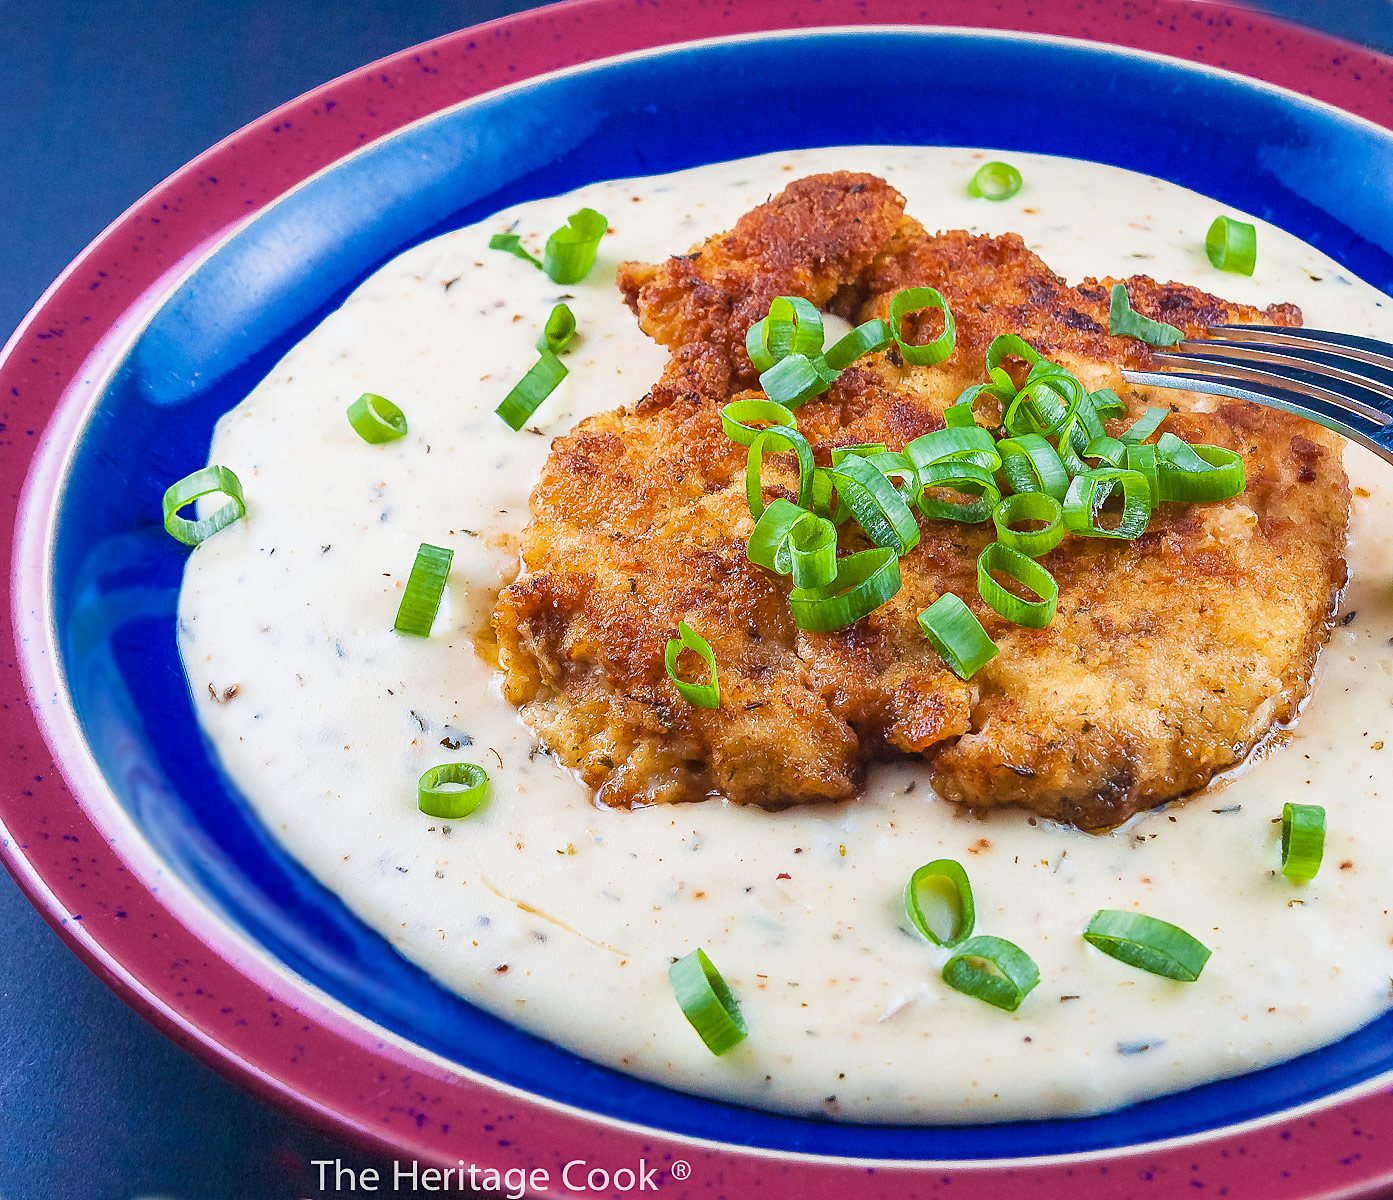
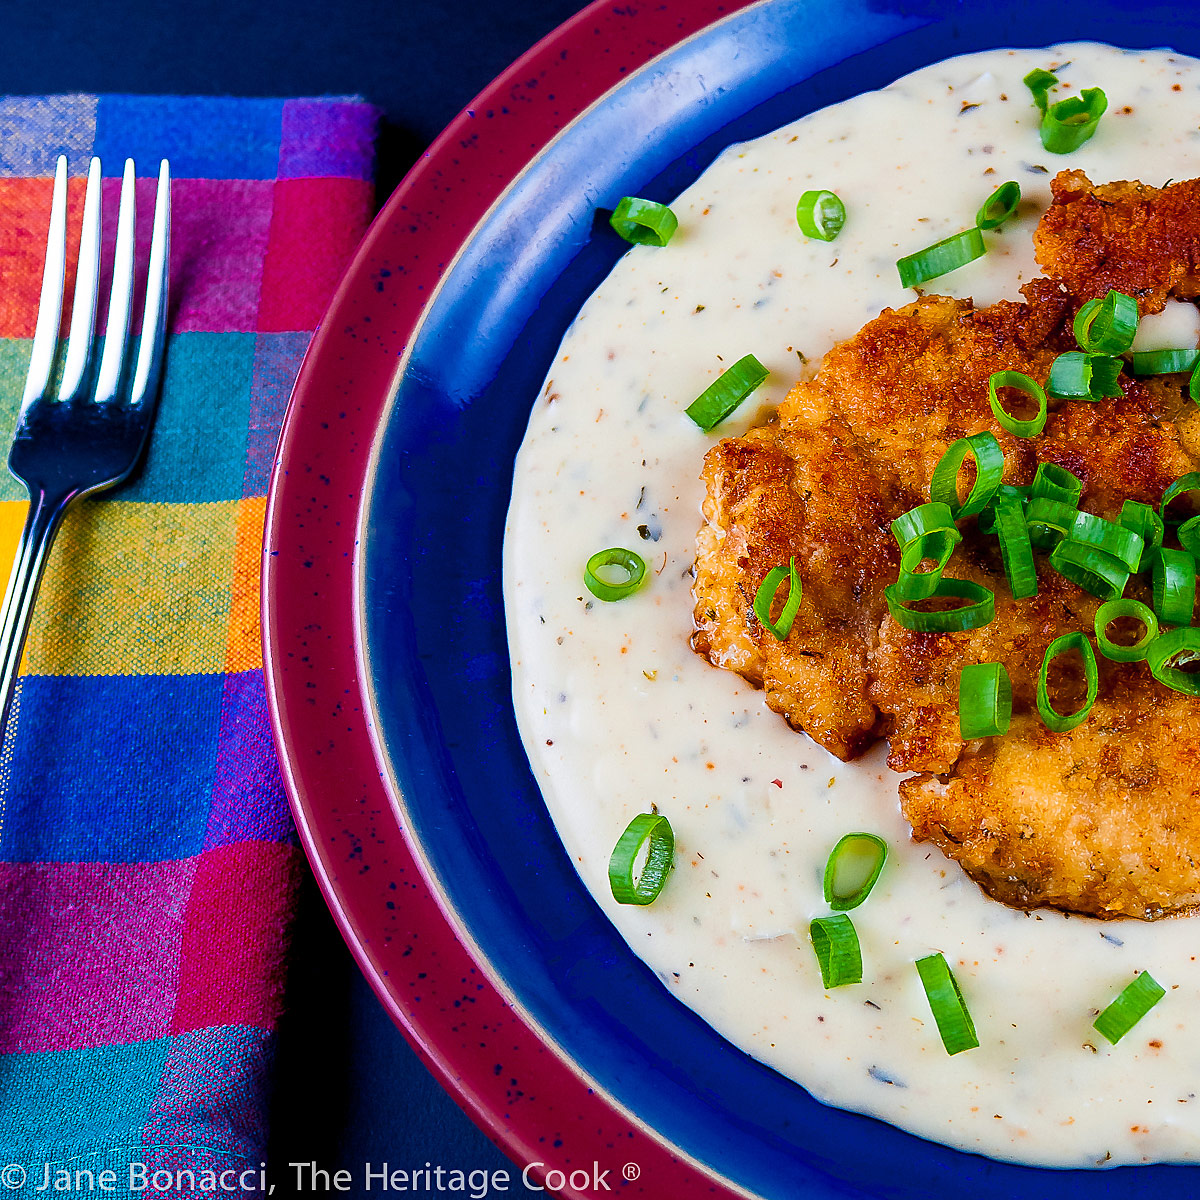
When serving batter-fried foods with gravies or sauces, it is best to put the gravy on the plate first and then set the fried food on top. This helps keep the coating crunchy. You can pass the remaining gravy at the table in case anyone wants to add more.
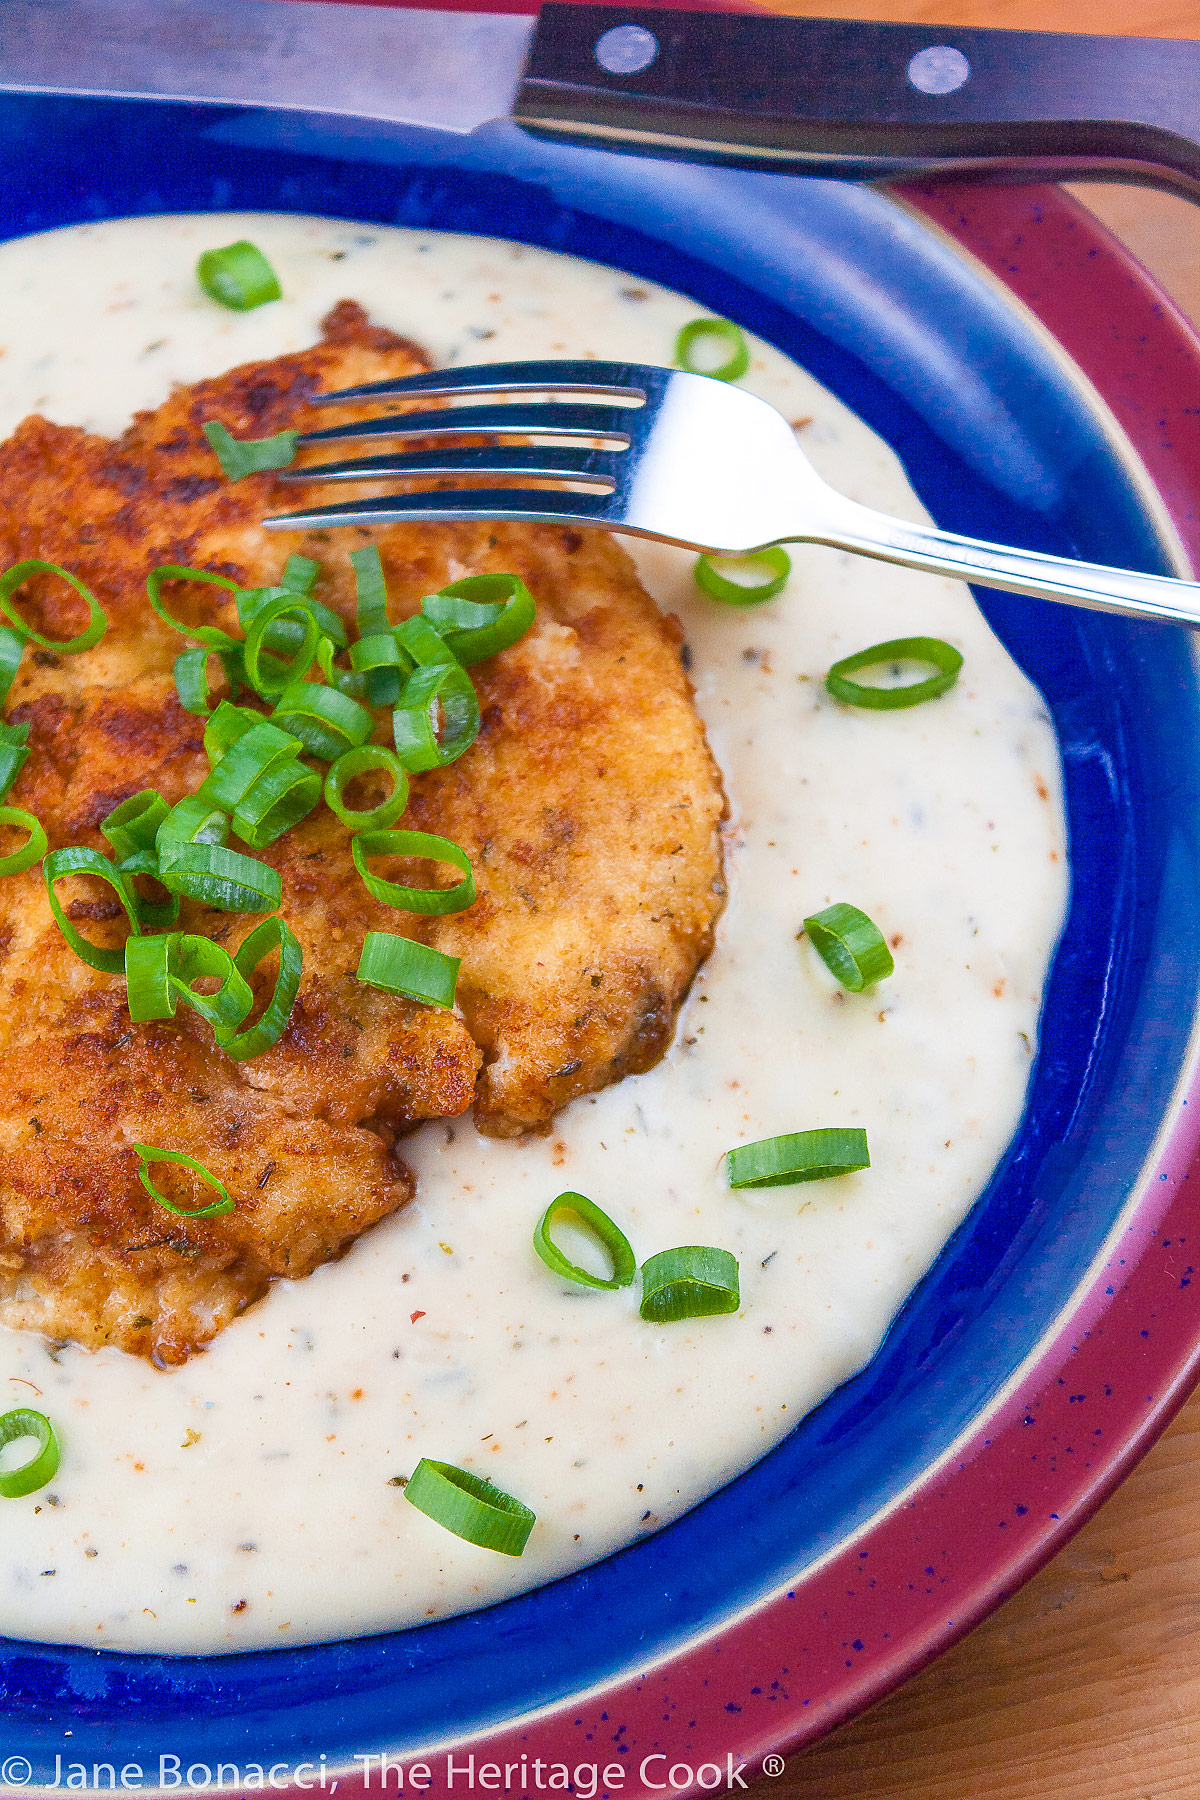
Brown and white foods are notoriously boring to look at, so serve this on a colorful plate and make sure you garnish the chicken with sliced green onions for bright interest. You can also serve this with brightly colored vegetables or salad to round out the meal.
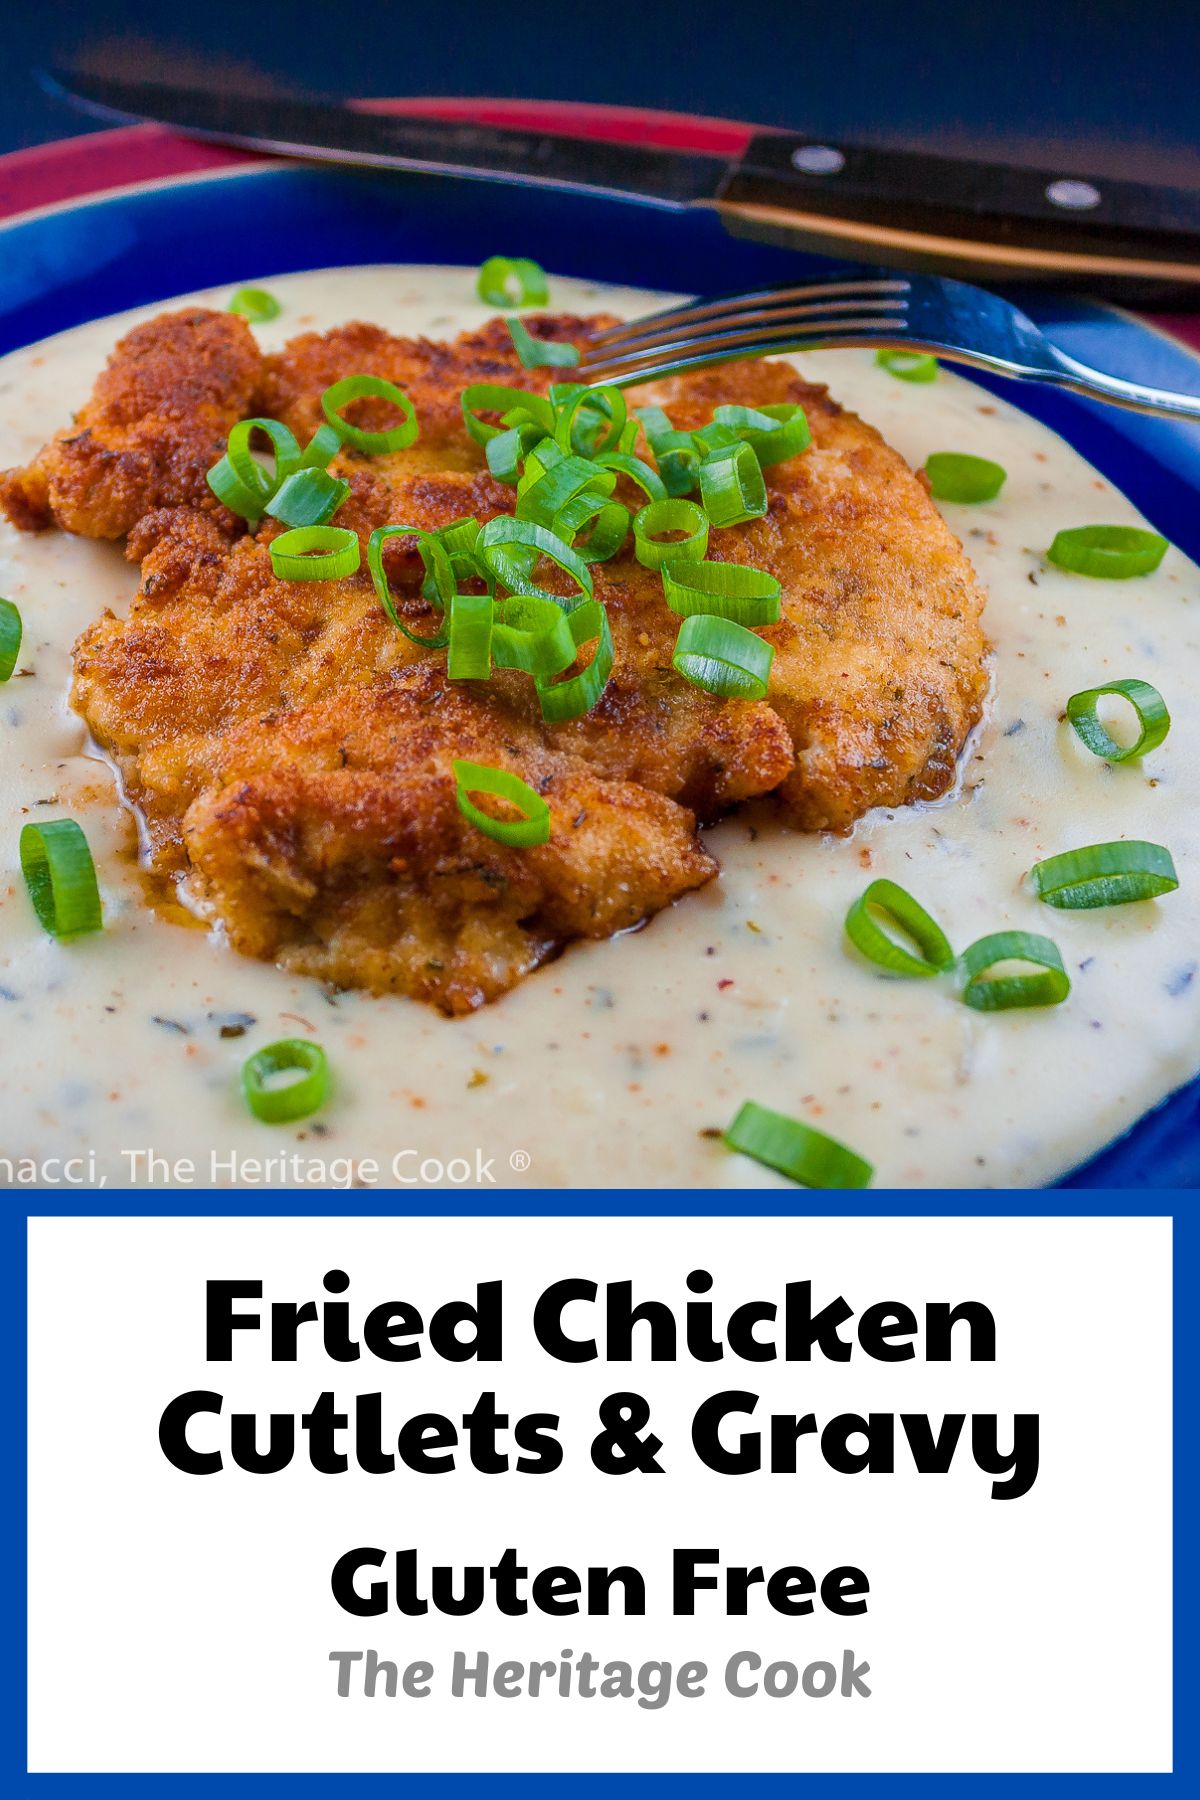
Today’s Fried Chicken Cutlets with Cream Gravy are a true indulgence and a darned tasty one. Packed with flavor and crunch from the breading, this is pure satisfaction in every bite!
I hope you enjoy this treat from my childhood with a nod to the evolution of my cooking. Check out all the recipes from my blogging friends and the Food Network staff.
Have a fabulous weekend everyone!!
Did you enjoy this recipe? Let me know in the comments and leave a star rating, I love hearing from you!
Ingredients needed for Fried Chicken Cutlets with Cream Gravy:
- Gravy: butter, olive oil, shallots, thyme, garlic, flour, chicken stock, heavy cream, Madeira wine or dry sherry
- Cutlets: boneless chicken breasts, fresh breadcrumbs, thyme, salt, pepper, eggs, butter, olive oil, green onions
PRO Tip:
Using a combination of butter and olive oil raises the smoke point of the butter and helps keep it from burning while frying foods. The butter adds flavor and the olive oil is healthy for you. It is a winning combination!
PRO Tip:
When pounding the chicken, be sure you use the flat, smooth side of the meat pounder or tenderizer. The spiked side is for tenderizing tough cuts of meat, softening the fibers running through the meat. The mallet can also be used to crush cookies for crumbs, mash garlic, or anything else that needs flattening.
How to make Fried Chicken Cutlets with Cream Gravy:
- Make the Gravy: Sauté the shallots and thyme in melted butter and olive oil over medium heat for about 2 minutes or until they are Add the garlic off the heat and cook 30 seconds then sprinkle in the flour, whisking until smooth with no lumps. Cook a couple of minutes until the raw aroma disappears whisking constantly.
- Slowly whisk in the stock, wine, and cream and continue cooking, whisking constantly, until thickened and creamy. Add salt and pepper to taste, move to a back burner and keep warm whisking occasionally.
- Prep the Chicken: Place one of the chicken breasts in a resealable plastic bag and pound with a meat mallet to an even thickness. Remove the tenders if present and you can cook them separately. When evenly flattened, transfer to a parchment-lined baking sheet and repeat with remaining chicken breasts.
- Place the breadcrumbs in a shallow dish and the beaten eggs in another shallow dish. Season the breadcrumbs with thyme, salt, and pepper – be generous. Set both dishes next to the stove.
- Dip the pounded chicken pieces in the egg wash and then coat generously with the breadcrumbs, shaking off any excess and return to the baking sheet; repeat with remaining chicken.
- Cook the Fried Chicken Cutlets: Add the chicken to a large skillet with hot butter and oil using tongs, adding only enough so that there is still room between the pieces, cooking in batches or use a second pan. Cook until browned on the first side then using tongs, flip each piece to cook the second side. Cook to 165°F (77°C) and crispy golden on both sides. Transfer to the baking sheet and keep warm in a low oven.
- When done cooking the chicken, pour any remaining oil and butter and browned bits into the gravy, stirring until fully incorporated. They add a ton of flavor to the gravy.
- To Serve: Use a ladle to pour some gravy onto each serving plate, swirling it out until slightly bigger than the cutlets. Place a piece of chicken on top of the gravy and sprinkle with the green onions. Serve immediately.
PRO Tip:
Making the gravy before frying the chicken may seem backwards, but it is doubly beneficial. By making the gravy first and keeping it warm, the chicken is piping hot when you serve it. And stirring the remaining butter and browned bits from the pan into the gravy gives you the same flavor as using the drippings to make it. All the benefits with none of the hassle.
Recommended Tools (affiliate links; no extra cost to you):
- Chef’s knife or paring knife
- Kitchen scale
- Meat tenderizer or mallet
- Baking sheet
- Large saucepan
- Shallow, flat dishes
- Large skillet
- Instant read thermometer
- Ladle
Gluten-Free Tips:
You can use your standard gluten-free flour blend to make the gravy or any individual gluten-free flour or starch such as rice, sorghum, millet, cornstarch, potato starch, arrowroot, etc. Some gluten-free flours require more liquid than others, so add chicken stock as needed.
You can adjust any baking recipe to gluten-free by using 120 grams per cup of my favorite gluten-free flour blend. If you are using another brand of gluten-free flour, whisk the mix, spoon it lightly into a measuring cup until mounded, level off the top with the back of a knife, and weigh the flour left in the cup. Use that weight as your standard per cup of that specific flour. Do this for each flour blend you use. Commercial blends such as Pamela’s All-Purpose Artisan Blend, Bob’s Red Mill 1-to-1, or King Arthur Measure for Measure are all good choices.
All recommended ingredients are gluten-free as of the writing of this article. Always check to be sure the products haven’t changed and are still safe to consume.
*NOTE: The major gluten-free organizations have declared that distilled alcohols are gluten free. Wine is also considered safe. For some very sensitive people wine may cause issues. In a few rare cases, wine makers may use barrels that have minute amounts of gluten in the caulk. If you have issues with wine, look for a winery that uses only stainless steel containers to age their wines.
Fried Chicken Cutlets with Cream Gravy (Gluten-Free)

Today’s Fried Chicken Cutlets with Cream Gravy are a true indulgence and a darned tasty one. Packed with flavor and crunch from the breading, when combined with the luscious creamy gravy this is pure satisfaction in every bite!
Ingredients
Cream Gravy
- 1/4 cup (57g; 1/2 stick) butter
- 1/4 cup (50g) organic olive oil
- 3 shallots, peeled and finely minced
- 2 tsp dried thyme leaves
- 1 clove garlic, peeled and minced
- 1/4 cup (30g) all-purpose flour or gluten-free all-purpose flour blend*
- 1 cup (237ml) chicken stock
- 1/2 cup (118ml) heavy cream
- 1/4 cup (59ml) Madeira wine, dry sherry, or water
Chicken Cutlets
- 4 skinless, boneless chicken breast halves
- 2 cups (168g) fresh breadcrumbs or gluten-free breadcrumbs
- 2 tsp dried thyme leaves
- 1 tsp kosher or sea salt
- 1 tsp freshly ground black pepper
- 2 large eggs (100g), well beaten
- 2 tbsp butter
- 2 tbsp organic olive oil
- Sliced green onions, for garnish
Instructions
- Prepare the Cream Gravy: Heat the butter and olive oil in a large saucepan over medium-high heat. When the oil is shimmering add the minced shallots and thyme and reduce the heat to medium. Cook for about 2 minutes or until shallots are softened.
- Remove the pan from the heat, add the garlic and cook another 30 seconds or until the garlic is fragrant. Add the flour and whisk until smooth with no lumps. Cook for about 2 minutes or until the flour no longer smells raw, but has not browned, whisking constantly.
- Slowly pour in the stock, cream, and wine, whisking constantly. Continue cooking, whisking constantly until thickened and creamy. Add salt and pepper to taste. Move to a back burner and keep warm.
- Prepare the Chicken Breasts: Place the chicken breasts, one at a time, in a resealable plastic bag and pound with the smooth side of a meat pounder until it is all one thickness. If your breasts still have the tenders attached, you can remove them prior to pounding the breasts and cook them separately. When flattened, transfer breasts to a parchment-lined baking sheet. Continue with remaining chicken pieces.
- If you are making this meal for children, you may want to cut the chicken cutlets into strips to create chicken fingers. Little ones love them and they may be more inclined to eat all of their chicken when they can eat it with their hands!
- Place the breadcrumbs in a shallow, flat dish (a pie dish works well) and season with the thyme, salt, and pepper. In another shallow dish place the beaten eggs. Set both of these containers next to the stove.
- Dip the pounded chicken breasts in the beaten egg and then in the seasoned breadcrumbs. Shake off any excess and set back on the parchment-lined baking sheet. Repeat with the remaining chicken breasts and tenders (if separated).
- Cook the Chicken: In a large skillet, heat the butter and oil together over medium heat. When the butter is melted and the oil is hot, use tongs to add the chicken to the pan. Make sure to leave some room between the pieces so the butter and oil can bubble up and brown the edges. Cook in batches if needed or use a second pan.
- Cook until well browned on the first side, then flip and cook the second side. Continue flipping occasionally so neither side burns, cooking until the chicken is cooked through to at least 165°F (74°C). The timing will depend on how thick the chicken is and how hot the pan is. Mine took about 10 to 12 minutes to be finished. Transfer to a baking sheet and keep warm in a low oven while you finish cooking any remaining chicken.
- When all the chicken is cooked and has been transferred out of the pan, scrape any remaining butter and browned bits into the gravy. Whisk until everything is incorporated. These browned bits will add tremendous flavor to the gravy.
- To Serve: Use a ladle to pour some gravy onto each serving plate, swirling it to spread it out until it is slightly larger than the cutlets. Place a cutlet on the pool of gravy and sprinkle with the green onions. Serve immediately.
Recipe found at www.theheritagecook.com
Notes
*You can adjust any recipe to gluten-free by using 120 grams per cup of my favorite gluten-free flour blend. If you are using another brand of gluten-free flour, whisk the mix, spoon it lightly into a measuring cup without a spout until mounded, level off the top with the back of a knife, and weigh the flour left in the cup. Use that weight as your standard per cup of that specific flour. Do this for each flour blend you use. Commercial blends such as Pamela's, Bob's Red Mill 1-to-1, or King Arthur Measure for Measure are all good choices.
All recommended ingredients are gluten-free as of the writing of this article. Always check to be sure the products haven’t changed and are still safe to consume.
NOTE: The major gluten-free organizations have declared that distilled alcohols are gluten free. Wine is also considered safe. For some very sensitive people wine may cause issues. In a few rare cases, winemakers may use barrels that have minute amounts of gluten in the caulk. If you have issues with wine, look for a winery that uses only stainless steel containers to age their wines.
Nutrition Information:
Yield:
4Serving Size:
1Amount Per Serving: Calories: 540Total Fat: 23gSaturated Fat: 8gTrans Fat: 0gUnsaturated Fat: 13gCholesterol: 216mgSodium: 1047mgCarbohydrates: 31gFiber: 3gSugar: 5gProtein: 47g
The nutritional information for recipes on this site is calculated by online tools and is merely an estimate.
If you enjoyed this recipe, be sure to follow me on social media so you never miss a post:
Create a New Tradition Today!
Make sure you check out all of these fabulous recipes from my blogging friends!
Jeanette’s Healthy Living: Slow Cooker White Chicken Chili with Green Chilies
Weelicious: Roast Chicken with Caramelized Lemons
Devour: Giada’s Top Chicken Dinners
Taste With The Eyes: Griddled Gochujang Chicken Sandwich, “Kimchi” Slaw and Seaweed Mayo
Napa Farmhouse 1885: Italian Chicken Stew with Olives and Kale
Red or Green?: Oven-Fried Tortilla Chicken Drumsticks
Blue Apron Blog: 5 Not Boring Weeknight Chicken Recipes
Virtually Homemade: Chicken Puttanesca
Elephants and the Coconut Trees: Spicy Deep Fried Chicken
Domesticate Me: Crispy Baked Chicken Tenders with Sriracha Honey Mustard (Gluten-Free!)
Dishing with Divya: Couscous with Chicken and Vegetables
In Jennie’s Kitchen: How to Roast a Chicken
FN Dish: Winning Chicken Dinners
The Heritage Cook: Fried Chicken Cutlets with Cream Gravy (You are Here)
Welcome! The suggestions here are not intended as dietary advice or as a substitute for consulting a dietician, physician, or other medical professional. Please see the Disclaimers/Privacy Policy page for additional details. Unauthorized use, distribution, and/or duplication of proprietary material from The Heritage Cook without prior approval is prohibited. If you have any questions or would like permission, please contact me. We participate in the Amazon Services LLC Associates Program, an affiliate advertising program designed to provide a means for sites to earn advertising fees by advertising and linking to amazon.com. As an Amazon Associate, I earn a small amount from qualifying purchases without any additional cost to you. This page may contain affiliate links. This post was first shared in Feb 2014. The article was updated in 2023.


diane padoven
Jane,
This chicken dish looks amazing. And the gravy?! Oh my….
Thank you for the recipe.
best,
Diane
napa farmhouse 1885
red or green?
Jeanette | Jeanette's Healthy Living
Jane – this does look like such comfort food – your grandmother Mimi would be proud!
Jane Bonacci
Oh Jeanette, I certainly hope she would be proud that I am carrying on her passion and sharing it here. She would probably think I use too many seasonings, LOL!